![Multi Restaurant Aggregator [MRP]](https://eatanceapp.com/wp-content/uploads/2022/03/Hamburger.svg)


Pharmacy App FAQs #
1. What I’ll get with my Pharmacy App purchase?
Ans: You’ll get the Source code of Customer Mobile App (iOS and Android), Driver Mobile App (iOS and Android), & and Master Admin Panel. We also provide assistance with Initial Implementation support to guide our clients in the best possible way.
2. Does the app work hand in hand for both Driver and Customer? Can I buy individual one and use it?
Ans: Certainly, you can buy either of them as per your request but integration for Driver app is connected with Customer app. If you would like to use the delivery app with any of your current Applications then the integration would require extra efforts.
3. Where do you integrate PAYMENT GATEWAY?
Ans: Payment Gateway is integrated directly with the code, and upon request, we can always have management within the Backend/Master Admin.
4. Does the app have functionality integrated, such as Social media login or SMS Gateway?
Ans: We can always integrate as much functionality as to include as an Add-On upon request. Please find the common list of Add-On available while purchasing the App online: https://eatanceapp.com/on-demand/pharmacy-app/ > And Scroll to “Additional Top Rated Features (add ons)”
5. Can we add another Payment Gateway to your Pharmacy Delivery Application?
Ans: Absolutely, our Application comes along with standard payment gateway integration, such as PayPal, Stripe, Amazon Pay, Apple Pay, 2Checkout, Adyen Alipay, Braintree, Klarna or Authorize.net. Our Application is highly compatible enough to integrate with other major payment gateways as well. The only thing is we need to understand the details of the gateway or check the API document once to understand the flow to integrate your payment gateway.
6. Is there an Add-On category Option?
Ans: Yes, we have provided both multiple and single selection options for Liquor to create all kind of Add-On Category for example; if the Admin needs to create a products that has a Addon with Single Select & Multi-select they can do so.
7. Is this model more cash-intensive or online payments?
Ans: Our Application is compatible with standard payment gateways like PayPal, Stripes, and others as per client requests. In this case, we always have the option to split the payment (if payment gateway allows) between Pharmacy and Master Admin
8. Can I add multiple Branches for the Pharmacy?
Ans: Yes, definitely. you can add branches/locations.
9. As a Pharmacy, can I add my own drivers?
Ans: Ans: Absolutely, we have provided the functionality. Master Admin can add Drivers
10. How can we track the drivers to the last mile in real time?
Ans: We do provide the integration of Google Map API, which will allow you to track the driver’s location during Delivery.
11. Can I get real-time order status?
Ans: Yes, we have this option to display the real-time order status in the Customer App. Also, you will get the notification sent by the system for the order.
12. Can I use 3rd party delivery executives for my Delivery?
Ans: Yes, we have integrated 3rd party services for our app only so we can also use any of the 3rd party services if they provide their details. For example, Third party delivery service: https://shadowfax.in/ or DoorDash
13. How many methods of payment are available? How many Gateways have you integrated?
Ans: We have integrated all standard Payment Gateway such as Stripe, PayPal, Adyen, Authorize.net, and many others, You also get Cash as a default option.
14. First-line support: It’s important to not neglect the value of the support that handles orders, complaints, and delivery problems – is this any where available in your Application?
Ans: We can integrate 3rd party support system such as Zoho or Chat-based system or other kind of CRM upon request, you can share your requirement with us.
15. If there is a sudden inflow of users to the service, will it be able to handle large traffic of orders?
Ans: Yes, what we have created is a MVP (Minimum Viable Product). Sustainable up to 7,000 daily orders which give enough room for your customer to order at once as we have tested the product with real data and already have various satisfied customers. The performance of the Application differs depending on the infrastructure and the server.
16. How scalable is your system?
Ans: Sustainability and Scalability: It is an MVP. It is scalable you want as the Application is built on. The system is highly compatible for customization as per your requirement as per the Application has been built on React Native and Code Igniter framework, which helps you to mold the Application as per your requirement.
17. Does your application support multi-currency and multilingual?
Ans: Yes, our Application supports multi currently and multilingual, we just need require the translation files from your end to change the content entirely.
18. Can I get the Taxes to display in price details?
Ans: Yes, certainly. We do provide the management to update the service charge and taxes via backend.
19. Can I place order, if I am not a registered user?
Ans: In the current Application we have kept the login as a mandatory option to process the order which requires your basic details with the delivery address. However, as per your request, we can mold the Application for Guest user ordering, but we would suggest the authenticity of the customer to avoid issues
20. Also, when I check out, the delivery charges do not show but gets added only in the final total at payment?
Ans: As a Customer you will be able to see the service or delivery charge at the checkout page if it is applicable
21. Will my customer get the Copay option while ordering the drugs from the online stores?
Ans: Certainly, we have already worked on the request for CoPAY option and included as Add-On while purchasing the app you can either opt CoPAY as Add-On or customize request as per your presize details in place.
22. Push Notification messages are free? How do I setup by myself? Or is there a limit if chargeable?
Ans: No charge or no fee and unlimited push notifications, They are system generated using Firebase and need to be setup. SMS are based on 3rd party and are chargeable and also limited
23. Can I create Pharmacy Admin?
Ans: Yes, Master admin can create a Pharmacy Admin for a Multi branch Pharmacy.
24. Do you provide hosting and domain services?
Ans: No, we do not provide these services as of now. But, we can always assist you with the list of requirements for the Application.
25. Does the application has precscription functionality?
Ans: Yes, we do support prescription as mandatory feature to buy any drugs/pills before purchases. Further the order is send to the store for approval and cross verify the prcescription upload by the user for order process.
26. Can customer search product base on brand or category?
Ans: Yes, the application can be setup with the require filters. Further, the application already have an option to add product base on category and by brands to filter.
27. Can customer cancle the order after purchase?
Ans: Yes, the customer can always cancel the order but the mechanism to cancel the order is manage by Store or Master admin only. However, the refund has to be settle outside of the system or if the payment gateway provide the option to refund than the integration for refund management can we apply via backend.
28. Can customer do multiple order at a time?
Ans: Unfortunately not with the case of Pharmacy app. As the Master and Store admin first needs to clear the order status for pending order. If the order is created the action for pending order has to be updated as require to process or create new order
Sales #
1. Where can I find Demo Login Details of PHARMACY A. Customer App / B. Driver ) ??
Ans: Please find the details above.
Eatance Pharmacy App:
URL: https://play.google.com/store/apps/details?id=com.eatancepharma&hl=en
Username: [email protected]
Password: Test@123
Eatance Pharmacy Delivery App:
URL: https://play.google.com/store/apps/details?id=com.eatancepharma.delivery&hl=en
Username: [email protected]
Password: Test@123
2. May I upload this app directly to the play store and app store without doing any coding?
Ans: You need to change Branding and need to make some change before uploading to the respective store. It will require minor coding, hence we recommend geting help of tech expert or professionals. Or else, we will always provide our customer Branding services which take care all of your Branding related request.
3. Do you provide hosting and cloud services with your Application?
Ans: Unfortunately, at the moment we don’t provide any of the hosting services as that would be something you would need to help us with. However, rest assured, our team will help you out completely with the request they have for hosting/Cloud Details before we get started with your project.
4. Will I get regular updates to the Application? Is it chargeable?
Ans: This is independent product sales as White Label application and unfortunately not available as SAAS for now.
(It’s a standalone product with a one-time purchase where you get the source code, and if there is any next version, you have to purchase the product again.)
The next version will be chargeable.
5. Are there any other charges involve in app/package purchase? Or What is the app costing, including as per other charges?
Ans: There are no hidden charges or taxes involved on top of the total product price. Only thing you will require to pay extra will be customization if any. This is for the entire package availed. (Indian customers: Yes, GST will be added on top of the product price, this can further be discussed with our sales team.)
6. With so many similar apps in the market, what makes your app stand out?
Ans: We provide the source code for our applications to all our customers. We also provide the support for the app or package you purchase to assist on app submission and take your business live. Certainly, there are many of our competitors selling similar products as very low cost but again you hardly able to find their support. With Eatance you will always have premium services such as Branding for all the material for marketing your business. And most importantly, Eatance is backed up with Evince Development with a 9+ years strong presence in the market.
7. What items are required for getting the product in place?
CLIENT PRE-REQUISITES:
So, what all you need from us to get started with the app?
1. LOGO: 1024×1024 PNG Format
2. PSD/AI for splash screen OR a PNG image for it in 1242 X 2208 resolution
3. Apple developer account enrolled in Apple Developer Membership. If client cannot provide that, then we will need agent access
4. Google Play account. If client cannot provide that, then we will need admin access and Firebase account credential and Server key
5. Store meta data information: App name, description, keywords, marketing URL, privacy policy URL, contact details (full name, phone, email, complete address)
6. App category
7. Google maps API key
8. Short & long description for play store
9. Selected images to be uploaded
10. For IOS the UID must be linked properly
11. C-Panel credential, must support to his CI
12. If payment gateway integration, then needs to support react native CLI
8. What are the Server Configuaration required for the app?
Ans: Certainly, please find the following server requirements for the app purachase:-
Operating System – Linux
Web Server – Apache
Database – MySQL
RAM: 8GB RAM
CPU: 2vCPU
Disk Space: 80GB SSD
Please Note Before Purchasing Any Server:
• The database should support PHP with the latest version of PHP 7.4 and MySQL 5+ Server
• Most importantly, it should support React Native Framework
• Any Cloud Hosting can also work for the App configuration However, the setup and installation fees are applicable as per the server purchased
9. What level of Support do you provide after delivery?
Ans: We certainly provide Paid Support plans to all our customer after delivery. Please find the details of support as follow:-
• Answers to (technical) questions about the item’s features.
• Assistance with reported bugs and issues.
Please note that Support does not include:
• Customization & adding new features
• Installation Services
• Support for 3rd party software and/or plugins
• Content related rejections and violations from Google
• App Publishing
10. Which Technology stack used for Mobile app and Backend?
Ans: The technology stack we have used is Backend PHP CodeIgniter (V3) and React Native Version: 0.60.5.
11. Should I buy a developer to change the logo, company name and other things or I can change it directly from the admin panel?
Ans: After Purchase, you need to change branding, App name, and Content, images. You cannot use the Content, images and app name anywhere to promote your Product. You can hire our team for branding changes and contact us on [email protected]
12. Can I just purchase the code and use it to resell for white lable purpose?
Ans: No, the app comes with the regular lisecene only. In which you can’t resell the app or code for white labelling purpose. Doing such activity is to breach the terms and conditions while purchasing the app and hence, Eatance team is liable to take legal action to the reseller.
13. Can I just purchase the code and modify the app at my end?
Ans: Certainly, after purchase of the app, you can always update the code as per your requirements. However, if Eatance is involed in support after the app purchase than we request you not to update the code by yourself and discuss with support team before updating any code. If the code is updated from your end, then for any functional breakdown or crash, Eatance will not take responsibility of the code you have updated at your end.
14. Do I need my Own Developer Account for Appstore & Google Play?
Ans: Yes, due to a recent Apple policy change, for the apps to be approved, you will need your own Apple Developer & Google Play Developer Account. You can learn more about the developer memberships here:
Apple: https://developer.apple.com/support/compare-memberships (Individuals will work) $99/yearly
Google Play: https://play.google.com/apps/publish/signup/
$25 One time payment
15. Do I need my own Google Maps API keys?
Ans: Yes, it is important to have your own Google Maps API Keys. You can use the Google Maps APIs on both commercial and non-profit websites as long as your site meets the Google Maps Platform Terms of Service. Most of our customers fit into the free google maps pricing package. For more details, please visit https://cloud.google.com/maps-platform/pricing/
16. Do you provide customization?
Ans: Yes, we do offer Customization, but it will be a chargeable request. For any customization inquiries, please contact us on our email [email protected]
17. What is the deadline looks like after we pay for the app?
Ans: Please do note that we would be taking approx. 5-7 Working Days to deliver the first Application as APK with only branding changes as skin changes as per the client logo.
In the second phase we would be integrating the Google Map API and Payment Gateway as per the API documents you have shared, which would take approx. 60 Working hours and in days approx. 8-10 Working days. Again, we would request you please have some con-ordination or details to discuss with Payment Gateway team to make the process inline.
Once everything is completed, we can push the app to live store and hand over the code or deploy the app on your server. Which would again require approx. 2-3 business days.
18. What is so different with Eatance APP?
Ans: We provide the source code for our applications to all our customers. We also provide the support for the app or package you purchase to assist on app submission and take your business live. Certainly, there are many of our competitors selling similar products as very low cost but again you hardly able to find their support. With Eatance you will always have premium services such as branding for all the material for marketing your business. And most importantly, Eatance is backed up with Evince Development with the 9+ years strong presence in market.
19. May I upload this app directly to the play store and app store without doing any coding?
Ans: You need to change Branding and need to make some change before uploading to the respective store. It will require minor coding, hence we recommend geting help of tech expert or professionals. Or else, we will always provide our customer Branding services which take care all of your Branding related request.
20. Do you provide hosting and cloud services with your Application?
Ans: Unfortunately, at the moment we don’t provide any of the hosting services as that would be something you would need to help us with. However, rest assured, our team will help you out completely with the request they have for hosting/Cloud Details before we get started with your project.
21. Will I get regular updates to the Application? Is it chargeable?
Ans: This is independent product sales as White Label application and unfortunately not available as SAAS for now.
(It’s a standalone product with a one-time purchase where you get the source code, and if there is any next version, you have to purchase the product again.)
The next version will be chargeable.
22. Are there any other charges involve in app/package purchase? Or What is the app costing, including as per other charges?
Ans: There are no hidden charges or taxes involved on top of the total product price. Only thing you will require to pay extra will be customization if any. This is for the entire package availed. (Indian customers: Yes, GST will be added on top of the product price, this can further be discussed with our sales team.)
23. With so many similar apps in the market, what makes your app stand out?
Ans: We provide the source code for our applications to all our customers. We also provide the support for the app or package you purchase to assist on app submission and take your business live. Certainly, there are many of our competitors selling similar products as very low cost but again you hardly able to find their support. With Eatance you will always have premium services such as Branding for all the material for marketing your business. And most importantly, Eatance is backed up with Evince Development with a 9+ years strong presence in the market.
24. What items are required for getting the product in place?
CLIENT PRE-REQUISITES:
So, what all you need from us to get started with the app?
13. LOGO: 1024×1024 PNG Format
14. PSD/AI for splash screen OR a PNG image for it in 1242 X 2208 resolution
15. Apple developer account enrolled in Apple Developer Membership. If client cannot provide that, then we will need agent access
16. Google Play account. If client cannot provide that, then we will need admin access and Firebase account credential and Server key
17. Store meta data information: App name, description, keywords, marketing URL, privacy policy URL, contact details (full name, phone, email, complete address)
18. App category
19. Google maps API key
20. Short & long description for play store
21. Selected images to be uploaded
22. For IOS the UID must be linked properly
23. C-Panel credential, must support to his CI
24. If payment gateway integration, then needs to support react native CLI
25. What are the Server Configuaration required for the app?
Ans: Certainly, please find the following server requirements for the app purachase:-
Operating System – Linux
Web Server – Apache
Database – MySQL
RAM: 8GB RAM
CPU: 2vCPU
Disk Space: 80GB SSD
Please Note Before Purchasing Any Server:
• The database should support PHP with the latest version of PHP 7.4 and MySQL 5+ Server
• Most importantly, it should support React Native Framework
• Any Cloud Hosting can also work for the App configuration However, the setup and installation fees are applicable as per the server purchased
26. What level of Support do you provide after delivery?
Ans: We certainly provide Paid Support plans to all our customer after delivery. Please find the details of support as follow:-
• Answers to (technical) questions about the item’s features.
• Assistance with reported bugs and issues.
Please note that Support does not include:
• Customization & adding new features
• Installation Services
• Support for 3rd party software and/or plugins
• Content related rejections and violations from Google
• App Publishing
27. Which Technology stack used for Mobile app and Backend?
Ans: The technology stack we have used is Backend PHP CodeIgniter (V3) and React Native Version: 0.60.5.
28. Should I buy a developer to change the logo, company name and other things or I can change it directly from the admin panel?
Ans: After Purchase, you need to change branding, App name, and Content, images. You cannot use the Content, images and app name anywhere to promote your Product. You can hire our team for branding changes and contact us on [email protected]
29. Can I just purchase the code and use it to resell for white lable purpose?
Ans: No, the app comes with the regular lisecene only. In which you can’t resell the app or code for white labelling purpose. Doing such activity is to breach the terms and conditions while purchasing the app and hence, Eatance team is liable to take legal action to the reseller.
30. Can I just purchase the code and modify the app at my end?
Ans: Certainly, after purchase of the app, you can always update the code as per your requirements. However, if Eatance is involed in support after the app purchase than we request you not to update the code by yourself and discuss with support team before updating any code. If the code is updated from your end, then for any functional breakdown or crash, Eatance will not take responsibility of the code you have updated at your end.
31. Do I need my Own Developer Account for Appstore & Google Play?
Ans: Yes, due to a recent Apple policy change, for the apps to be approved, you will need your own Apple Developer & Google Play Developer Account. You can learn more about the developer memberships here:
Apple: https://developer.apple.com/support/compare-memberships (Individuals will work) $99/yearly
Google Play: https://play.google.com/apps/publish/signup/ $25 One time payment
32. Do I need my own Google Maps API keys?
Ans: Yes, it is important to have your own Google Maps API Keys. You can use the Google Maps APIs on both commercial and non-profit websites as long as your site meets the Google Maps Platform Terms of Service. Most of our customers fit into the free google maps pricing package. For more details, please visit https://cloud.google.com/maps-platform/pricing/
33. Do you provide customization?
Ans: Yes, we do offer Customization, but it will be a chargeable request. For any customization inquiries, please contact us on our email [email protected]
34. What is the deadline looks like after we pay for the app?
Ans: Please do note that we would be taking approx. 5-7 Working Days to deliver the first Application as APK with only branding changes as skin changes as per the client logo.
In the second phase we would be integrating the Google Map API and Payment Gateway as per the API documents you have shared, which would take approx. 60 Working hours and in days approx. 8-10 Working days. Again, we would request you please have some con-ordination or details to discuss with Payment Gateway team to make the process inline.
Once everything is completed, we can push the app to live store and hand over the code or deploy the app on your server. Which would again require approx. 2-3 business days.
35. What is so different with Eatance APP?
Ans: We provide the source code for our applications to all our customers. We also provide the support for the app or package you purchase to assist on app submission and take your business live. Certainly, there are many of our competitors selling similar products as very low cost but again you hardly able to find their support. With Eatance you will always have premium services such as branding for all the material for marketing your business. And most importantly, Eatance is backed up with Evince Development with the 9+ years strong presence in market.
Admin Panel #
1. Will Admin panel show me number of available delivery executives?
Ans: You would only able to view the Drivers which are created in the Application. However, to display the linking of Driver occupancy is not there, and we need to take the request as an Add-On.
2. Delayed orders Alert? Average Delay time on those orders?
Ans: So basically, there is a flag, and alert should raise base on the order assigned to the Pharmacy admin and master admin. Currently that is something possible with customiztion request.
3. Will I Admin, be able to do the allocation of orders to delivery person ?
Ans: Yes, it is already provided in the Application for sending the alerts of new order to nearby or all drivers. Even the Master admin can assign the order to the driver to override the system.
4. Does it have route optimization to enable Pharmacy delivery in time?
Ans: Yes, as we integrate the google maps, so it does provide the best route to deliver the package at that particular time. So, the delivery app gets connected with customer app for tracking purpose and display the live tracking or location of driver
5. Do you have a companion App for Delivery boys?
Ans: Yes, we already provide Delivery for tracking and managing drivers in both iOS and Android.
6. Does the delivery app have/consist of an in-app collection of barcodes, photos, signatures, and notes. ?
Ans: We can always take up the request of customization as per the current app is for pharmacy delivery where we don’t require the signature or barcode reading for delivery purposes.
7. Customer has option to connect with driver via chat, call, and text?
Ans: Yes, customer can always connect to the drivers via call to the register mobile number. But we can provide further features based on custom requests.
8. Does this application allow to manage the orders in sequence coming to the Pharmacy Store to ensure they get priority based on ticket
Ans: Our system does allow the order to accept as per the open and closing hours setup for the Pharmacy. We have provided the Store to accept / reject the order in terms of availability issue. However, to create the priority-based order is more of customization request as per the requirements. So, we can always assist you on setting up priority-based algorithm for every Store, if required.
9. Is there any option for billings?
Ans: The Customer can view past order details via Customer App, whenever a customer places a order, the Admin receives a email and once the adminn confirms the order, the customer will receive a push notification. If you’ve any other specific requirement, you can always share your requirement with us.
10. How robust is your Admin Panel?
Ans: Administrative interface and utility usability: Extensively developed with goal to save time and improve the efficiency of the entire service. Imagine a couple of seconds saved on a frequent operation and multiplied by the number of operators in the call center. It can play a big part in the outcome for the potential client. As mentioned earlier, we have MVP setup for Food Delivery Network and currently you can have almost 7k orders per day and 1k concrete user ordering. Mostly importantly we have created the Application in React Native and using CI for backend which gives core functionality to extend the app at high scalability including the front-end development.
11. Can able to manage taxes and service fees, for individual Liquor in web admin panel?
Yes, we have created Management in backend to set Taxes and Service fees as percentage or by amount.
12. Can I also generate the report for all taxes and service fees on individual Pharmacy from web admin panel?
Yes, we have created the general reporting system which you can also export in CSV or Spreadsheet. So you can view the accurate earning done from all or individual Pharmacy filtering the data by calendar date system.
13. Do you have Mobile App for Pharmacy Admin?
Yes, we have created Mobile app for Pharmacy Admin which helps admin to Accept/Reject orders, view on-going orders details and update status or assign the driver. To update menu, edit Pharmacy details and for all other features you need access web app and is not the part of Pharmacy Admin Mobile App.
14. Can Master and Pharmacy Admin both can generate coupon for the orders?
Yes, we have created coupon management where Admin can generate coupons based for Pharmac. Customer can apply coupon in the checkout page which will refelect on total of customer order.
15. Can I set Driver Commission to maintain the payment done and unpaid for Deliveries?
Yes, Master Admin can create Delivery Zones for Drivers and assign specific charge for them. Also Admin can view entire commission history for all deliveries done by individual drivers. And they check all the records of commission earned and can maintain the type section of paid and unpaid for record entry purpose. Further the admin can always update the commission to all the driver base on the radius allocation as general commission. For example within >3miles raidus delivery the commission would be 2 USD and <3miles raidus delivery the commission would be 5 USD.
16. Can I Bulk import products other than adding single item at a time in the system?
Ans: Yes, Master Admin can always upload bulk products within the system. To perform bulk upload at ease we have also provided sample CSV/Spreadsheet reference to bulk upload with dummy data. Admin just needs to follow the same format field by field and upload product efficiently within the system.
17. Can I send custom notification or emails to the users?
Ans: Absolutely, you can just not create custom notifications and emails but also can save them for further purpose. We have even provided you the functionality to send the notification and emails as per the categories/groups. Either you can send messages/emails to all or select the category such as Customers and Store Admins.
Developer Help
Eatance Community welcomes you, and we would like to Thank you for showing your esteemed interest in our Product.
The Eatance Setup package comes with a thorough explanation for the manual setup guide and all the query resolutions. It is advisable to review the support and workflow documents for understanding the back-end architecture of Eatance designed by our Product Architects. We are always reachable at [email protected] in case of any further issues.
The below article is a step-by-step guide for manual installation and understanding the Eatance application with a closer look. For your convenience, the article is divided into 3 significant verticals of the application, namely Eatance Admin Module, Eatance Mobile Application for Android, and iOS.
Admin Setup
Admin Configuration
Step 1:- Logging into cPanel Application
As an administrator, you will be required to log in through valid credentials into your cPanel Desktop application which can be downloaded from here. You can also Login through valid credentials into its web application from Here. The below screenshot is attached for your reference.
Step 2:- Upload Application Source Code
As a part of the next step, you will be required to upload the HTML Package on the Eatance Domain. Click on Files in the top-left toolbar, and inside it, visit the Files Manager icon.
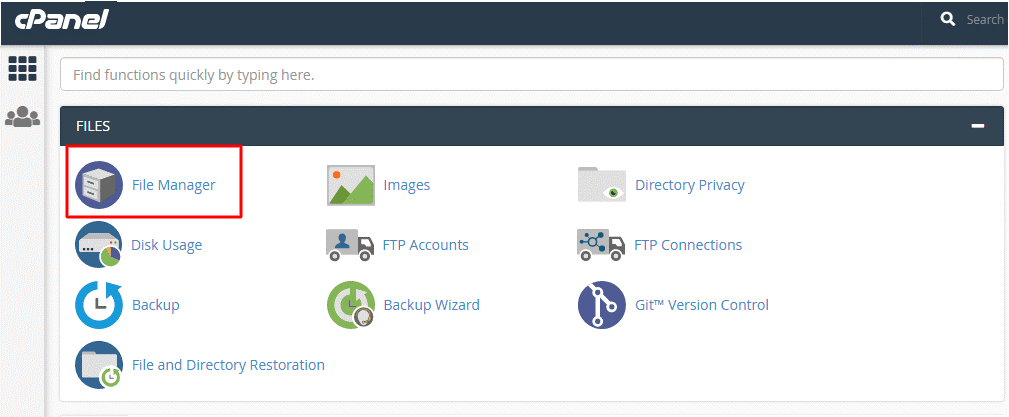
After clicking on the Files Manager icon, you will view the Files Manager Dashboard and, under this folder, select the public_html option.
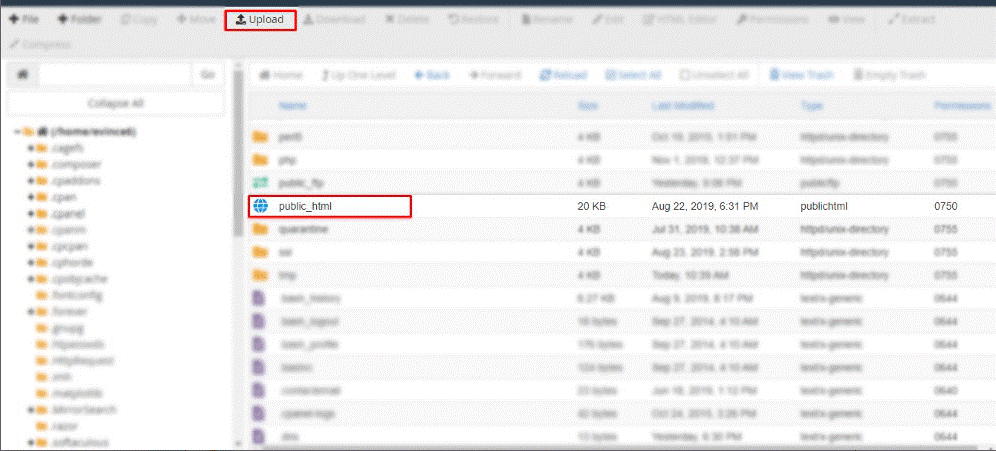
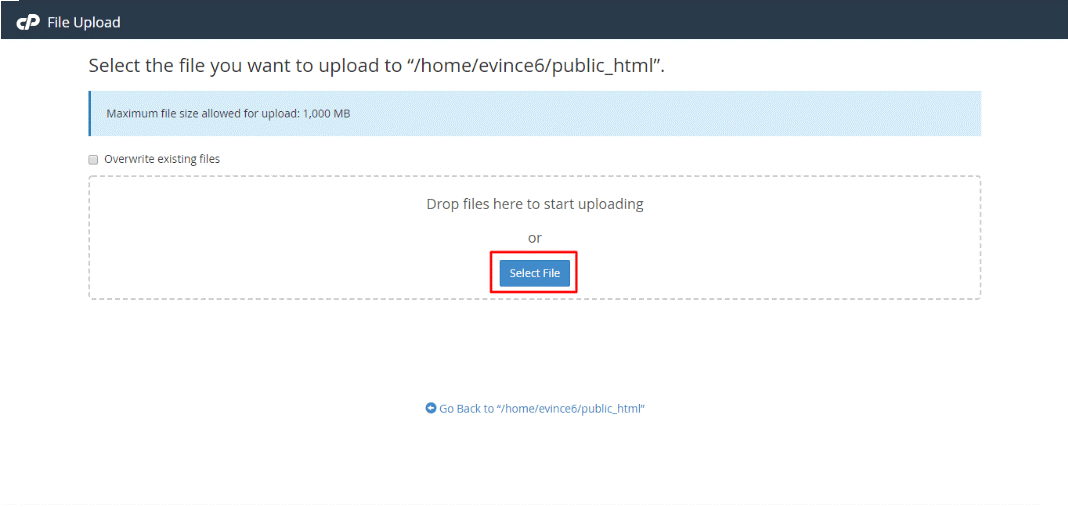
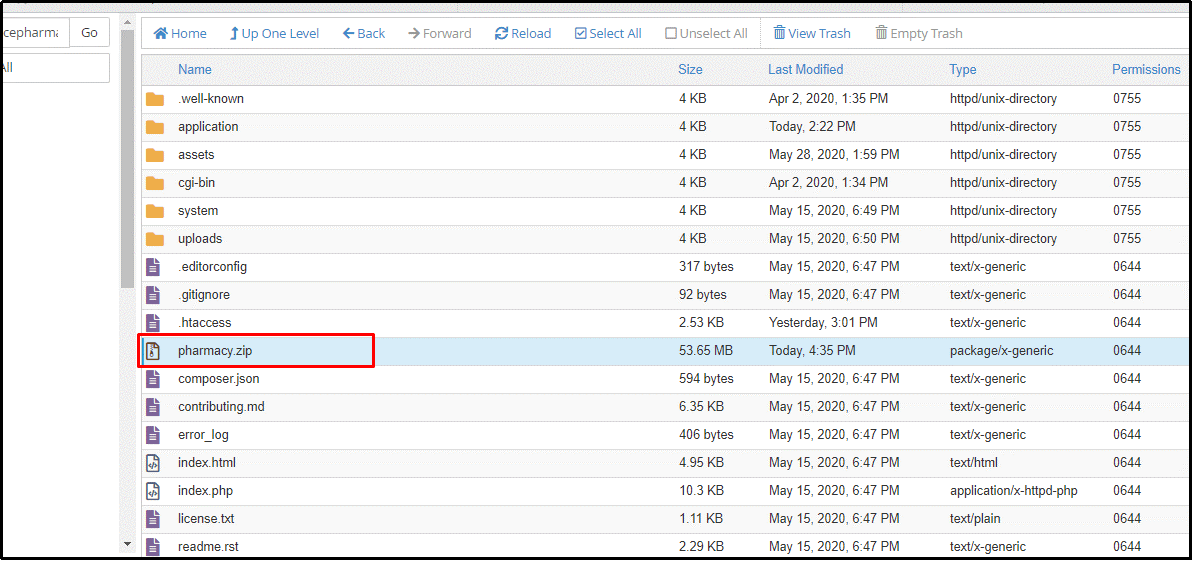
The next step involves uploading the eatancePharmacy.zip file, for the Click on Upload option is available on the toolbar in Files Manager Dashboard. Make sure to check the file path as “/home/evince6/public_html,” You can either upload the file from your computer or drag & drop it on the upload section.
Once the file is uploaded, click on the .zip file as shown in the below figure
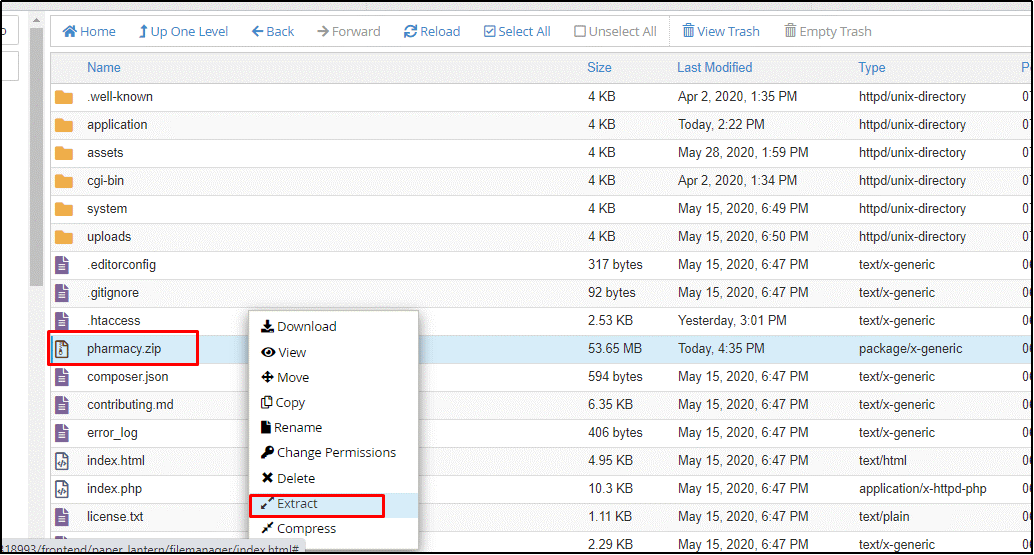
After selecting the .zip file, You will need to extract the .zip file, which can be done by right-clicking on the selected .zip file as shown in the below figure.
A popup will appear once you have selected the Extract option, where you will need to enter the location path where the application code is stored.
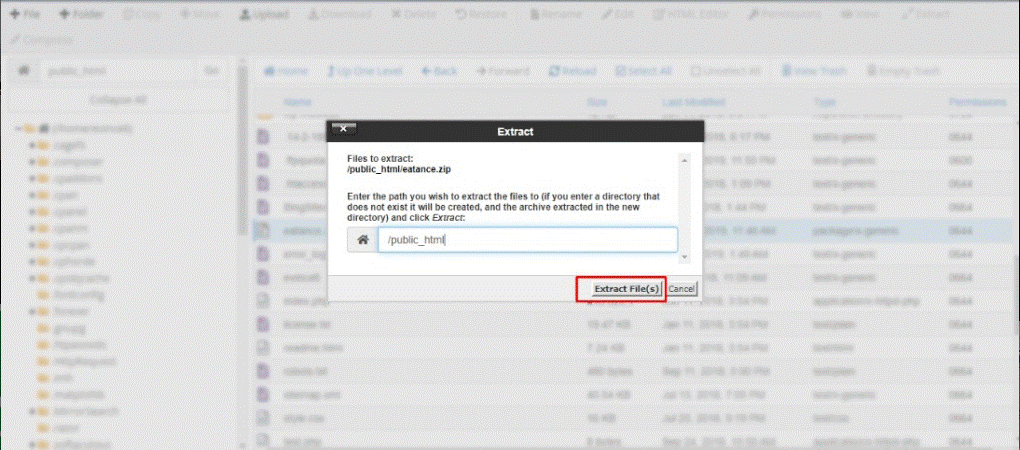
If the application code is stored inside the public_html folder, then mention the path as /public_html/ and click on Extract File(s) button as shown in the below figure.
If stored at any other location, copy and paste the file path in the placeholder provided in the popup and then click on the Extract Files(s) button. The application code will be automatically uploaded to the web domain.
Step 3:- Create Database
The next step: you will be required to perform is setting up the Database. The database section is available under the Files Manager section in the cPanel dashboard. Under the Database section, click on MySQL Databases.

As an application administrator, you will be required to create a separate database for Eatance Pharmacy Application. For that, a section under MySQL Database will be opened, and you need to enter the name of the Database.
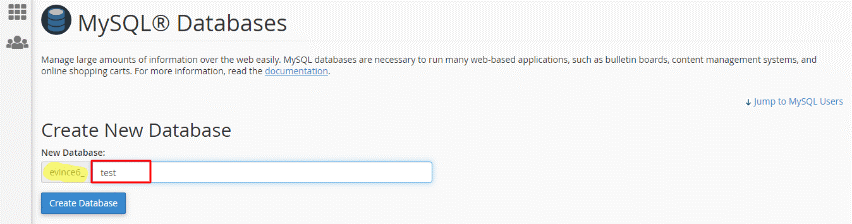
Enter the name of your New Database as shown in the above figure, click on the Create Database button, the following figure will appear.

You need to verify that if the created Database is added, click on the Go Back button to add, redirecting to Database Section on cPanel Dashboard.
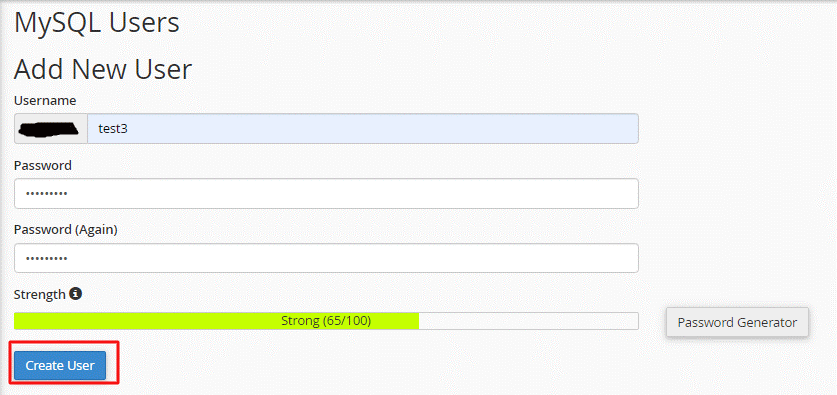
Step 4:- Adding a new Database User
To create a new user, go to the Add New User section. Enter Username, Password, and Re-enter Password in Password (Again) textbox as shown in the below figure. After entering the password, you need to click on Create User button.
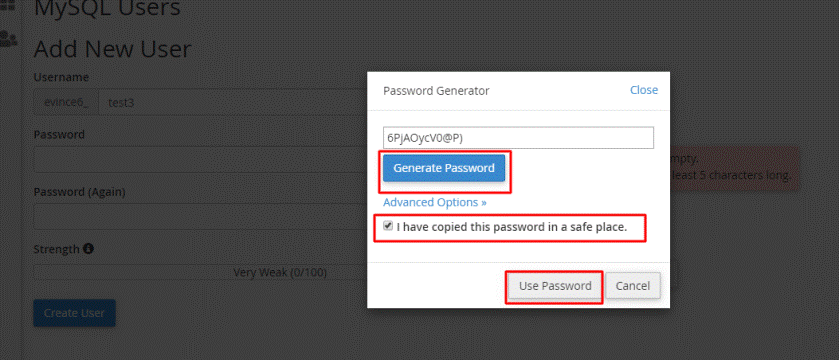
Suppose you cannot think of any strong password for the database access. In that case, the cPanel application provides an option to generate a password as per the required password standards through Generate Password button. Once you have generated a strong password, you will be required to save the password manually, confirm it by selecting the checkbox in the Password Generator checkbox, and further click on the Use Password button.
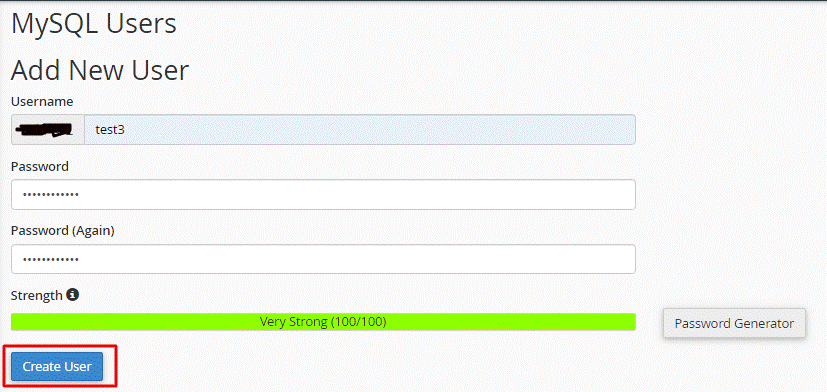
Further, the system will automatically redirect you to the MySQL Users page, and the system-generated password will be saved in the Password placeholder as shown in the below figure. Further, you need to click on Create User, and a message stating successful creation of the user will be shown on the screen.
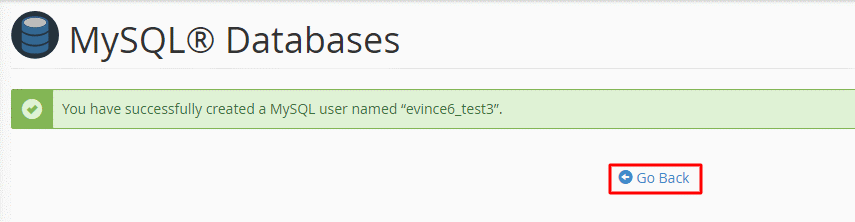
Now, click on the Go Back button. You will be reverted to Add New Database section, scroll down to Add User to Database sections.
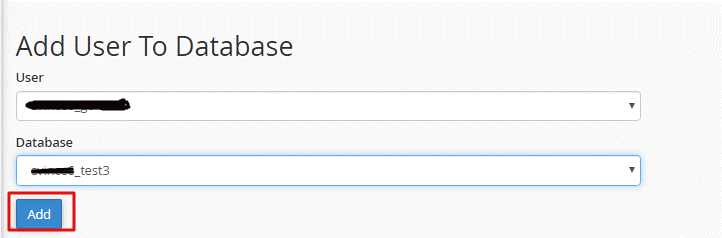
As shown in the above figure, select a User name from the list, and its corresponding newly created Database. Click on the Add button to go to the Manage User Privileges page.
Step 5:- Assign Privileges to the User
To create a new user, go to the Add New User section. Enter Username, Password, and Re-enter Password in Password (Again) textbox as shown in the below figure.
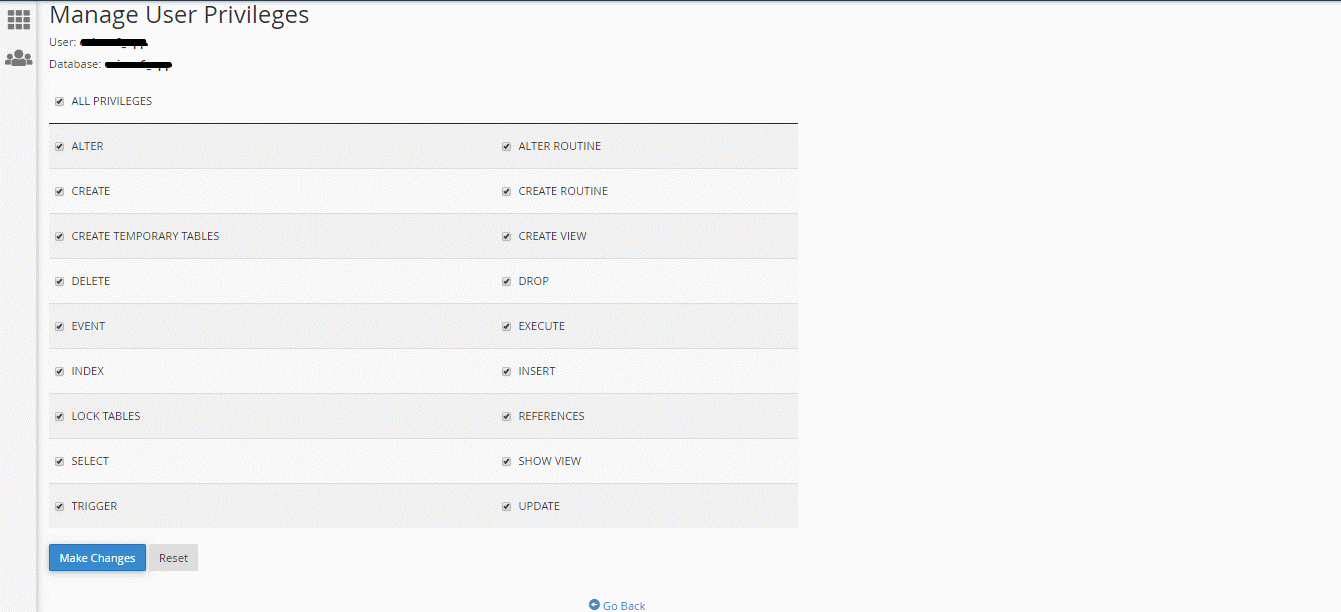
As shown in the above figure, Tick mark on to assign all the privileges (rights) to the created users from the Manage User Privileges section. Click on the Go Back option to go to the previous page.
Click on the button to go to cPanel Dashboard.
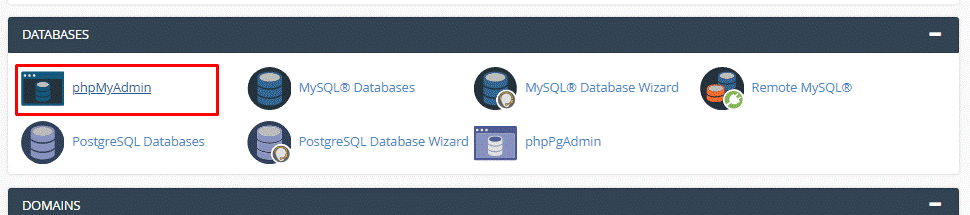
Step 6:- Importing Database
To import the created Database (For Database Connectivity), select the phpMyAdmin option as shown in the figure below:
Select the name of your Database, as shown in the below figure.
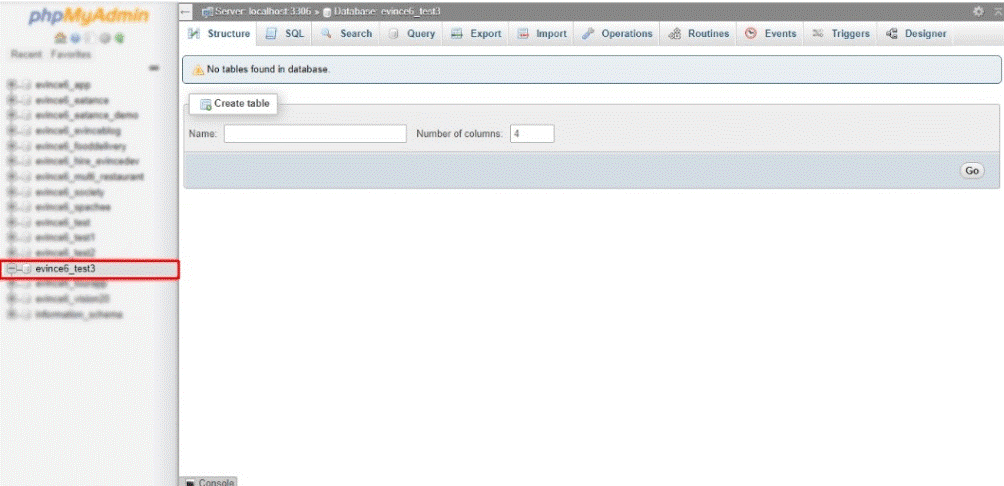
Click on the Import button as shown in the below figure:
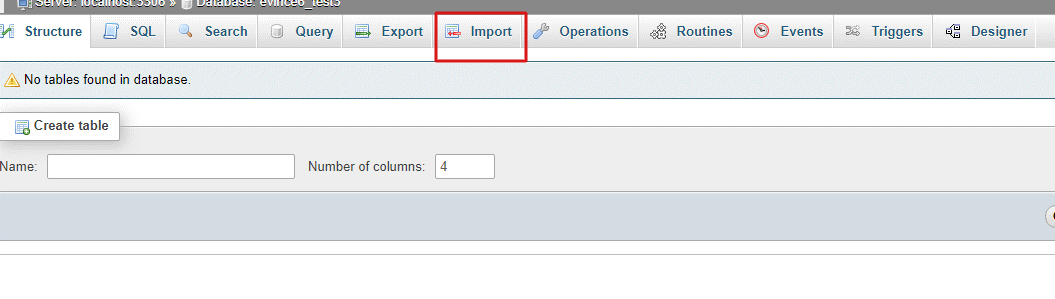
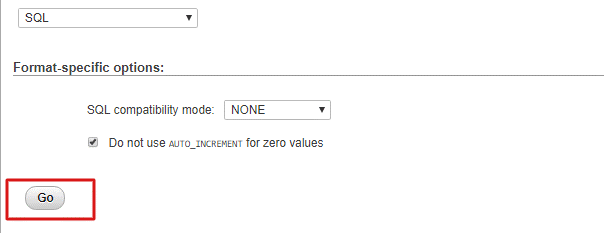
Select .sql file, your package from your system. Scroll Down and click on the Go button, as shown in the below figure:
Step 7:- Setup Database to Source Code
To update your database access in the file, open the source code folder. For that, you need to click on the <strong>File Manager option. Further, Click on the public_html option.
If you have created a folder, click on the folder name (For Eg. Eatance Pharmacy), then click on the application ->Config-> database.php option.
Or else directly access source code from the location path of application ->Config-> database.php option.
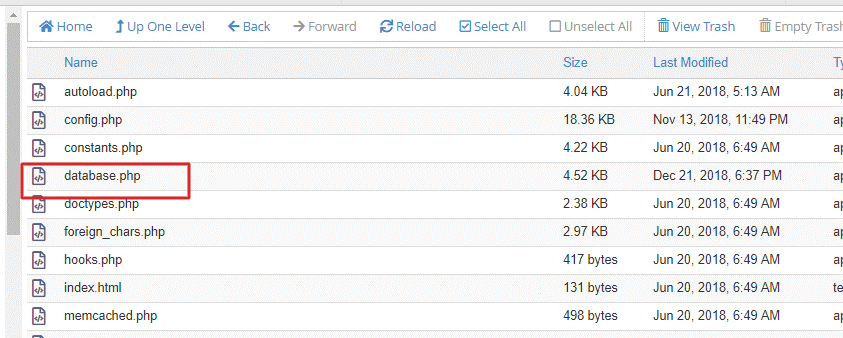
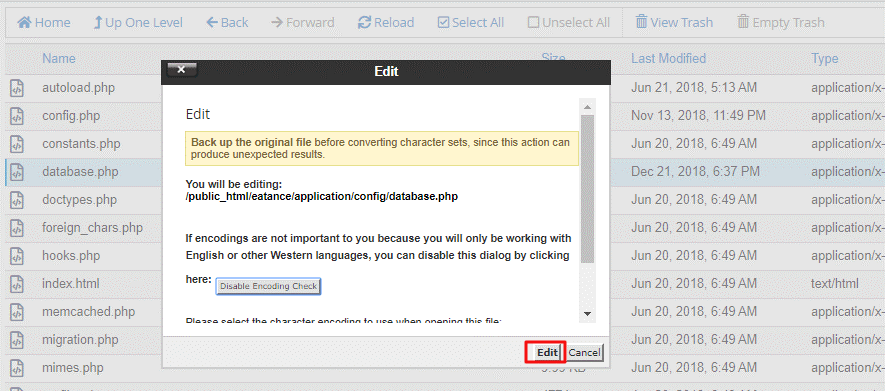
Here, right-click on the database.php file as shown in the figure below.
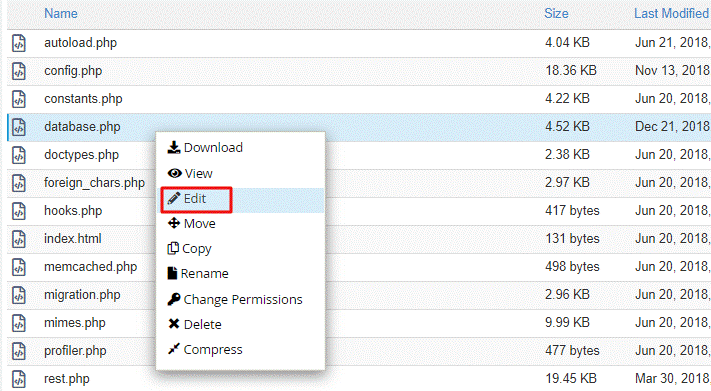
Click on the edit button to update the database details following popup will appear as below figure.
Step 8:- Update Important details in the Database
Scroll down to update database details.

As highlighted in the above figure, update the following information in the Database.
- Host Name: localhost
- Username: ‘database user’ (For Example: eatance1).
- Password: ‘database user’s password’ (For Example: abcUe@H=clIs).
- Database: ‘database Name’ (For Example: eatance1).
For Admin Module Access:
- To access the admin module, Enter your folder name in your URL,
- For Example, http://example.com/” Backoffice/.”
- Here,” back office” is the folder name for back-end access. The following figure will appear:

Enter your E-mail and Password in the textbox and click on the Login button.
After Login, the following Admin Dashboard of Eatance Pharmacy application will appear:
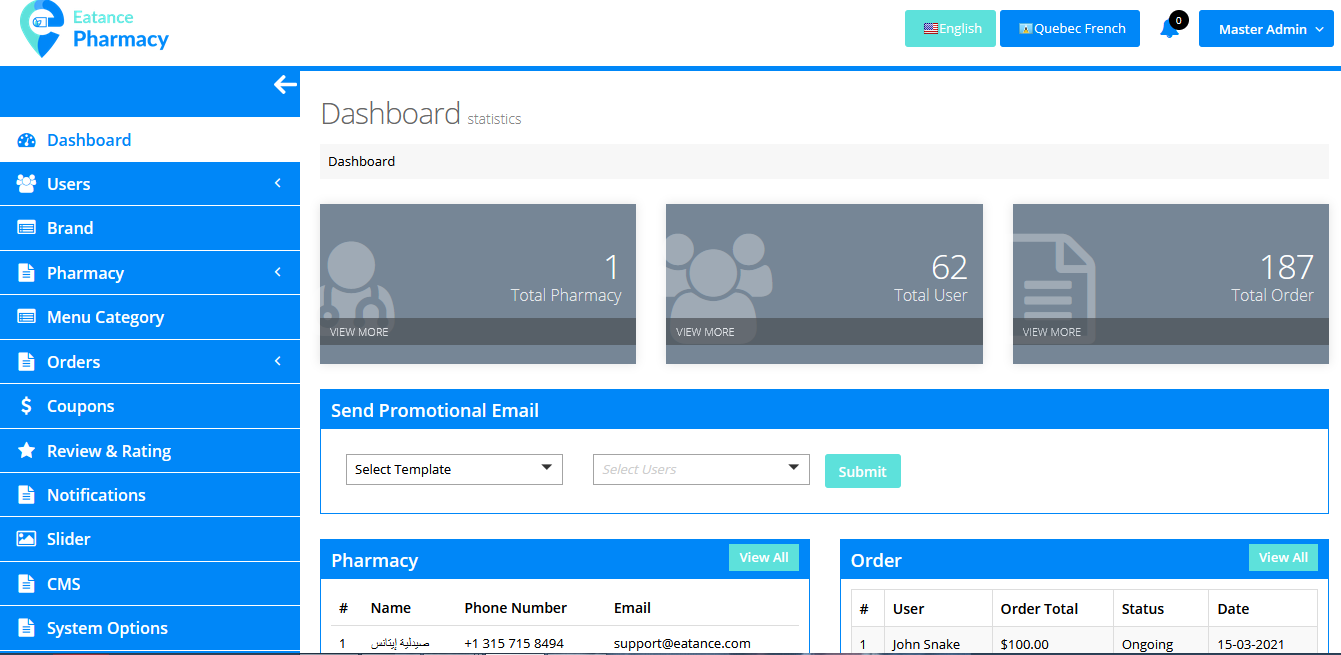
Now, if you have added your package to the public_html folder, then it will work.
But suppose, if you have created another folder inside public_html and uploaded package into that specific folder, then you need to change it from the .htaccess file; it will be on the root path as shown in the figure below:
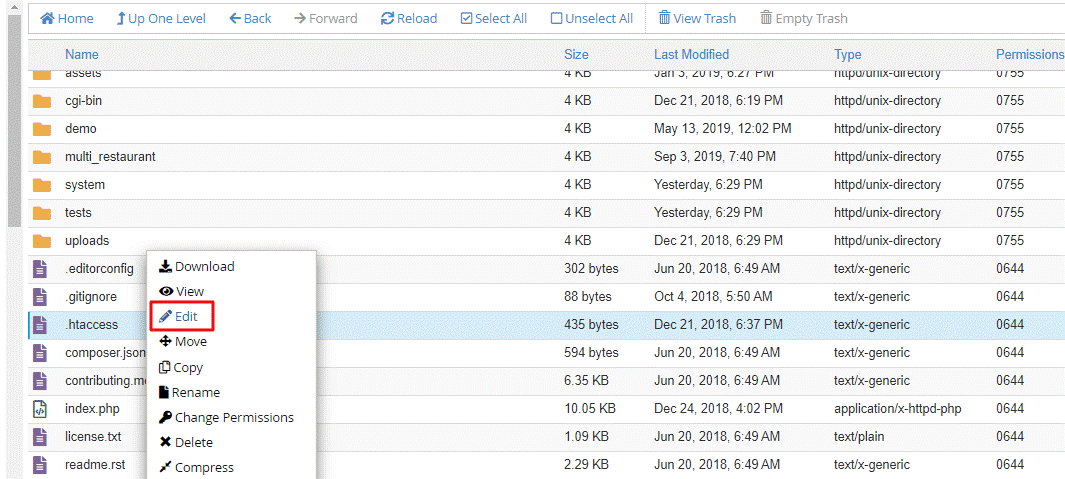
Select the Edit option from the above list. The following popup will appear:
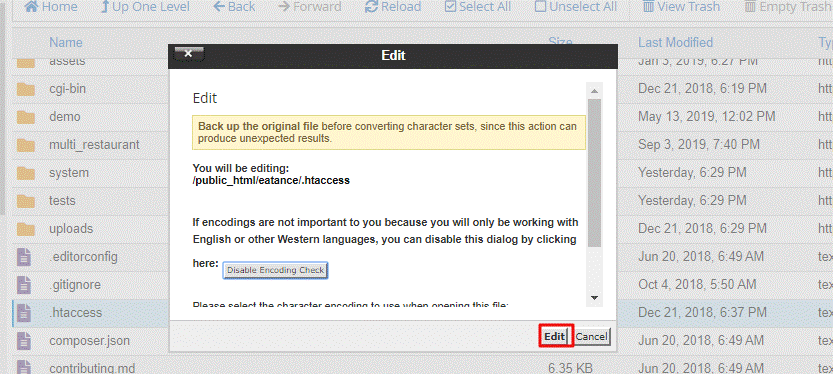
Now, here you are required to enter the specific folder name in Rewrite base /your folder name /, as shown in the below figure:

Set your folder name, and if you have inserted your package in the folder, then for back-end access, you need to access it with the following URL (by entering the name of your folder). http://eatanceapp.com/your_folder_name/backoffice
If Domain or Subdomain points to a specific directory, there is no need to change it in the .htaccess file.
If Domain or subdomain does not point to a specific directory, then specify folder name in .htaccess file.
Android Configuration
Setting up React Native:
As Eatance Application is a multi-platform application, it can run on Android & iOS devices. You will be required to set up the react-native platform.
To have smooth installation and operation of the application, you should install the following things before setting up the application.
- Visual Studio Code can be downloaded from Here
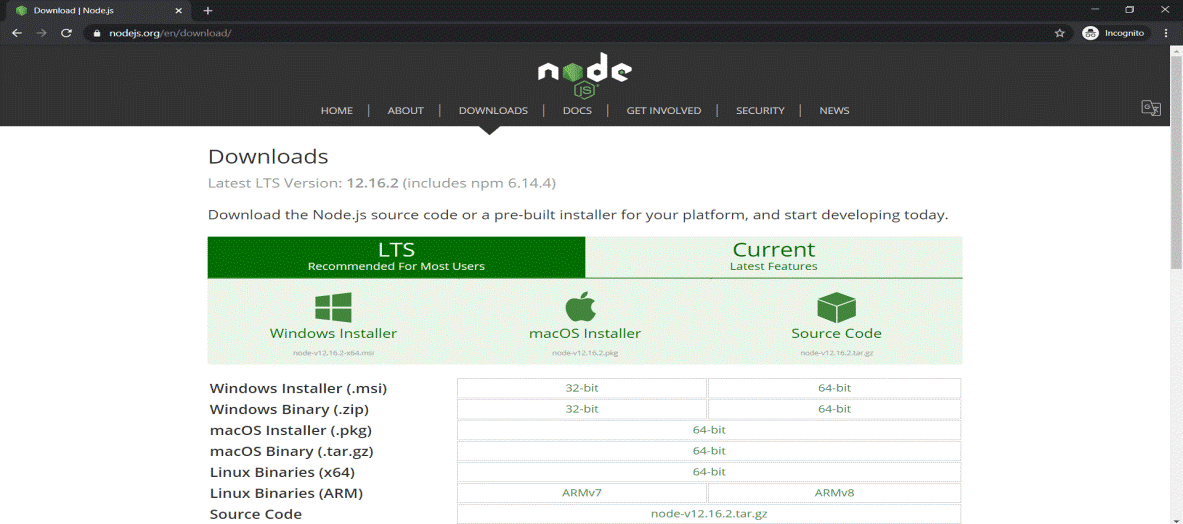
- Node JS 12.x.x or higher, it can be downloaded from Here

Setting up Android:
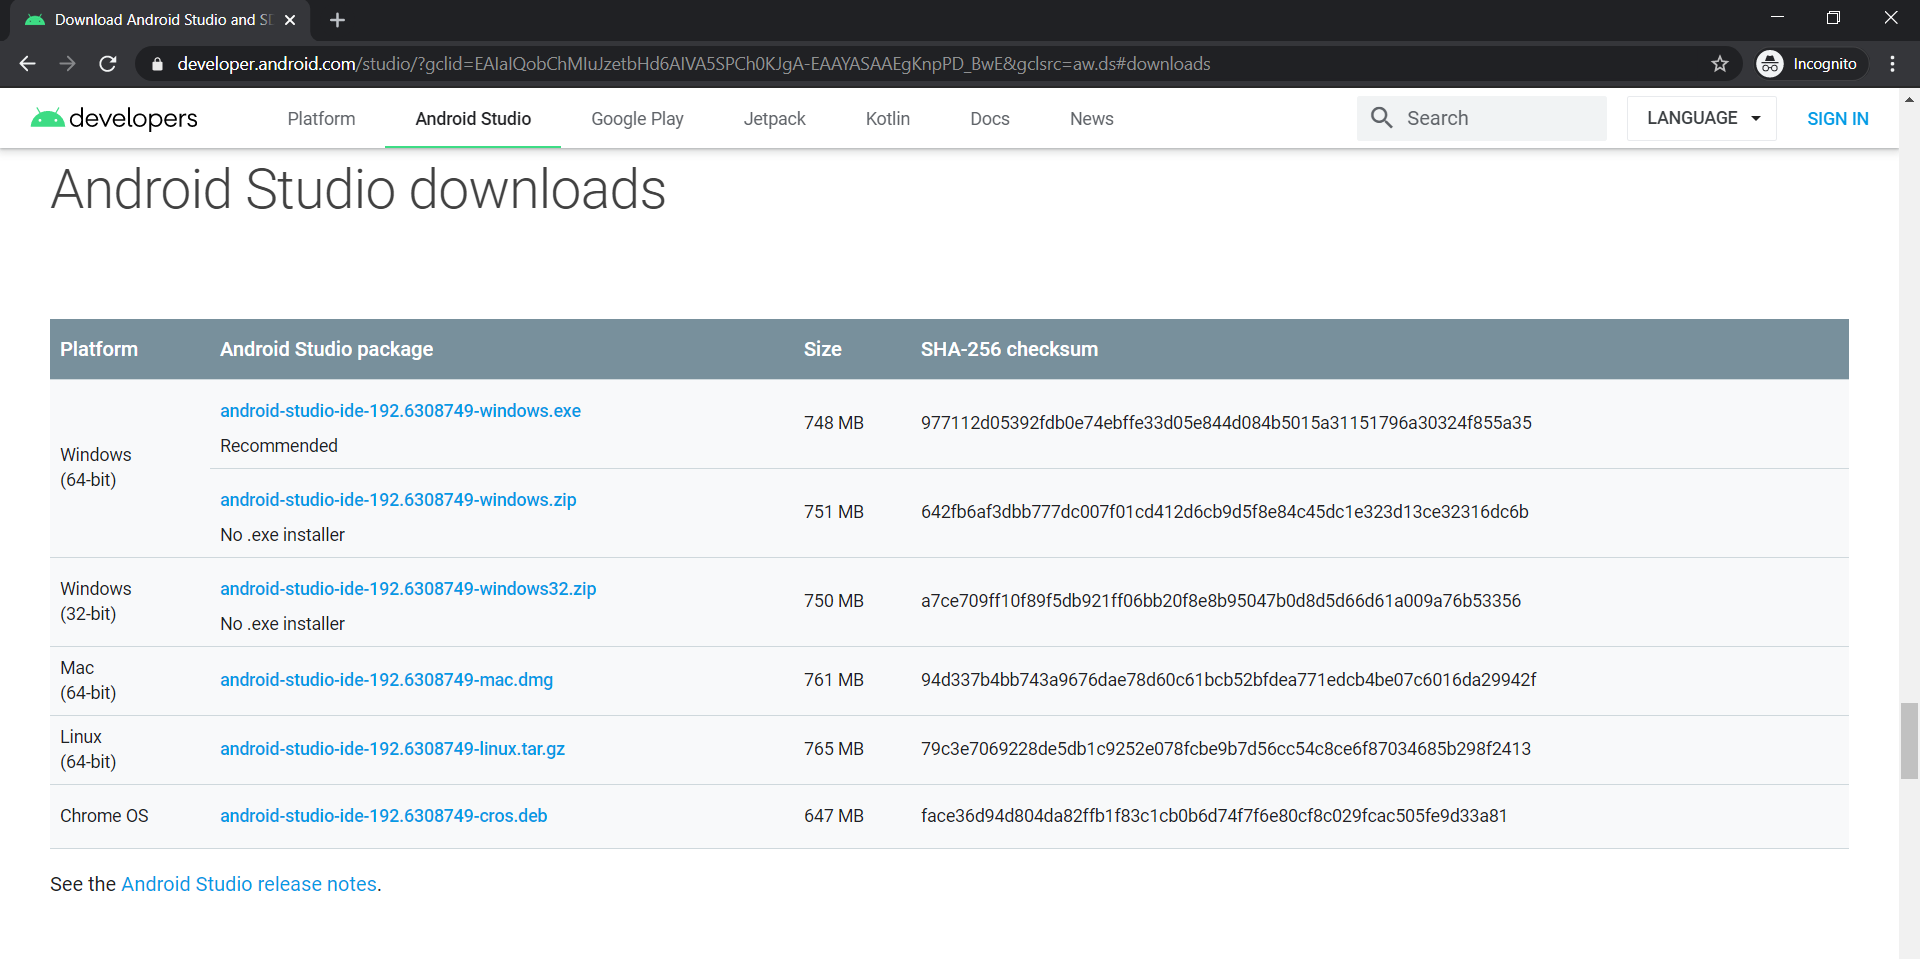
The Eatance Pharmacy Application is also operational on android devices; hence you will require to download and install android setup. It can be downloaded from Here
First, install Java from this URL
https://www.java.com/en/download/
We have to install android studio, and you can install the same from their official site from the following URL.
https://developer.android.com/studio/
Running on Android:
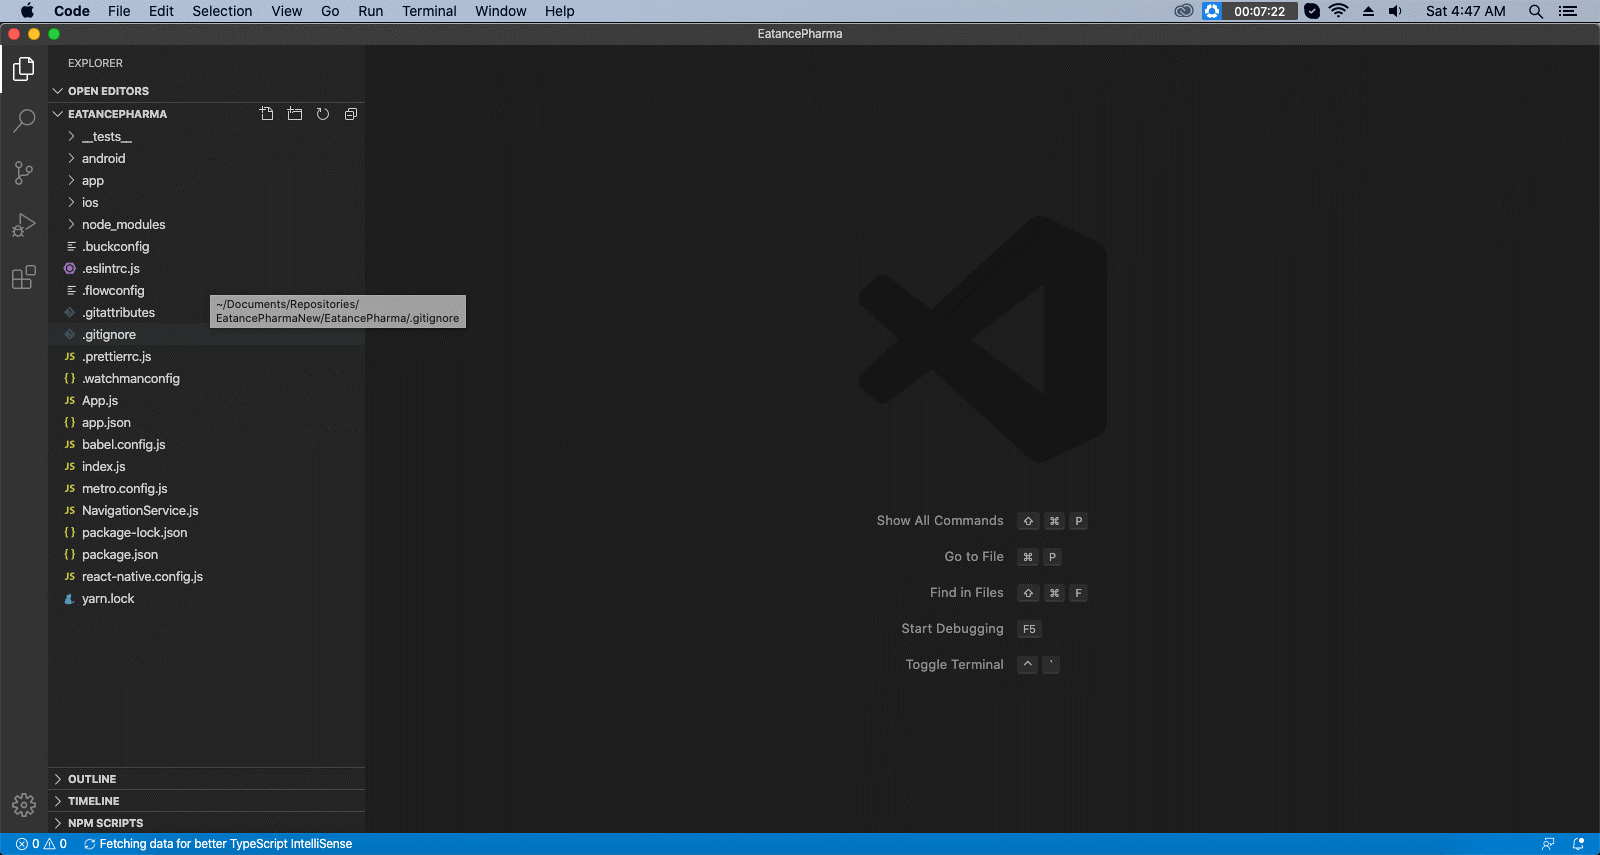
You need to open the Visual Studio project, and it will create the following structure by default.
As Eatance is dependent on various external third parties and you can install the third party dependencies through the following command
- npm install
To link all the newly installed modules, we need to run the following command.
- react-native link
After all the modules are linked, we are ready to run the app by running the following command. Please ensure an actual device connected with USB debugging is turned on or has an emulator running.
- react-native run-android
Suppose you are not able to execute the application on your connected device. In that case, you can try re-running the command react-native-run-android and if it stills not executable in Visual Studio, then try from the following commands:
- cd android 3. cd.
- ./gradlew clean 4. react-native run-android
You can also try deleting the build folder in the Eatance folder by navigating to the Eatance->android->app.
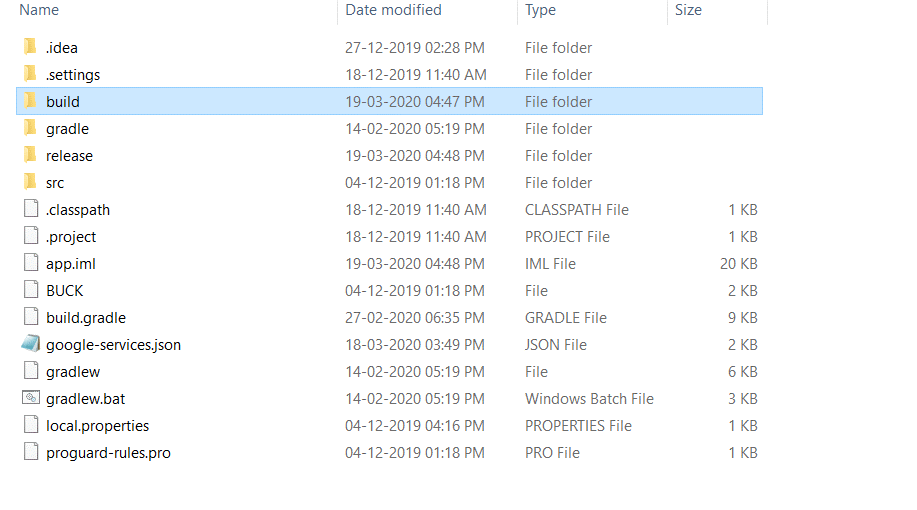
After deleting the mentioned folder, you need to re-run the following command again to refresh the recently build folders.
- react-native run-android
Now as you will be able to successfully run the application on the connected device if you feel
To change the package name and application ID, then you can do it as well.
To perform this, you need to finalize a package name and let it be com.EatancePharmacy.
Now go to the following directory in file explorer.
Eatance\android\app\src\main\java
Create a new folder named com inside the java folder, then move inside the com folder, create another folder inside the com folder, named EatancePharmacy.
Now our folder structure is ready, let’s move the files inside the Eatance\android\app\src\main\java\com\eatance to the EatancePharmacy folder.
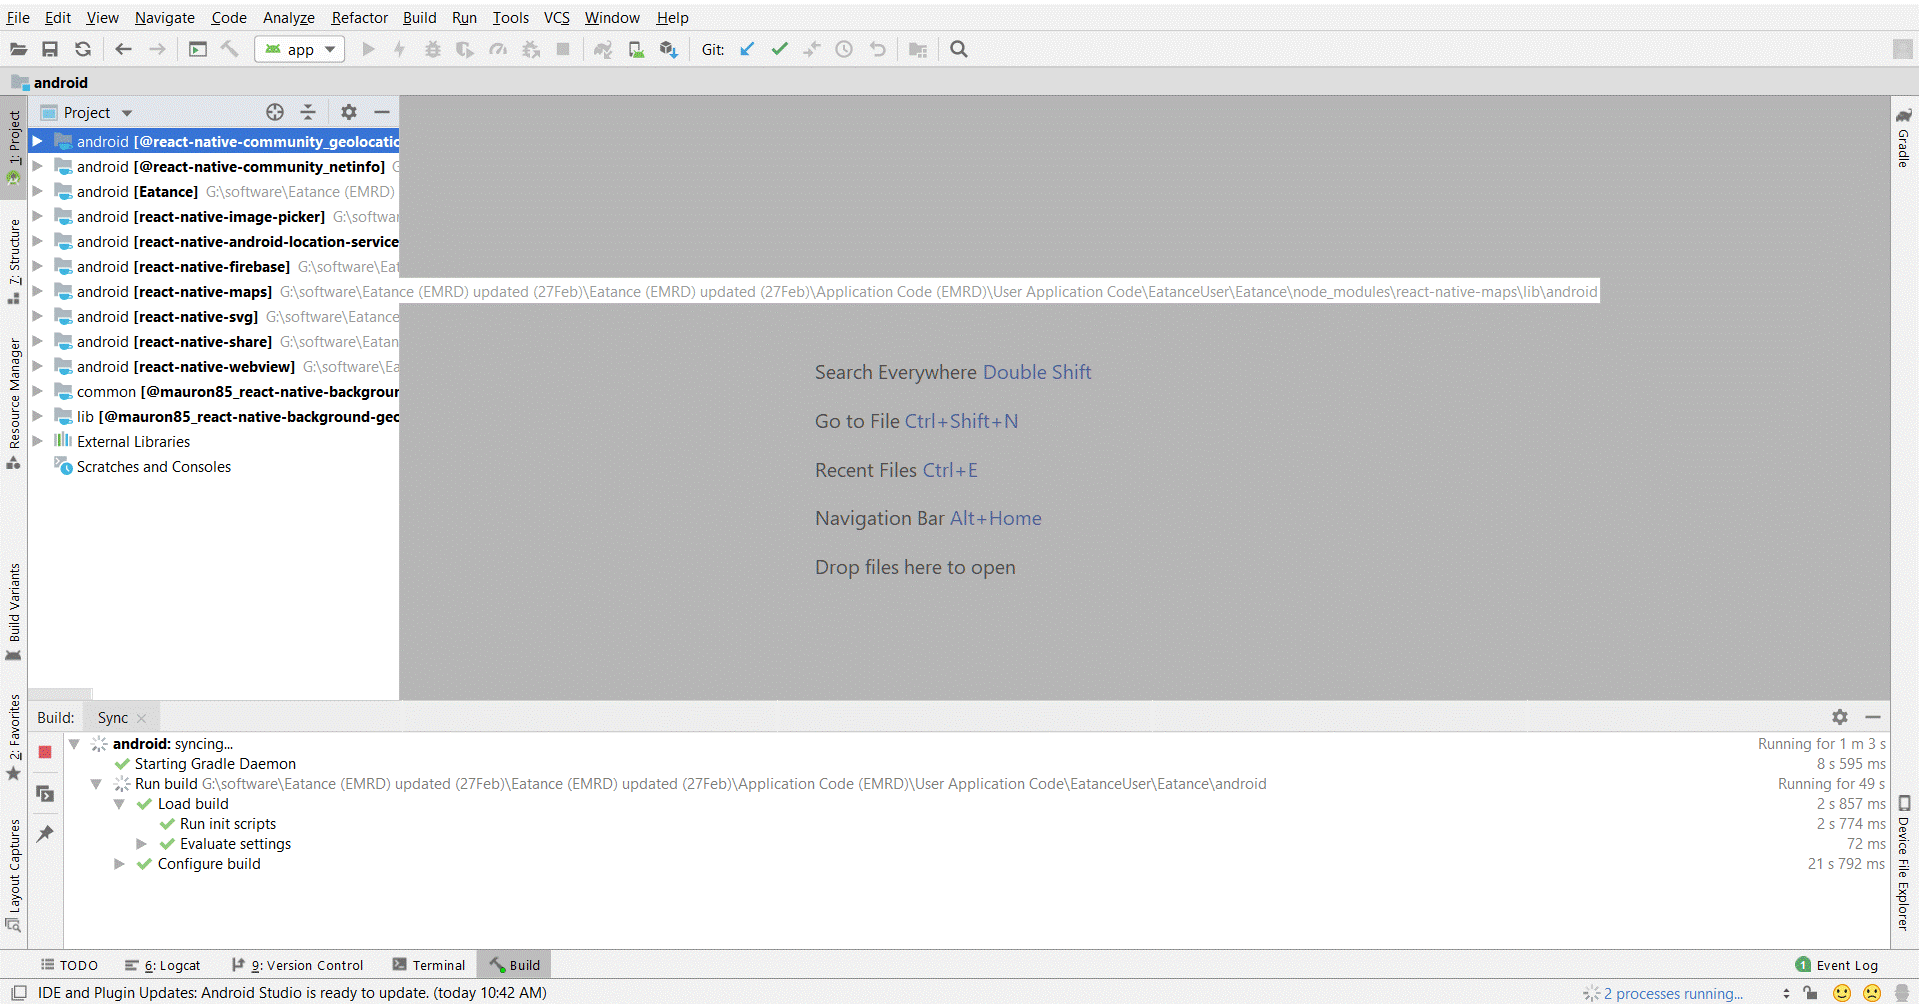
The next step is to launch android studio and open the Android under Eatance Pharmacy Project, as shown in the below figure.
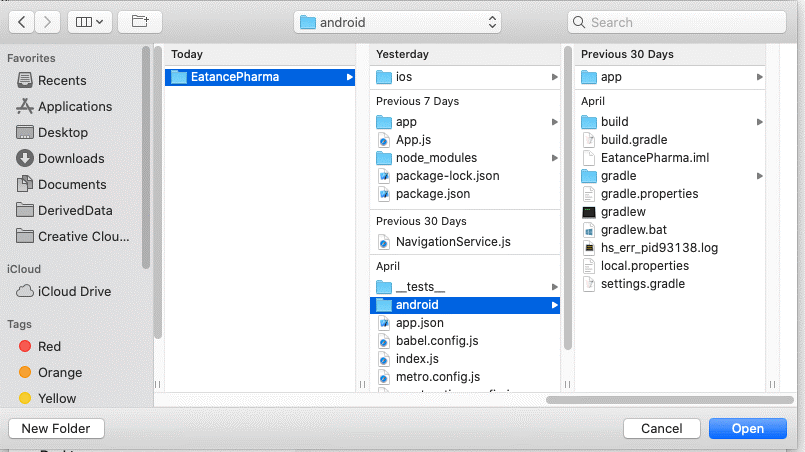
The next screen in the android studio will be as shown below, and you need to require to change the package name in the following files, which will be located in Eatance Pharmacy->app
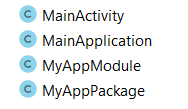
After changing the package name in the above files, you need to hardcode it as well through the XML file, and that can be done in the AndroidManifest.xml file available at Eatance/src/main/res/xml/AndroidManifest.xml
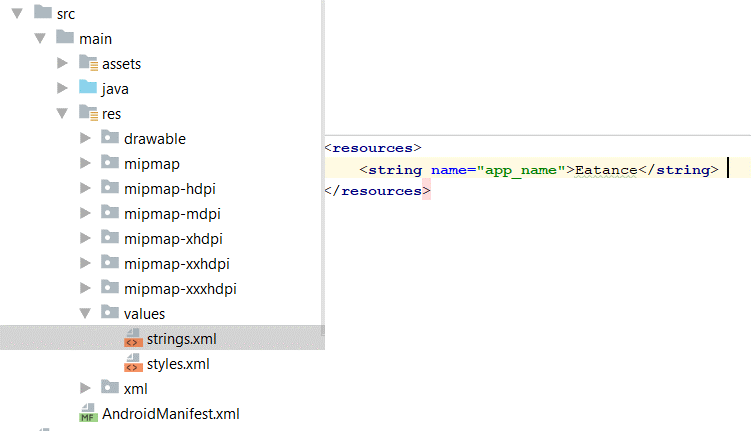
Now it’s time to change the application’s title, which will be visible in the device’s app menu.
The application name for the app menu can be changed by visiting the following file android\app\src\main\res\values\strings.XML; you need to edit the file in the android studio with the desired name you want to keep for your Pharmacy application.
You can also change app theme color by changing the color accent to desired hex color code in the styles.xml file, as shown in the below figure.

You can change the app logo by replacing the images inside this folder with your required images (Remember to rename the new images as the old image names).
- Eatance\android\app\src\main\res\drawable
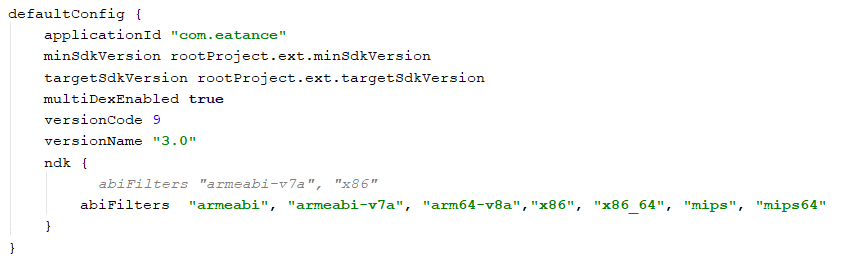
You have to change the application in the following file
Eatance\android\app\build.gradle from com. eatance to your required package name; in our case, it’s com.EatancePharmacy. Also, change versionCode to 1 and versionName to 1.0
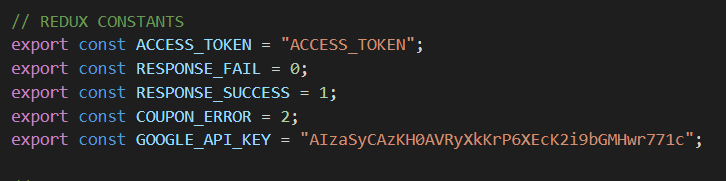
You have to specify the google maps API key in 2 places to load the map. Open Eatance\app\utils\Constants.js in visual studio code. Please refer to the following guide, how to get a google maps API key.
And also here inside the AndroidManifest.xml file.

Now to use the app on your server, change the BASE_URL to your back-end URL inside the Constants.js file.

We have completed all the required steps to run our very own app except the firebase setup. Let’s do that so that we can finally run our app.
Obtaining a Google Maps API Key
Go to google cloud console by clicking the following link. Select your project and click on open. Let’s open My Food App.
https://console.cloud.google.com
Click on the side menu and select API and Services and click on Dashboard.
Click on ENABLE API AND SERVICES. Search for Maps SDK for Android, Geocoding API, and enable them.
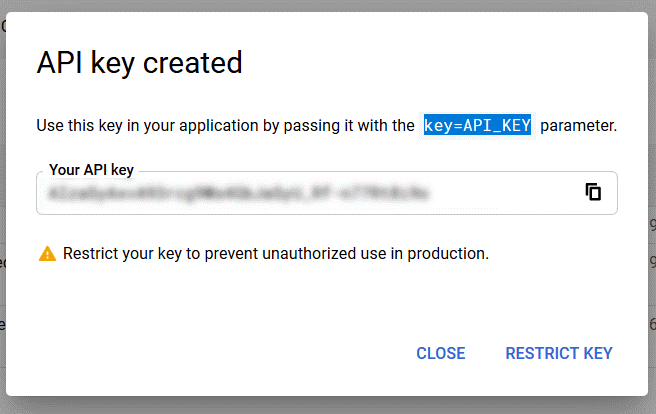
Click on the navigation menu, select API & Services, click on credentials, and click Create credentials > API key on the Credentials page.
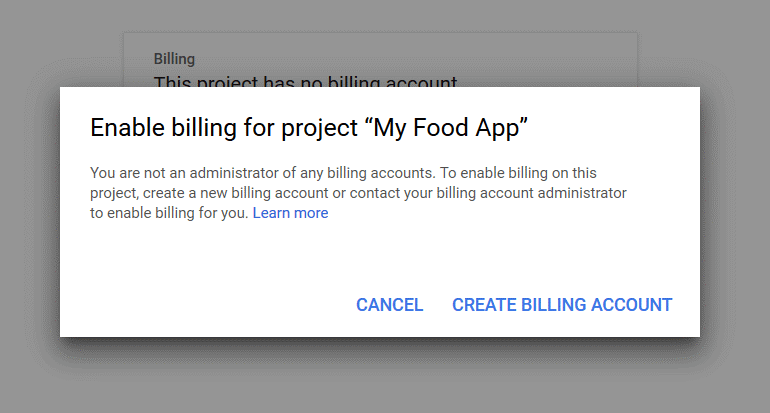
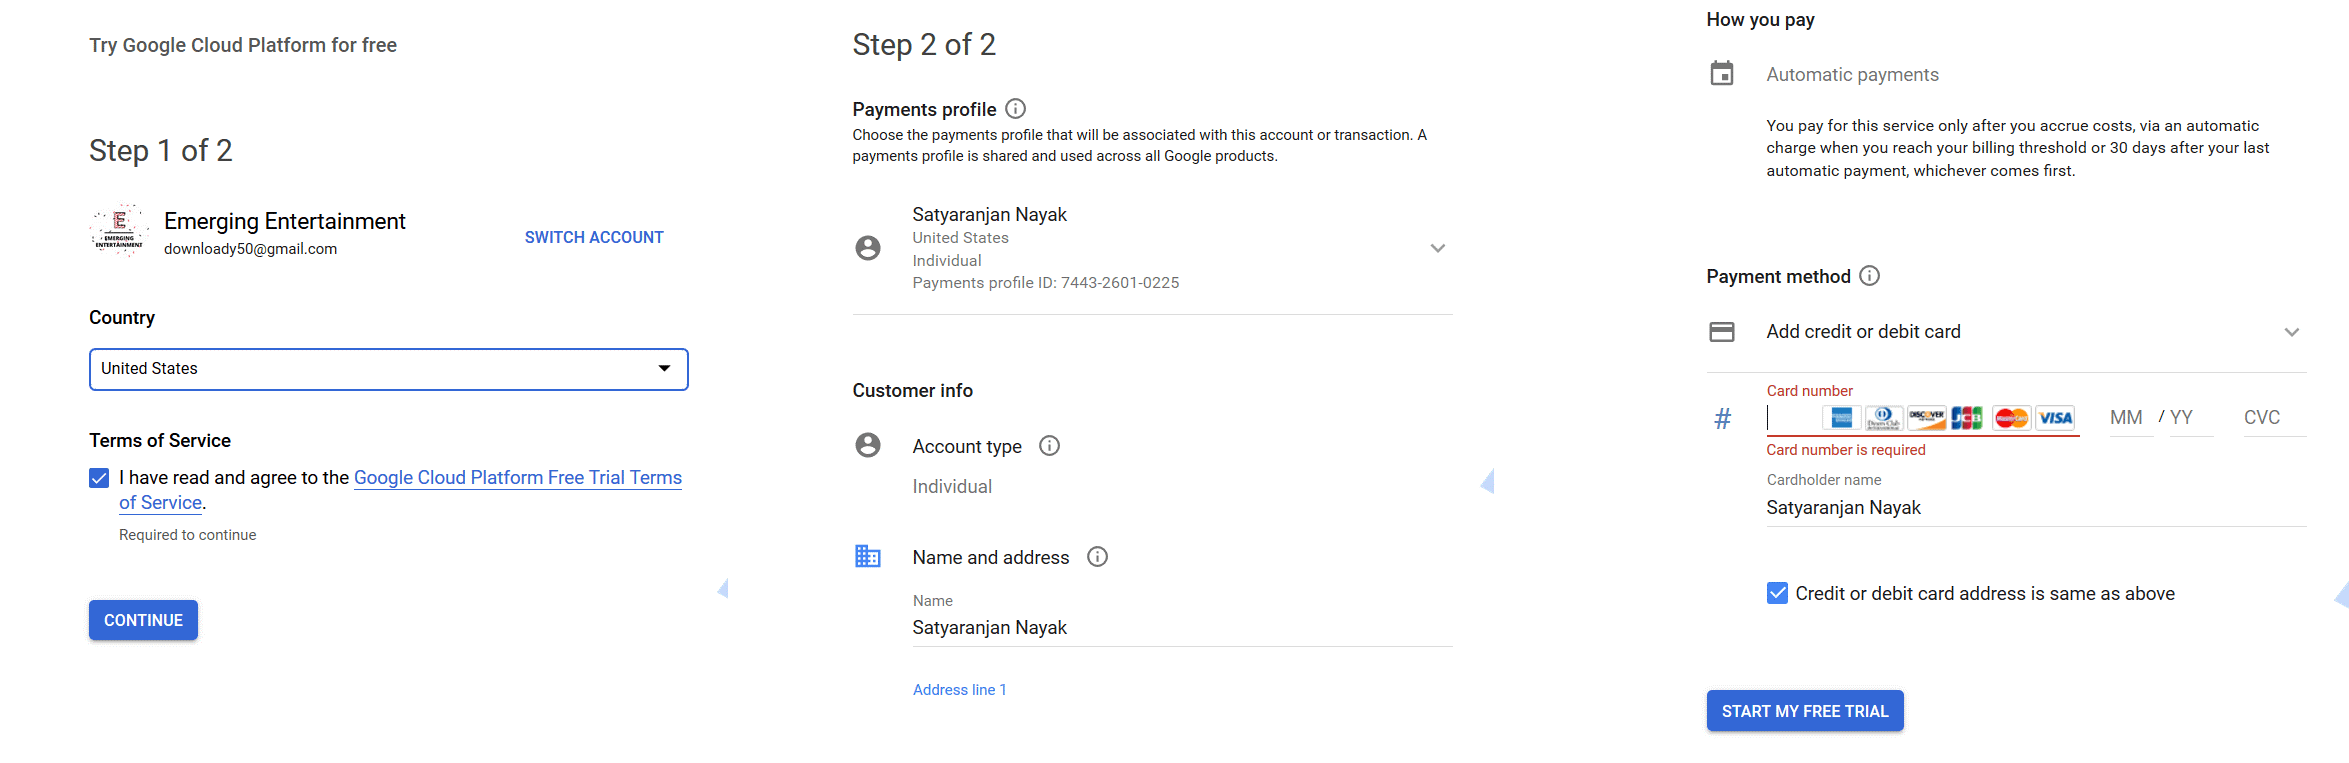
To make the APIs work, you need to link a billing account or create a billing account.
Accept terms of service and click on Continue. Then add personal and Payment details and click on the START MY FREE TRIAL. After this, we are ready to use the MAP API key in the app.
Setting Up Firebase for Eatance Pharmacy Android Application
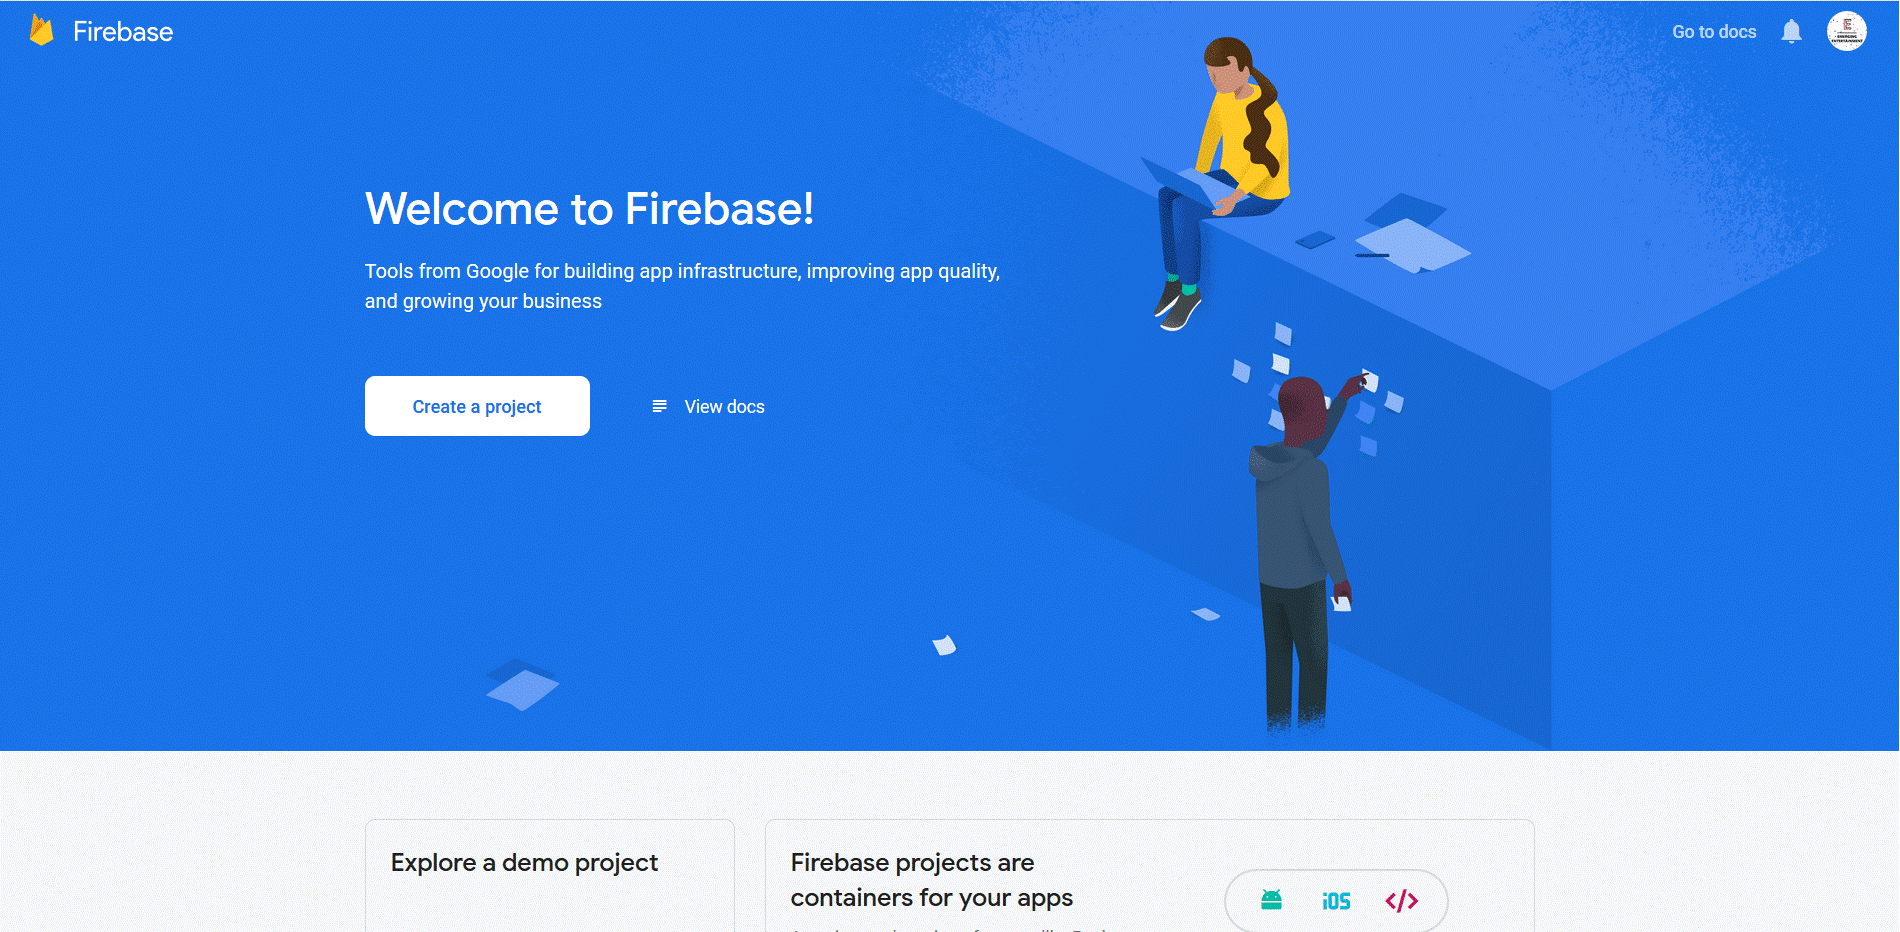
You need to visit the Firebase website first of all through this link. After visiting the page, you will be required to Login into the firebase through your Google account, and you will land on the below Dashboard.
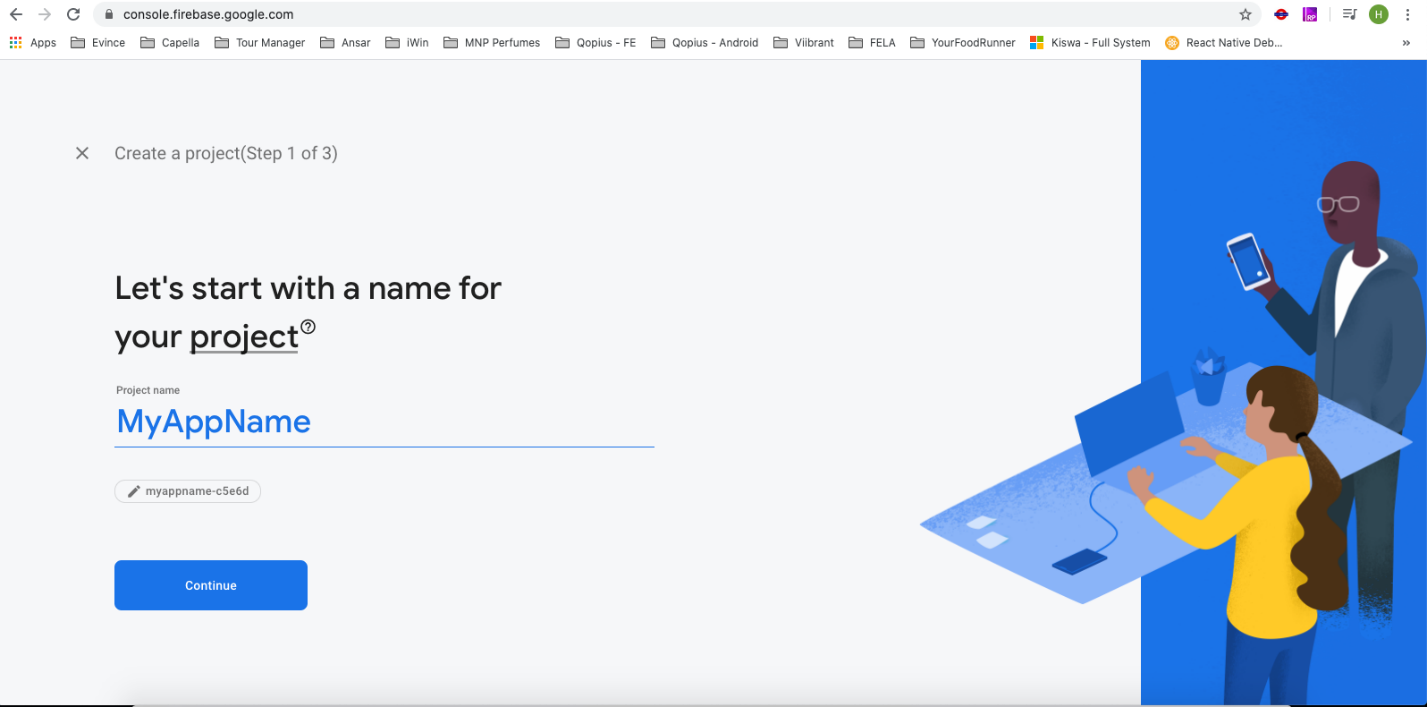
As shown in the above figure, click on Create Project button, and you will be asked to accept the agreement for continuing and Click on Continue on Step 3.
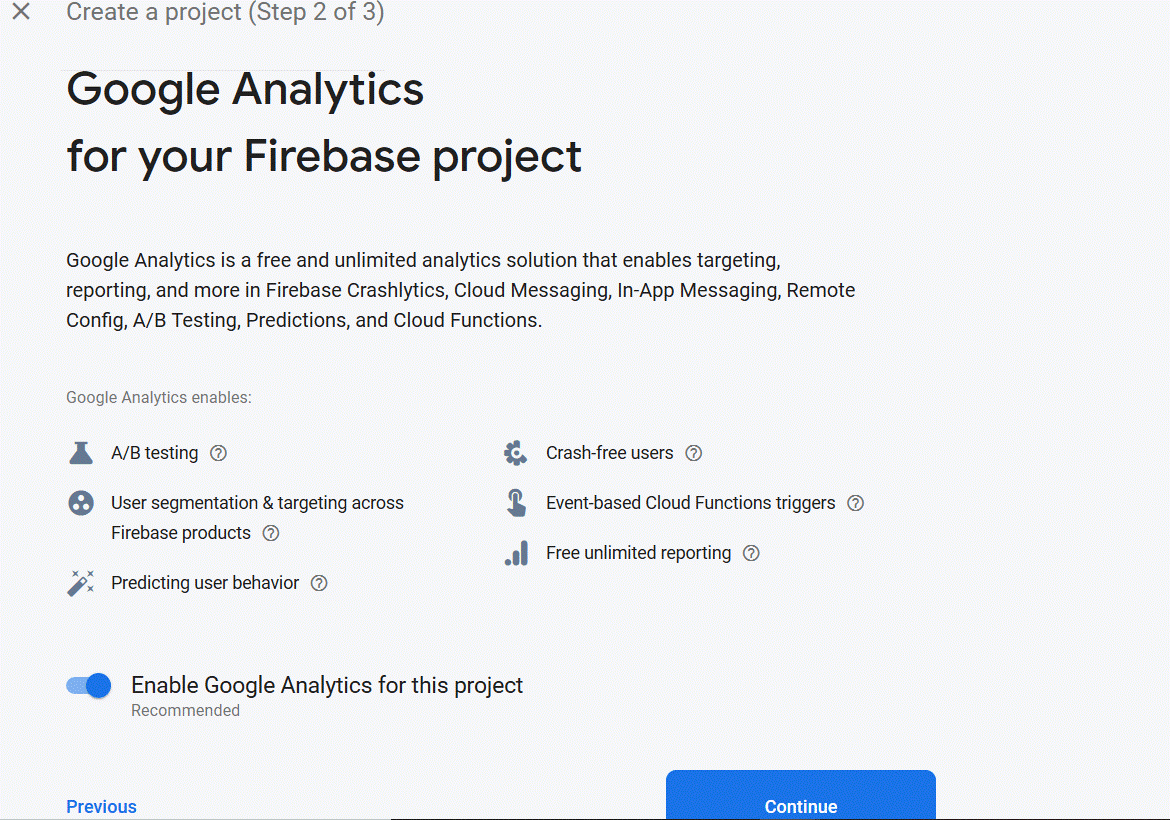
Further, you will be asked to select the analytics option, accept the terms and conditions and click on Create Project as a final step for creating the Firebase project.
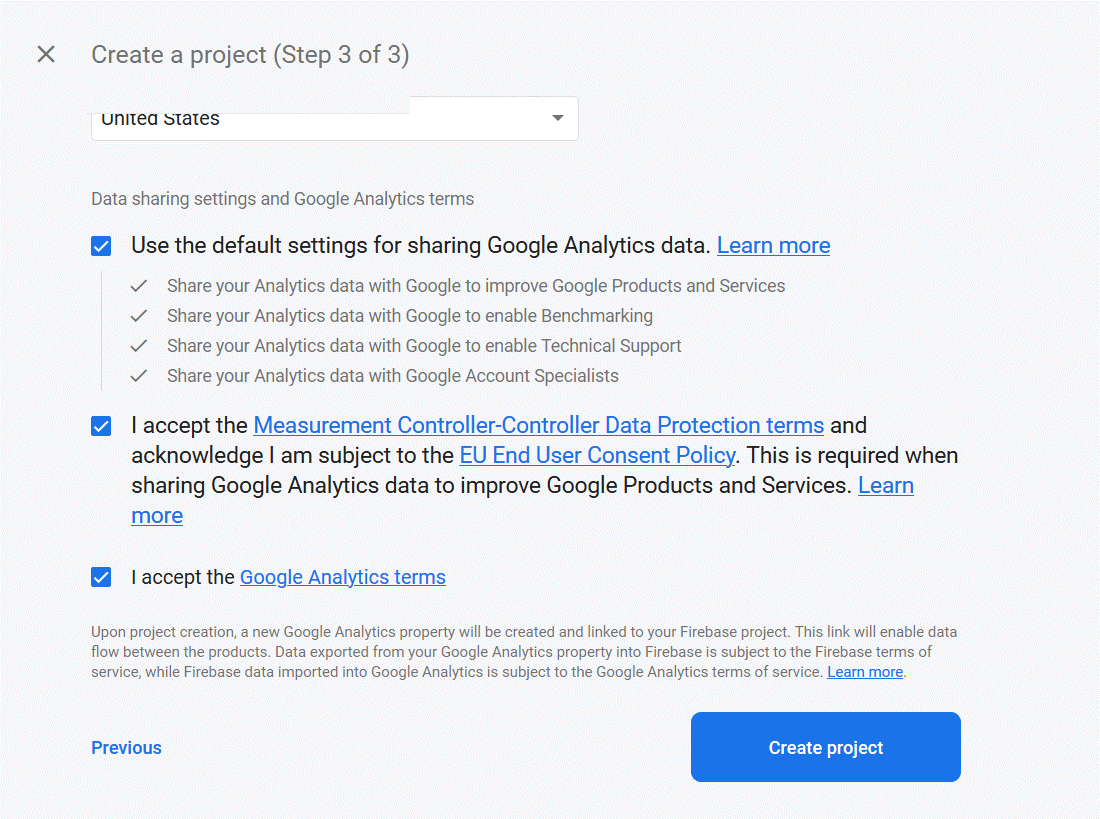
The following splash screen shows the project’s name and the message that the project is ready.
After clicking on Continue, you will be redirected to the Project dashboard, as shown in the figure below.

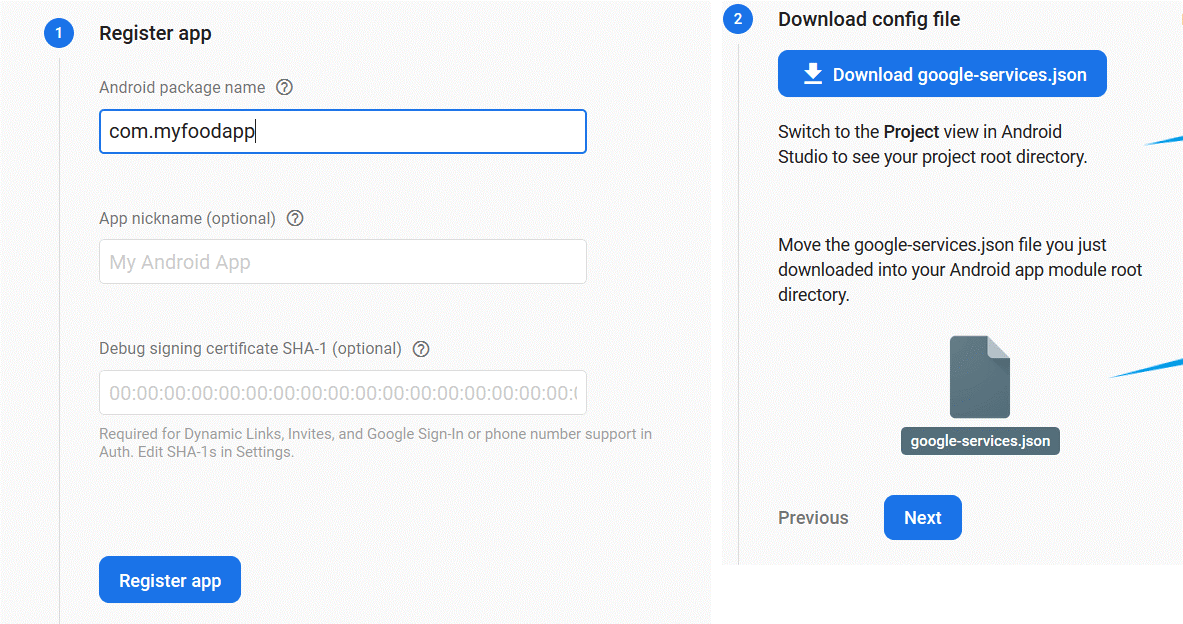
The first step after the project is to register your android application, which is the Eatance Pharmacy application in our case. Along with the package name, you can keep a nickname for the application as well. Once filling up the registration form, click on the Download google-services.json button to download the configuration file and then click on the Next Button on the page’s bottom right.
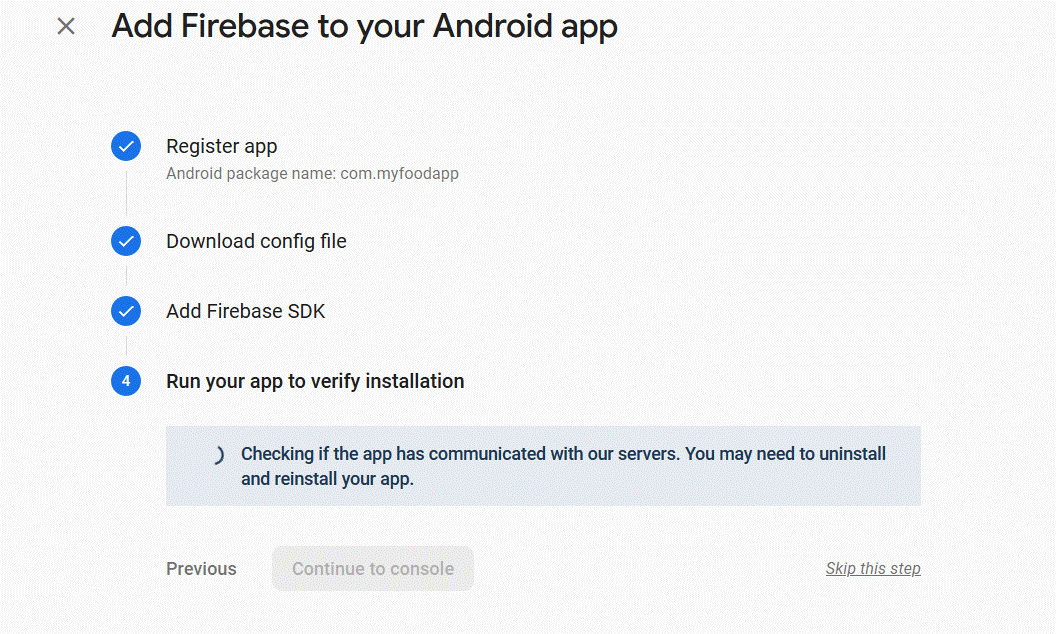
The next step will be to check all the requirements, and you can skip this step by clicking on Skip this step as shown in the below figure.
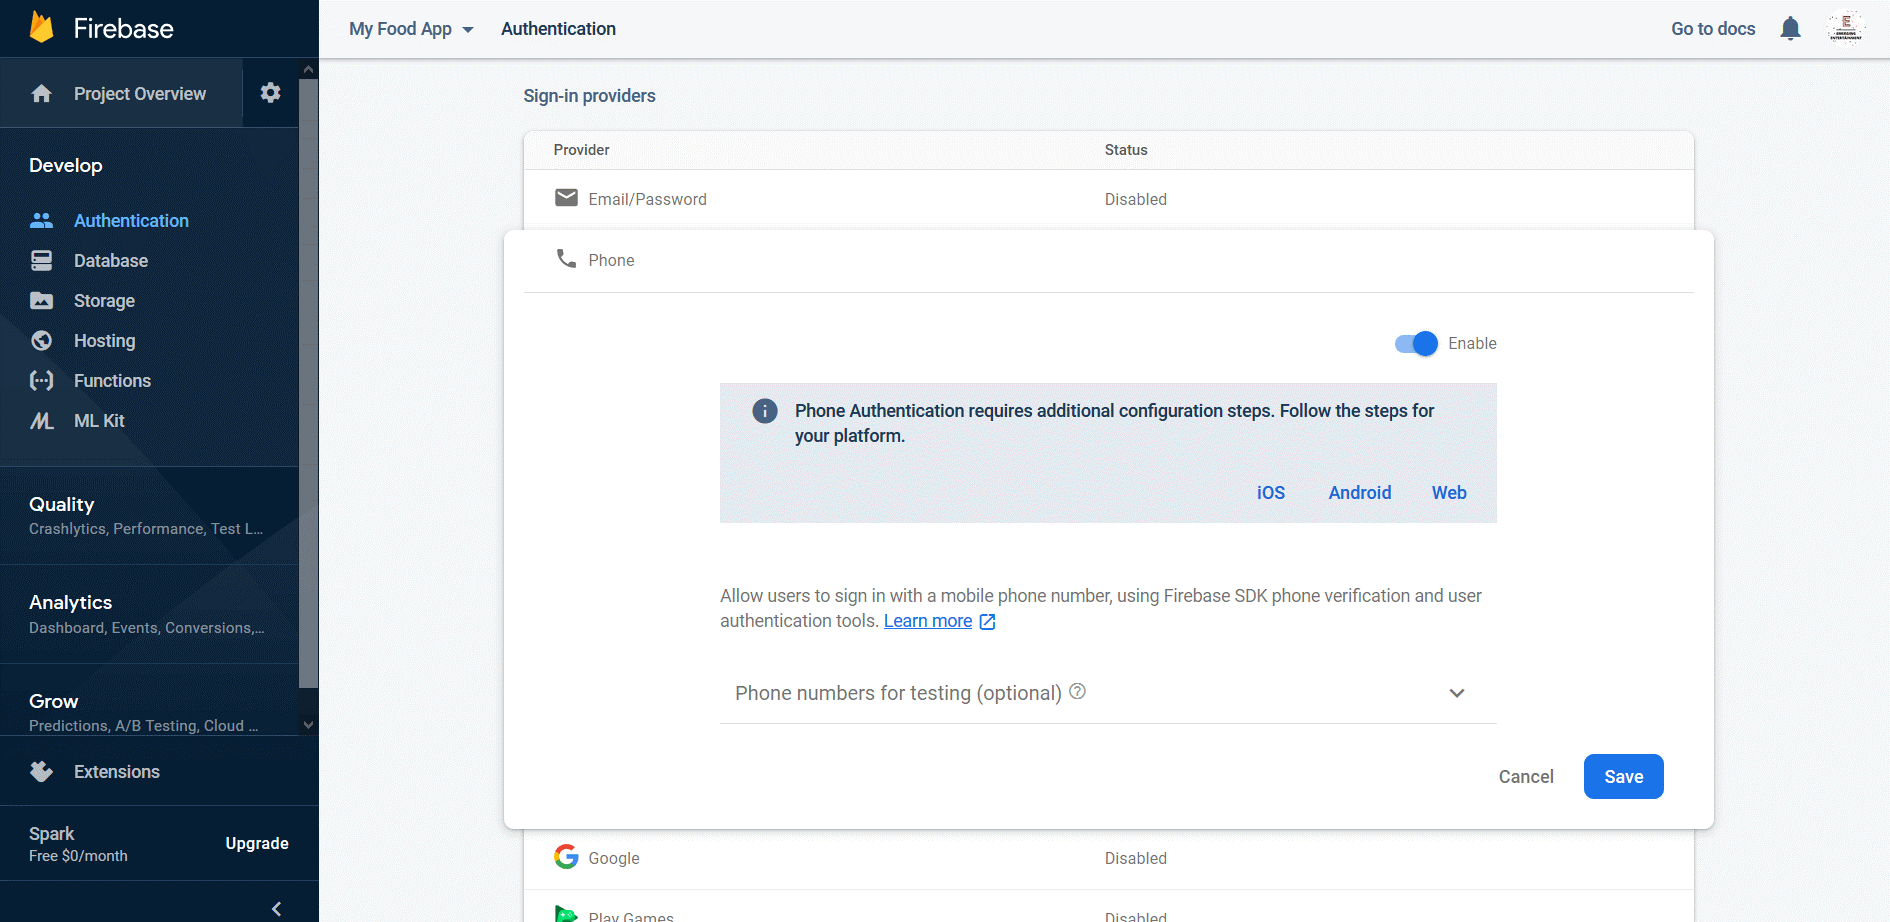
Now we must set up an authentication method to access the firebase for our Eatance Pharmacy App. For this, after clicking on Skip this step button, you will be redirected to the Project Dashboard. On the Dashboard, there is an Authentication option and under it, enable the Phone authentication option.
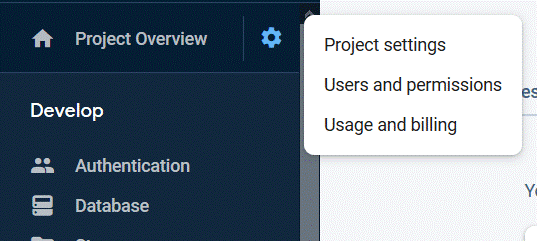
The next step involves configuring the back-end notification; click on the Settings icon beside Project overview on the top left corner and then click on the Project Settings option.
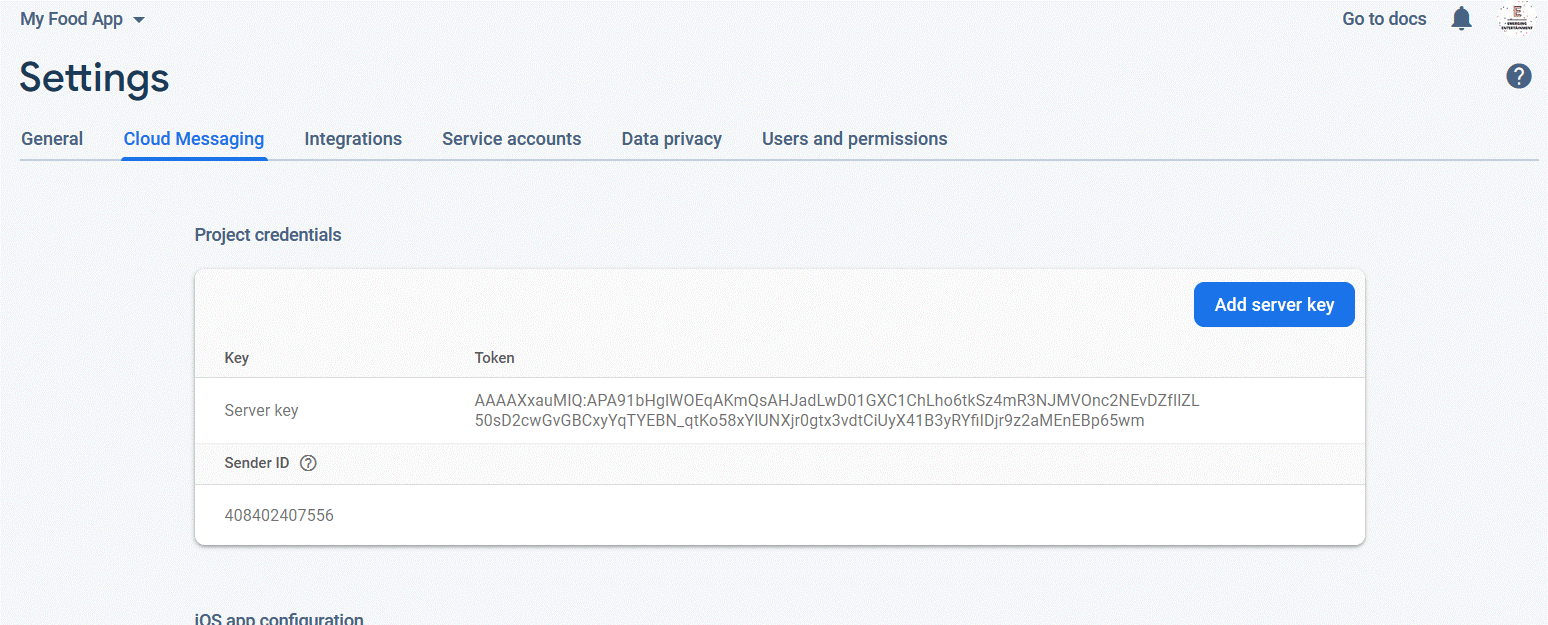
Under Project Settings, visit on Cloud Messaging option and note the server key required for setting up in the back-end for notification.
Now let’s set the google-services.json file we had just downloaded a while ago.
Go to Eatance\android\app and replace the old google-services.json file with the newly downloaded one.
Creating a signed application for play store release
As you have developed and completed the Eatance Pharmacy Application configuration, this section will help you set up a Google Plays store account and a step-by-step guide to uploading the mobile application. Get ready! It’s ready to be launched.
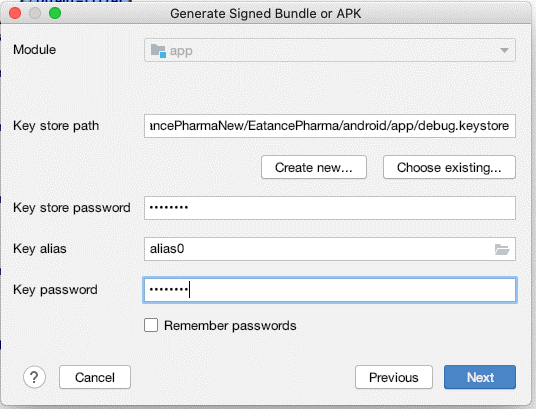
First, open Android Studio and click on the Build option available in the toolbar
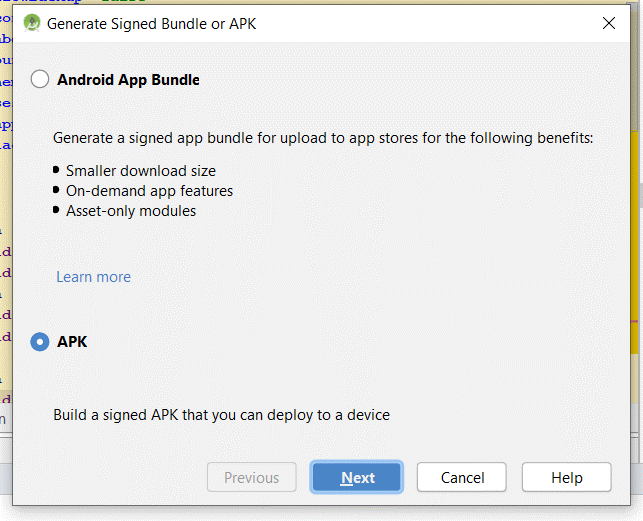
As shown in the above figure, click on the Next button, and you will see a dialog box as below.
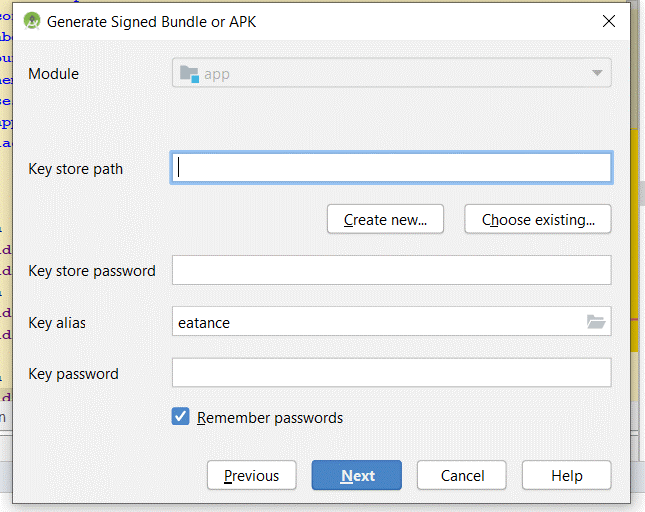
Enter the Key Store path and Click on Create New button, and the below dialog box will be opened.
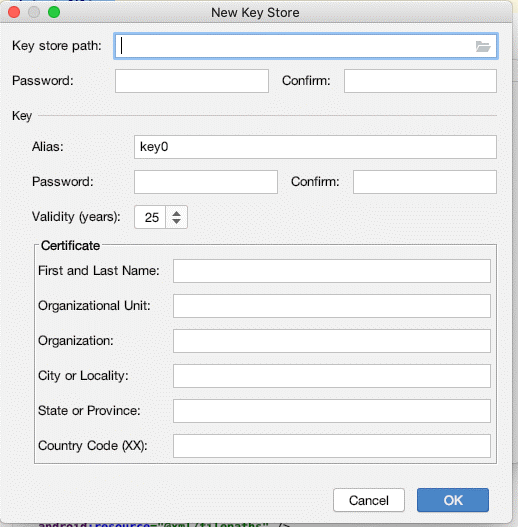
Fill out the required details and click on OK. Remember that once a Keystore file is created and the application is uploaded to Play Store, then you will always need this .jks file to upload a new version of the same app in the future. So please save it safely with you
Select the newly created Keystore, add alias, password, and click Next.
On Clicking Next, you will see the below screen, select the release option, and then click on the Finish option to finish the play store’s Pharmacy app’s release.
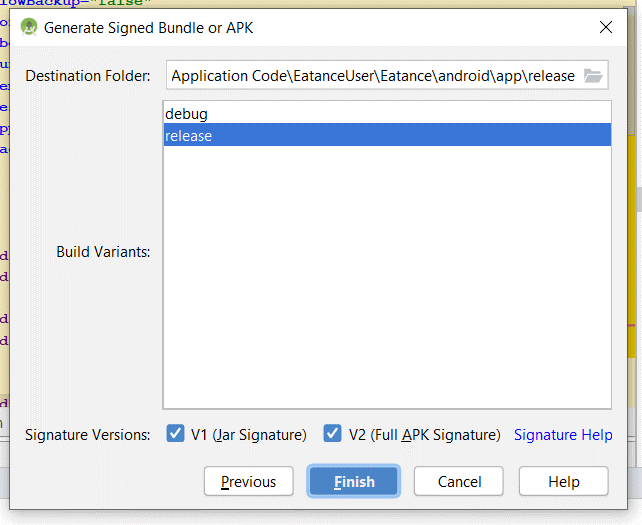
On successfully finishing the process, an APK will be generated in the following folder EatancePharmacy
\android\app\release as apk-release.apk
iOS Configuration
Setting up React Native
The following steps are written considering an assumption that you are operating on a Mac OS system.
As our project is based on react native, we need to set up react-native to run the project.
To ensure an easy run of the project, you are advised to install the following software’s on your pc.
- Visual studio code
- Node JS 12.x.x or higher
Download visual studio code from the following URL
https://code.visualstudio.com/download
You can download Node JS from the following URL; After completing the installation, we are ready to set up the project in Visual Studio
https://nodejs.org/en/download/
For installing React Native on your Mac, please follow the guidelines from the React Native Environment Section. There are 2 options for the setup:
- React Native CLI Quickstart – Consider this for setup purposes.
- Expo CLI Quickstart
CocoaPods Setup
CocoaPods is a compiling environment required for iOS apps, and that’s why it’s required to be present on your system.
We will consider Mac OS Catalina 10.15.3 for this guide.
CocoaPods managed library dependencies for the XCode projects.
As CocoaPods is built on Ruby and Mac OS already provided the default version of Ruby, hence it is suggestable to continue with the default version unless you are familiar with the complexities in installing the latest version.
Using the default Ruby install will require you to use sudo when installing gems. (This is only an issue for the duration of the gem installation, though.)
Open Terminal application on your Mac and type the below command
- $ sudo gem install cocoapods
If you encounter any problems during installation, please visit https://guides.cocoapods.org/using/troubleshooting this guide.
Running Eatance Pharmacy application in iOS
Open the project in the visual studio code with the following project structure.
Install the third-party dependencies to run by running the following command in the below terminal.
- npm install
Since our project has React Native v0.62.1, we do not need to link the libraries manually. As of React Native 0.60, all libraries get auto-linked at the time of their installation. For linking in iOS, navigate to the iOS folder and install pods using the below commands:
- cd ios
- pod install
To link the assets and fonts, run the below command:
- react-native link
To run the application on the iOS simulator, execute the below command:
- react-native run-ios
If you cannot run the app for the first time, then execute the react-native run-ios command again and check as sometimes the Metro Bundler does not get activated on the first run. If that does not help, you can contact our Support Team, and they will guide you further from this point.
Once we successfully run on a simulator device, you will like to change the bundle identifier according to your requirement.
To perform this, you need to finalize a package name, let in our case it be com.myappname
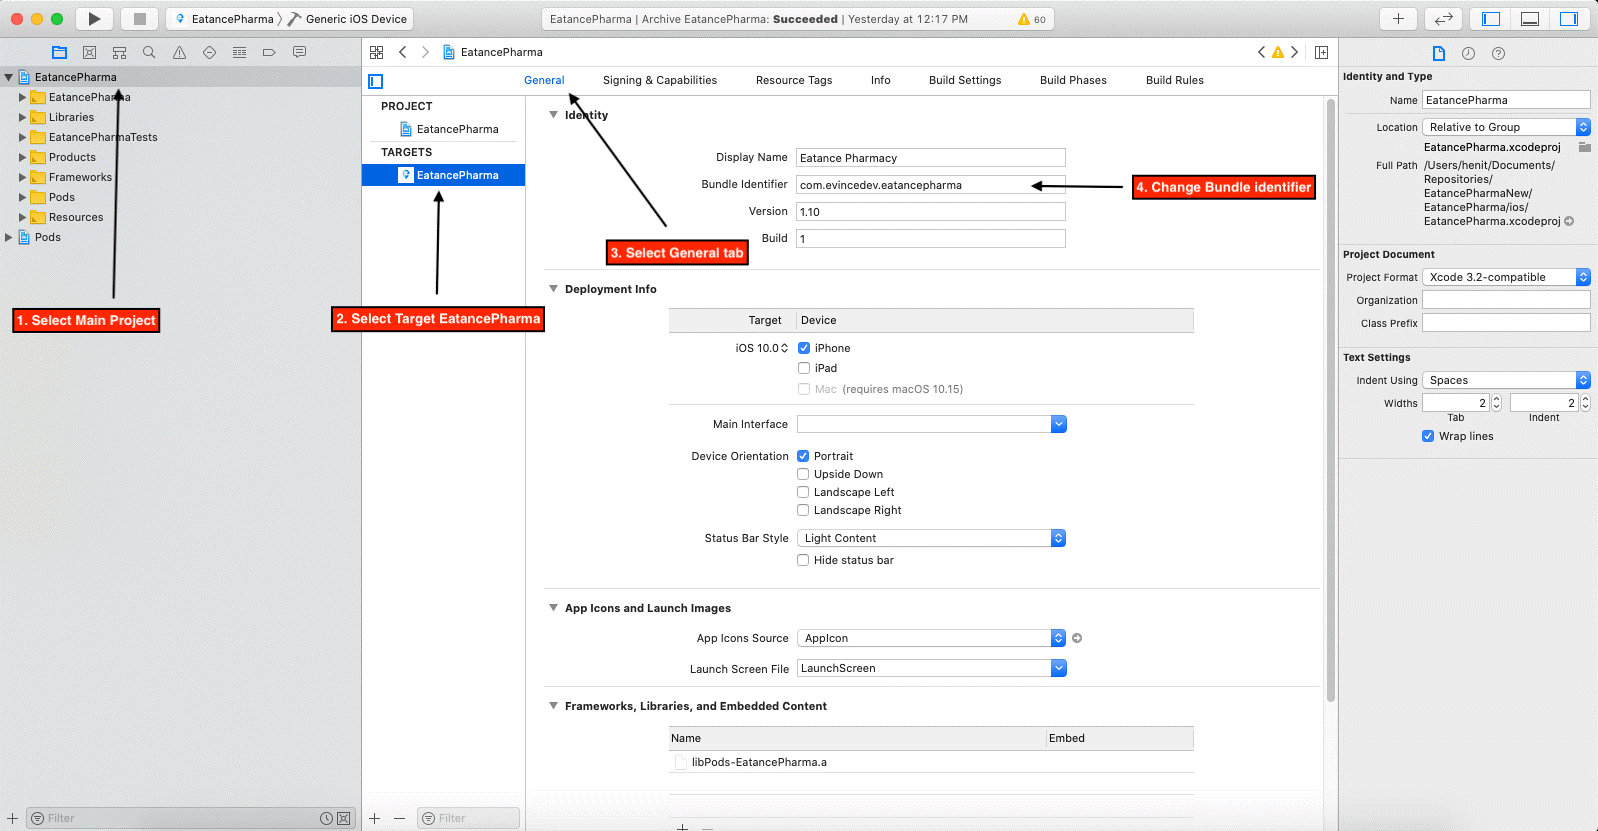
Open EatancePharmacy.xcworkspace file by double-clicking it.
Follow the steps as shown in the screenshot below and change the bundle identifier to com.myappname:
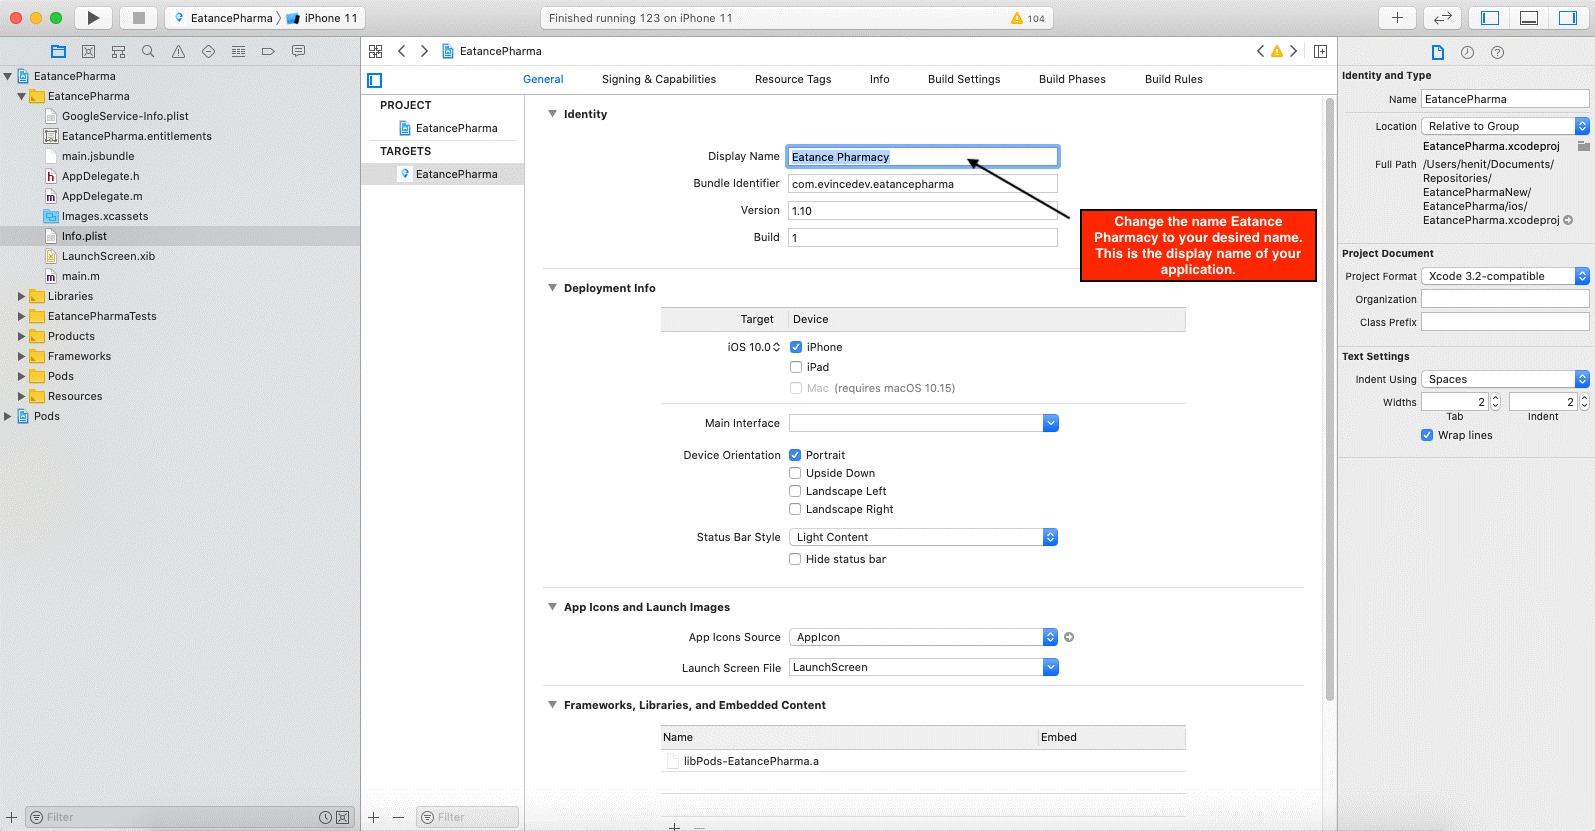
To change the application name, perform the steps shown below:
To change the app icon, replace the icons in the folder shown below with the same names:
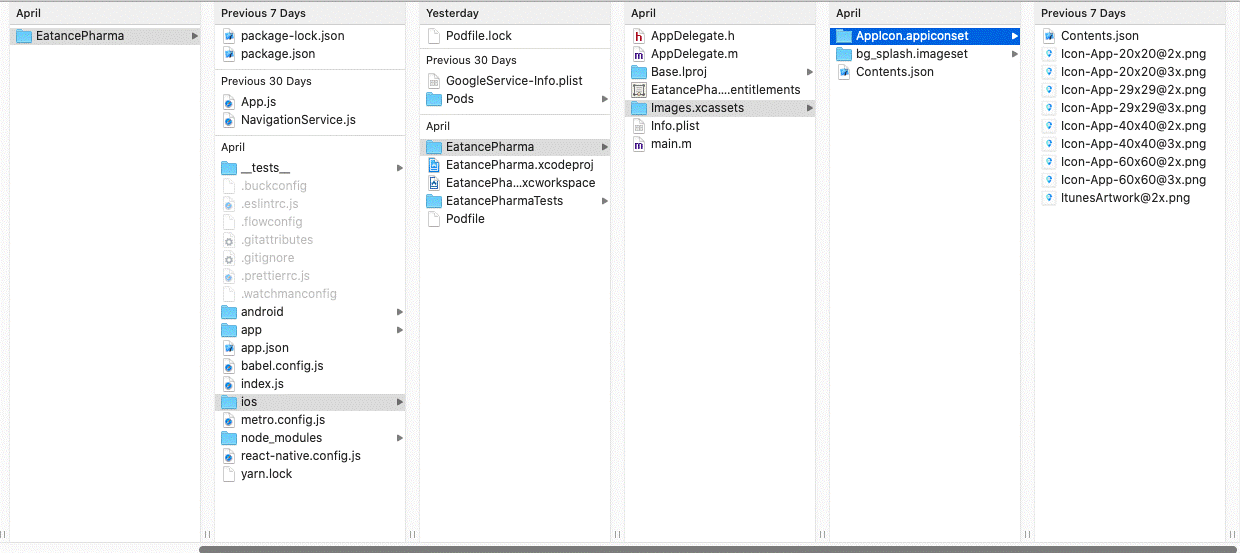
The name of the images should represent the image resolution itself.
- Icon-App-20×20@2x means that it’s a 2x resolution of 20 pixels. This means that the image should be of 40×40 dimensions.
- Icon-App-20×20@3x means that it’s 3x resolution of 20 pixels. This means that the image should be of 60×60 dimensions.
- ItunesArtwork@2x should be of 1024×1024 dimension.
- All images must be in PNG format and must be with a solid background. The transparent background will not be supported, and Apple will not accept your application.
- All images must be flat, meaning that any of the images’ edges should not be rounded.
Create Bundle Identifier
Log in into Apple Developer Portal. The document is prepared considering that you have an Apple Account enrolled in Apple Developer Program.
On successful Login, you should see the webpage like below:
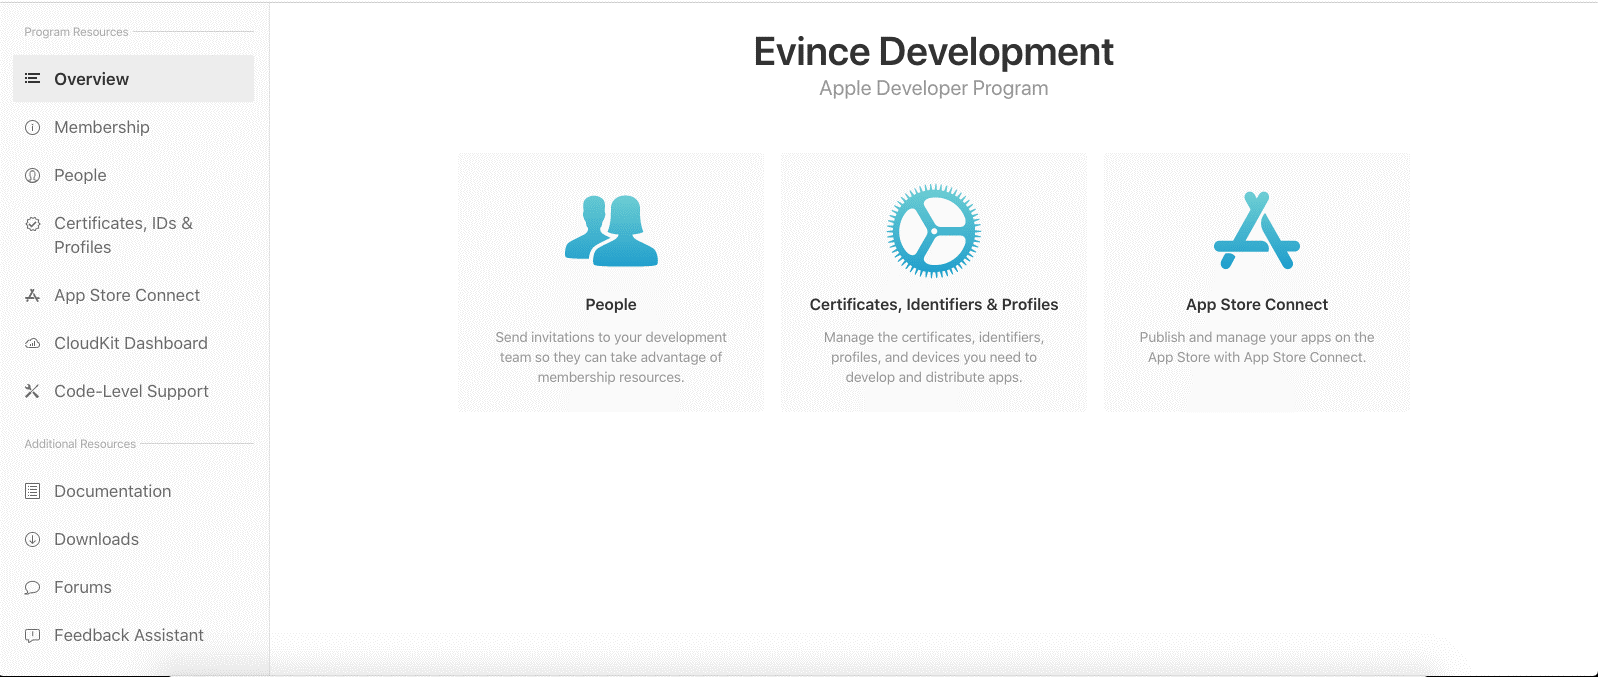
In case you do not see such options, then it means that your Apple account is not enrolled in Apple Developer Program. That account should be enrolled in Apple Developer Program, which means that you have a paid Apple Developer Account. More information regarding getting the Apple Developer Account and its Pricing can be accessed in the links.
In case you do not see such options, then it means that your Apple account is not enrolled in Apple Developer Program. Having said that account should be enrolled in Apple Developer Program, we mean that you have a paid Apple Developer Account. More information regarding getting the Apple Developer Account and its Pricing can be accessed in the embedded links.
Every iOS application has a unique identifier, which is termed a bundle identifier. To upload the application to App Store, you need to create a unique bundle identifier. The steps for creating a bundle identifier are as below:
- Click on Certificates, Identifiers & Profiles in the left menu pane, and select Identifiers from the left panel. You will see a + button to register a new identifier.

Next, you will be shown a list of all types of identifiers that can be registered inside an Apple Developer Program. We need to select App IDs from the list as shown in the screenshot below:
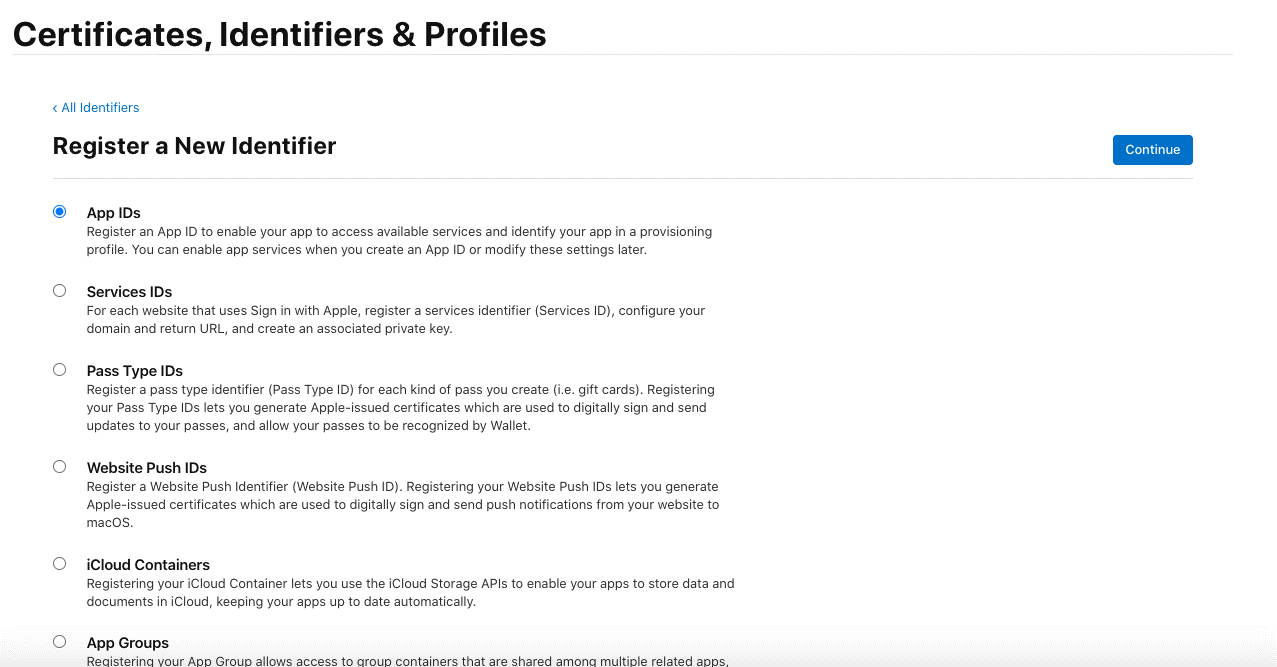
Click Continue, and then you will be asked to enter the description of the bundle identifier. The name of the application for the registered bundle identifier needs to be entered here. E.g., EatancePharmacy
Apart from that, there is another option to select the type of bundle identifier. There are 2 types of bundle identifier:
- Explicit (We are considering this type for the write-up)
- Wildcard (For more info on this, please refer to this link)
In the Bundle ID field, you can enter the bundle identifier that you want to keep. E.g., com.EatancePharmacy. Below is the screenshot attached for reference:
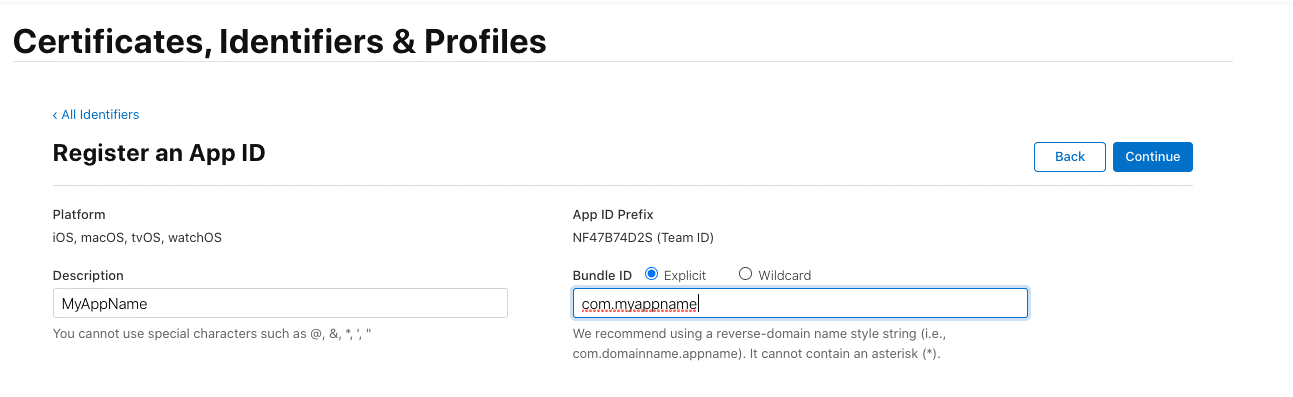
Below, there will be a section of Capabilities. Our application supports push notifications. So we need to select it from the list of Capabilities. You can select multiple capabilities as per your iOS app-supported features.
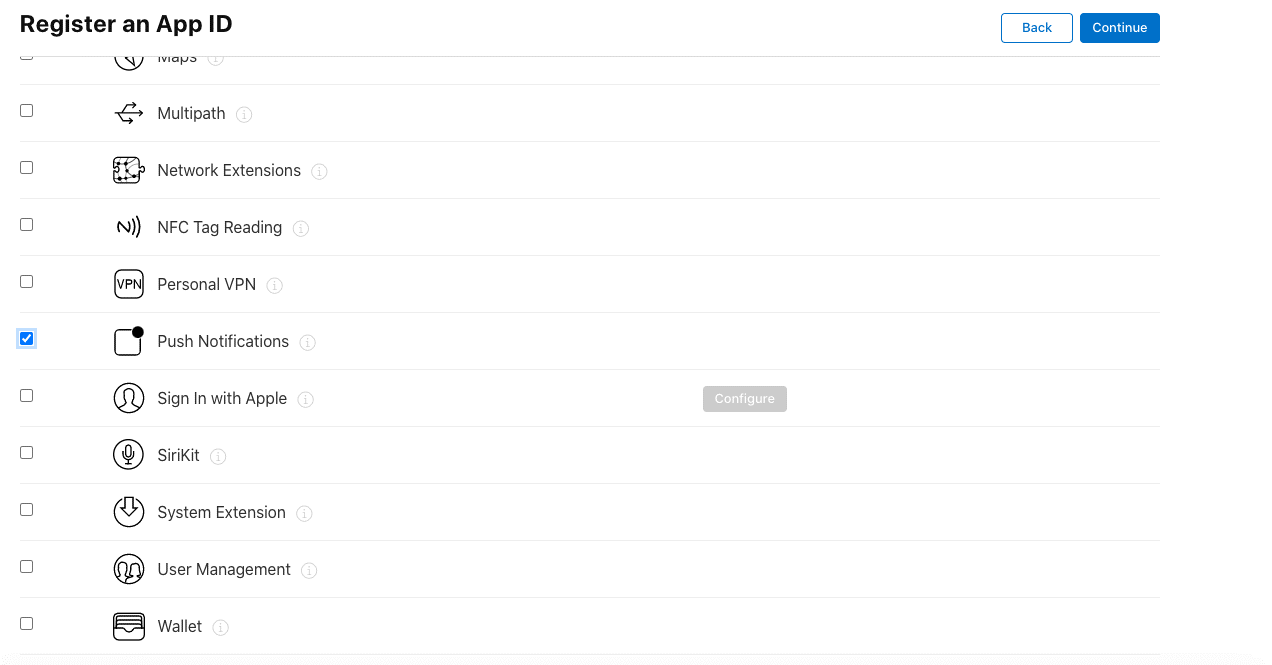
Click Continue and Done.
We have completed the setup of the Bundle Identifier. Next, we will generate Certificates.
Create Certificates
An iOS developer certificate is a code-signing certificate, a digital signature that associates you and your digital identity with your applications.
There are 2 types of certificates, mainly
- Developer Certificate
- Distribution Certificate (We are considering this type for our iOS application)
A Distribution Certificate identifies your organization within a distribution provisioning profile and allows you to submit your app to the store.
Click on Certificates, Identifiers & Profiles from the above screenshot shared web page, and select Certificates from the left panel. You will see a + button to generate a new certificate, as we did while configuring the bundle identifier.

The below screen will be opened after clicking the + icon, and you will need to select the iOS Distribution (App Store and AdHoc) radio button as shown in the below figure.
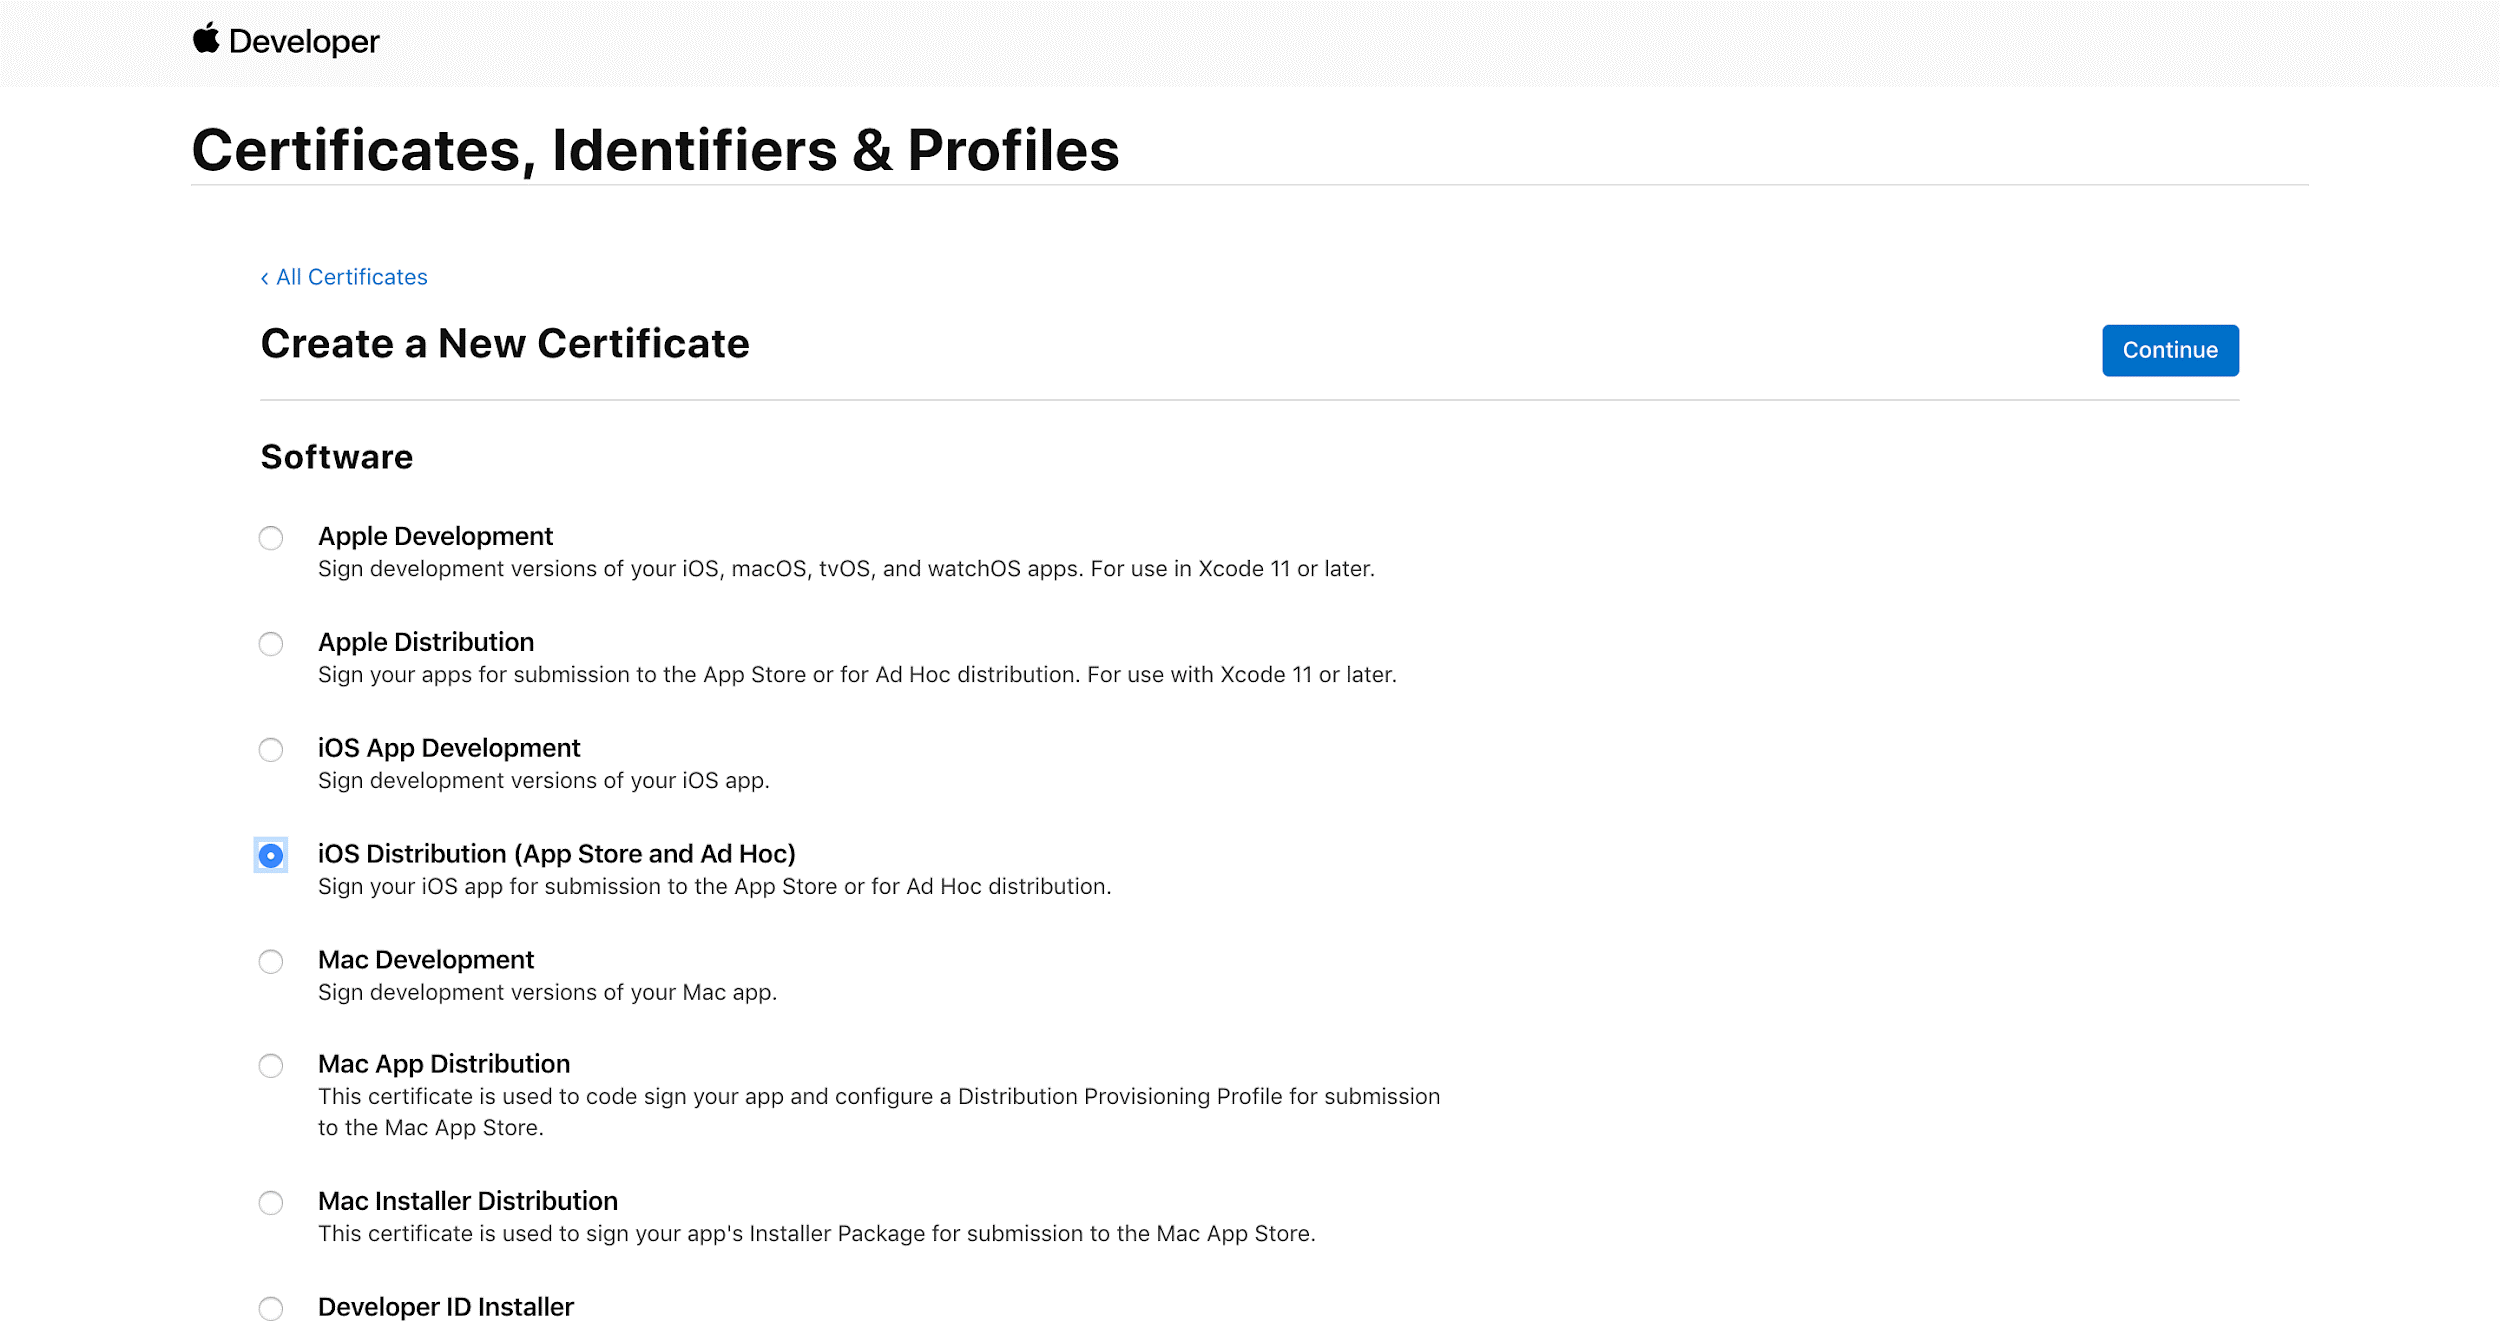
Upon Clicking Continue, Click ‘Choose File’ and select the CSR file if you have previously created it. The CSR stands for Certificate Signing Request. It digitally signs the certificate that you are going to create. Then click continue.
- If you do not have a CSR file, then you will need to generate that first. Follow this link to generate a CSR file

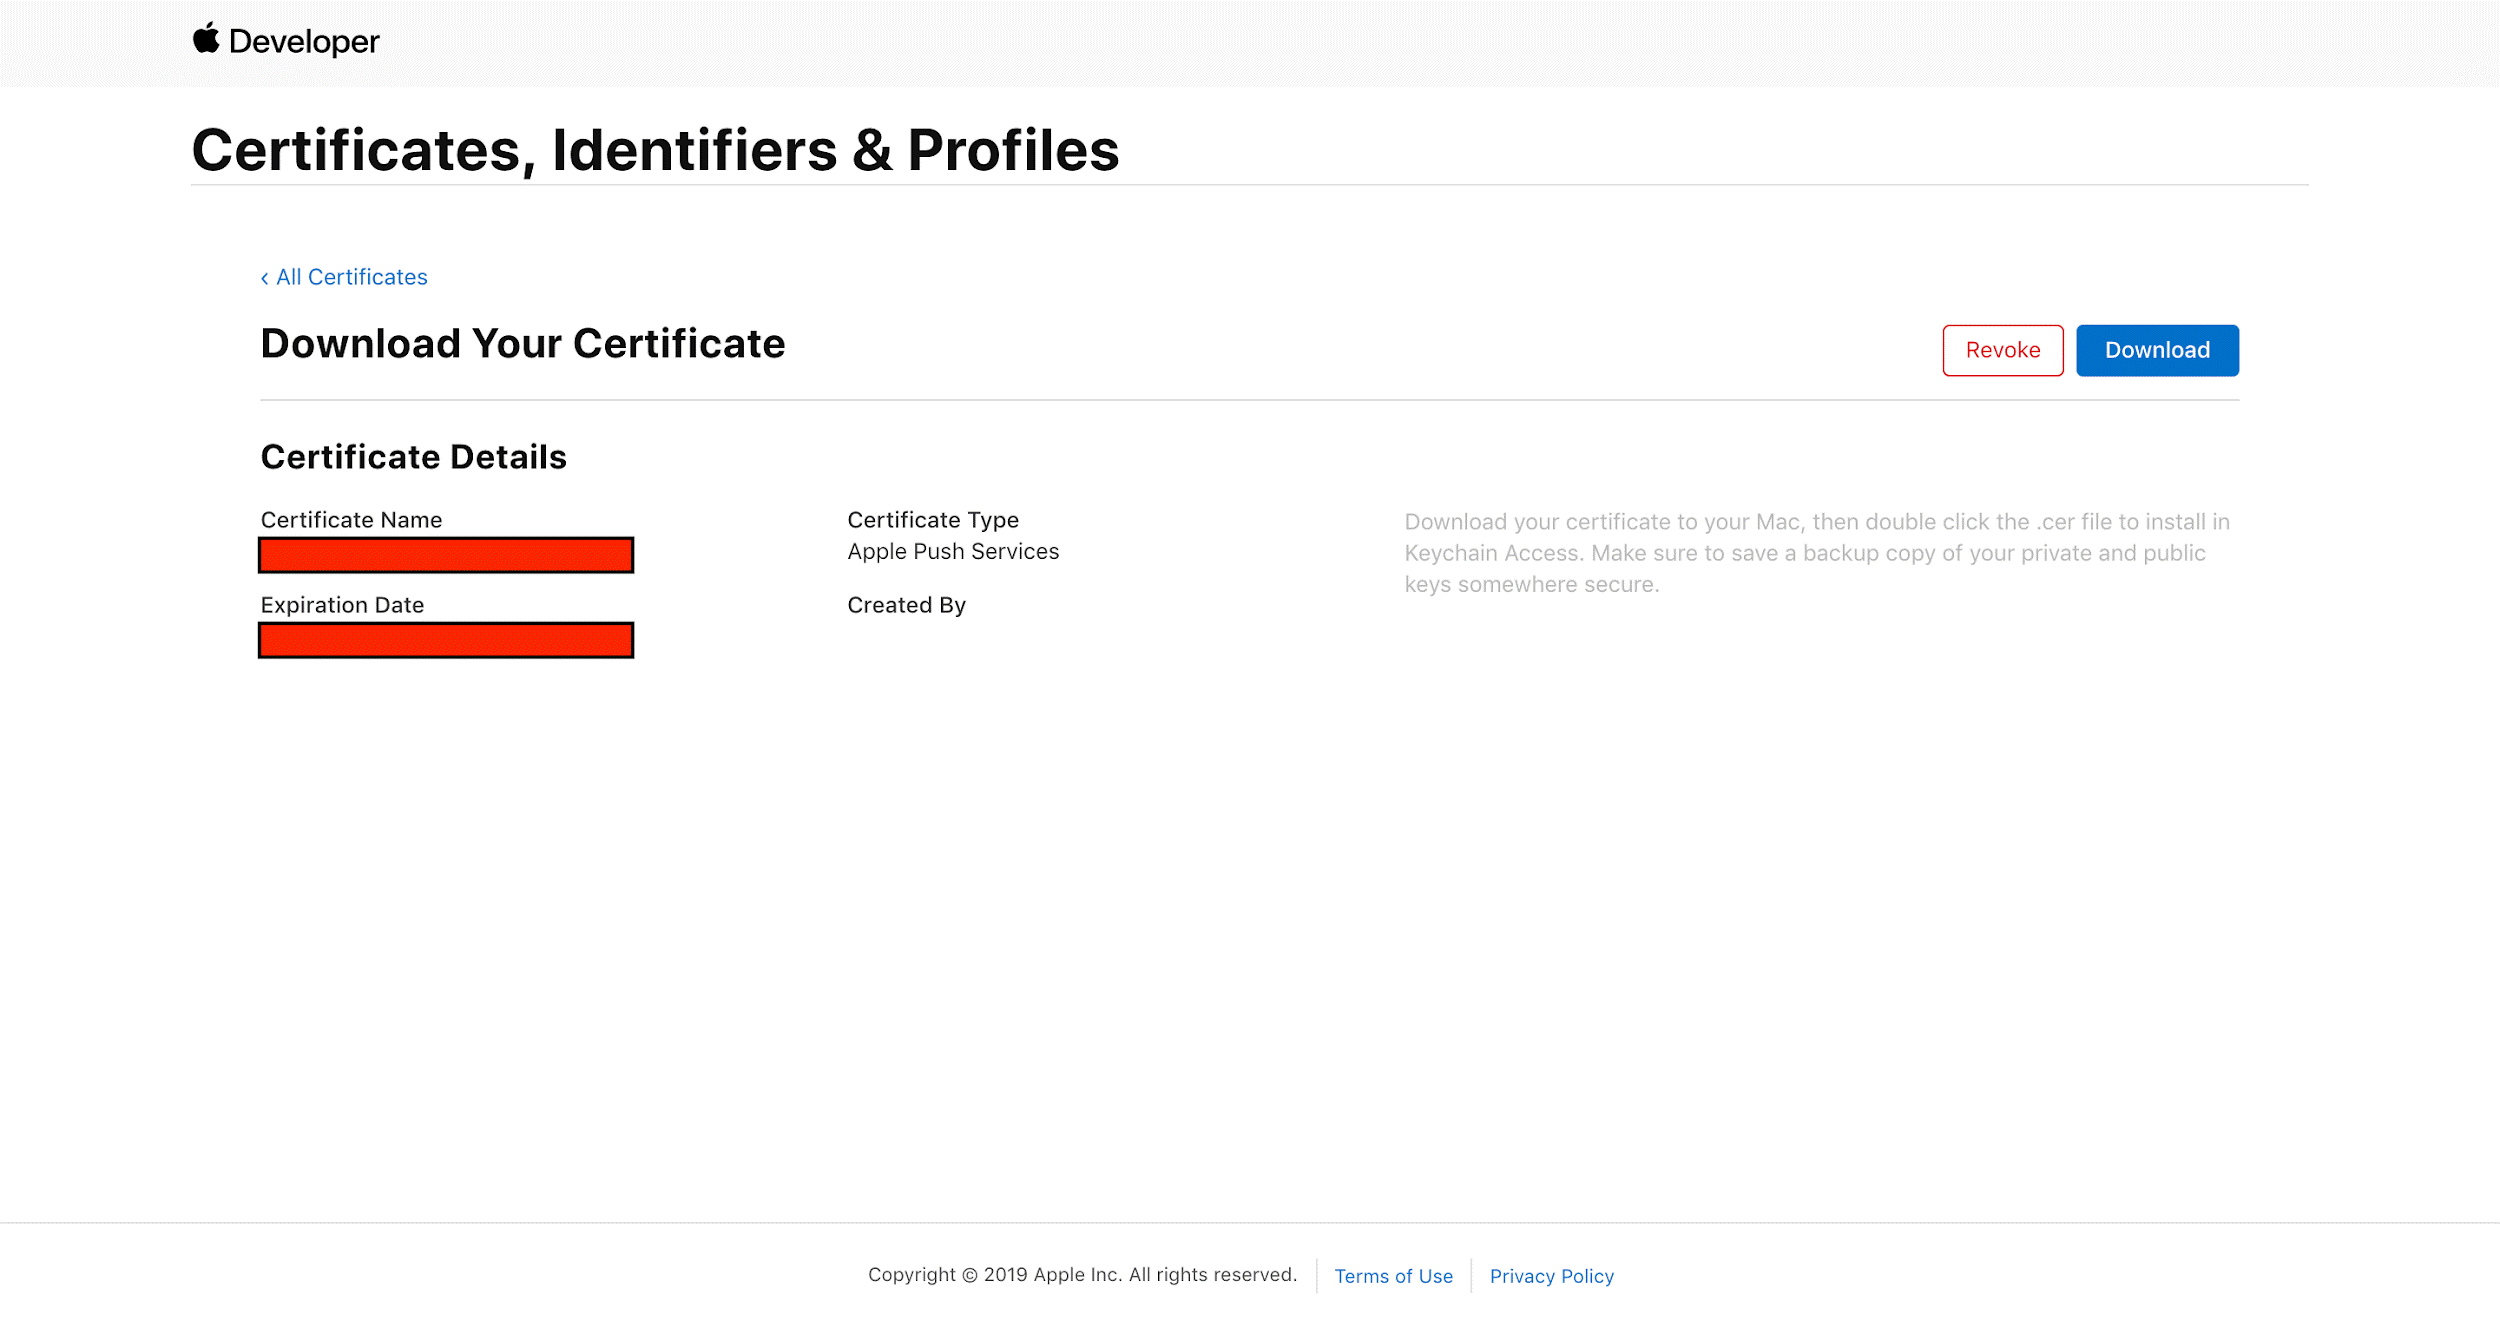
Your CSR will create a new certificate and Click the ‘Download’ button to download a .cer file, as shown in the below figure.
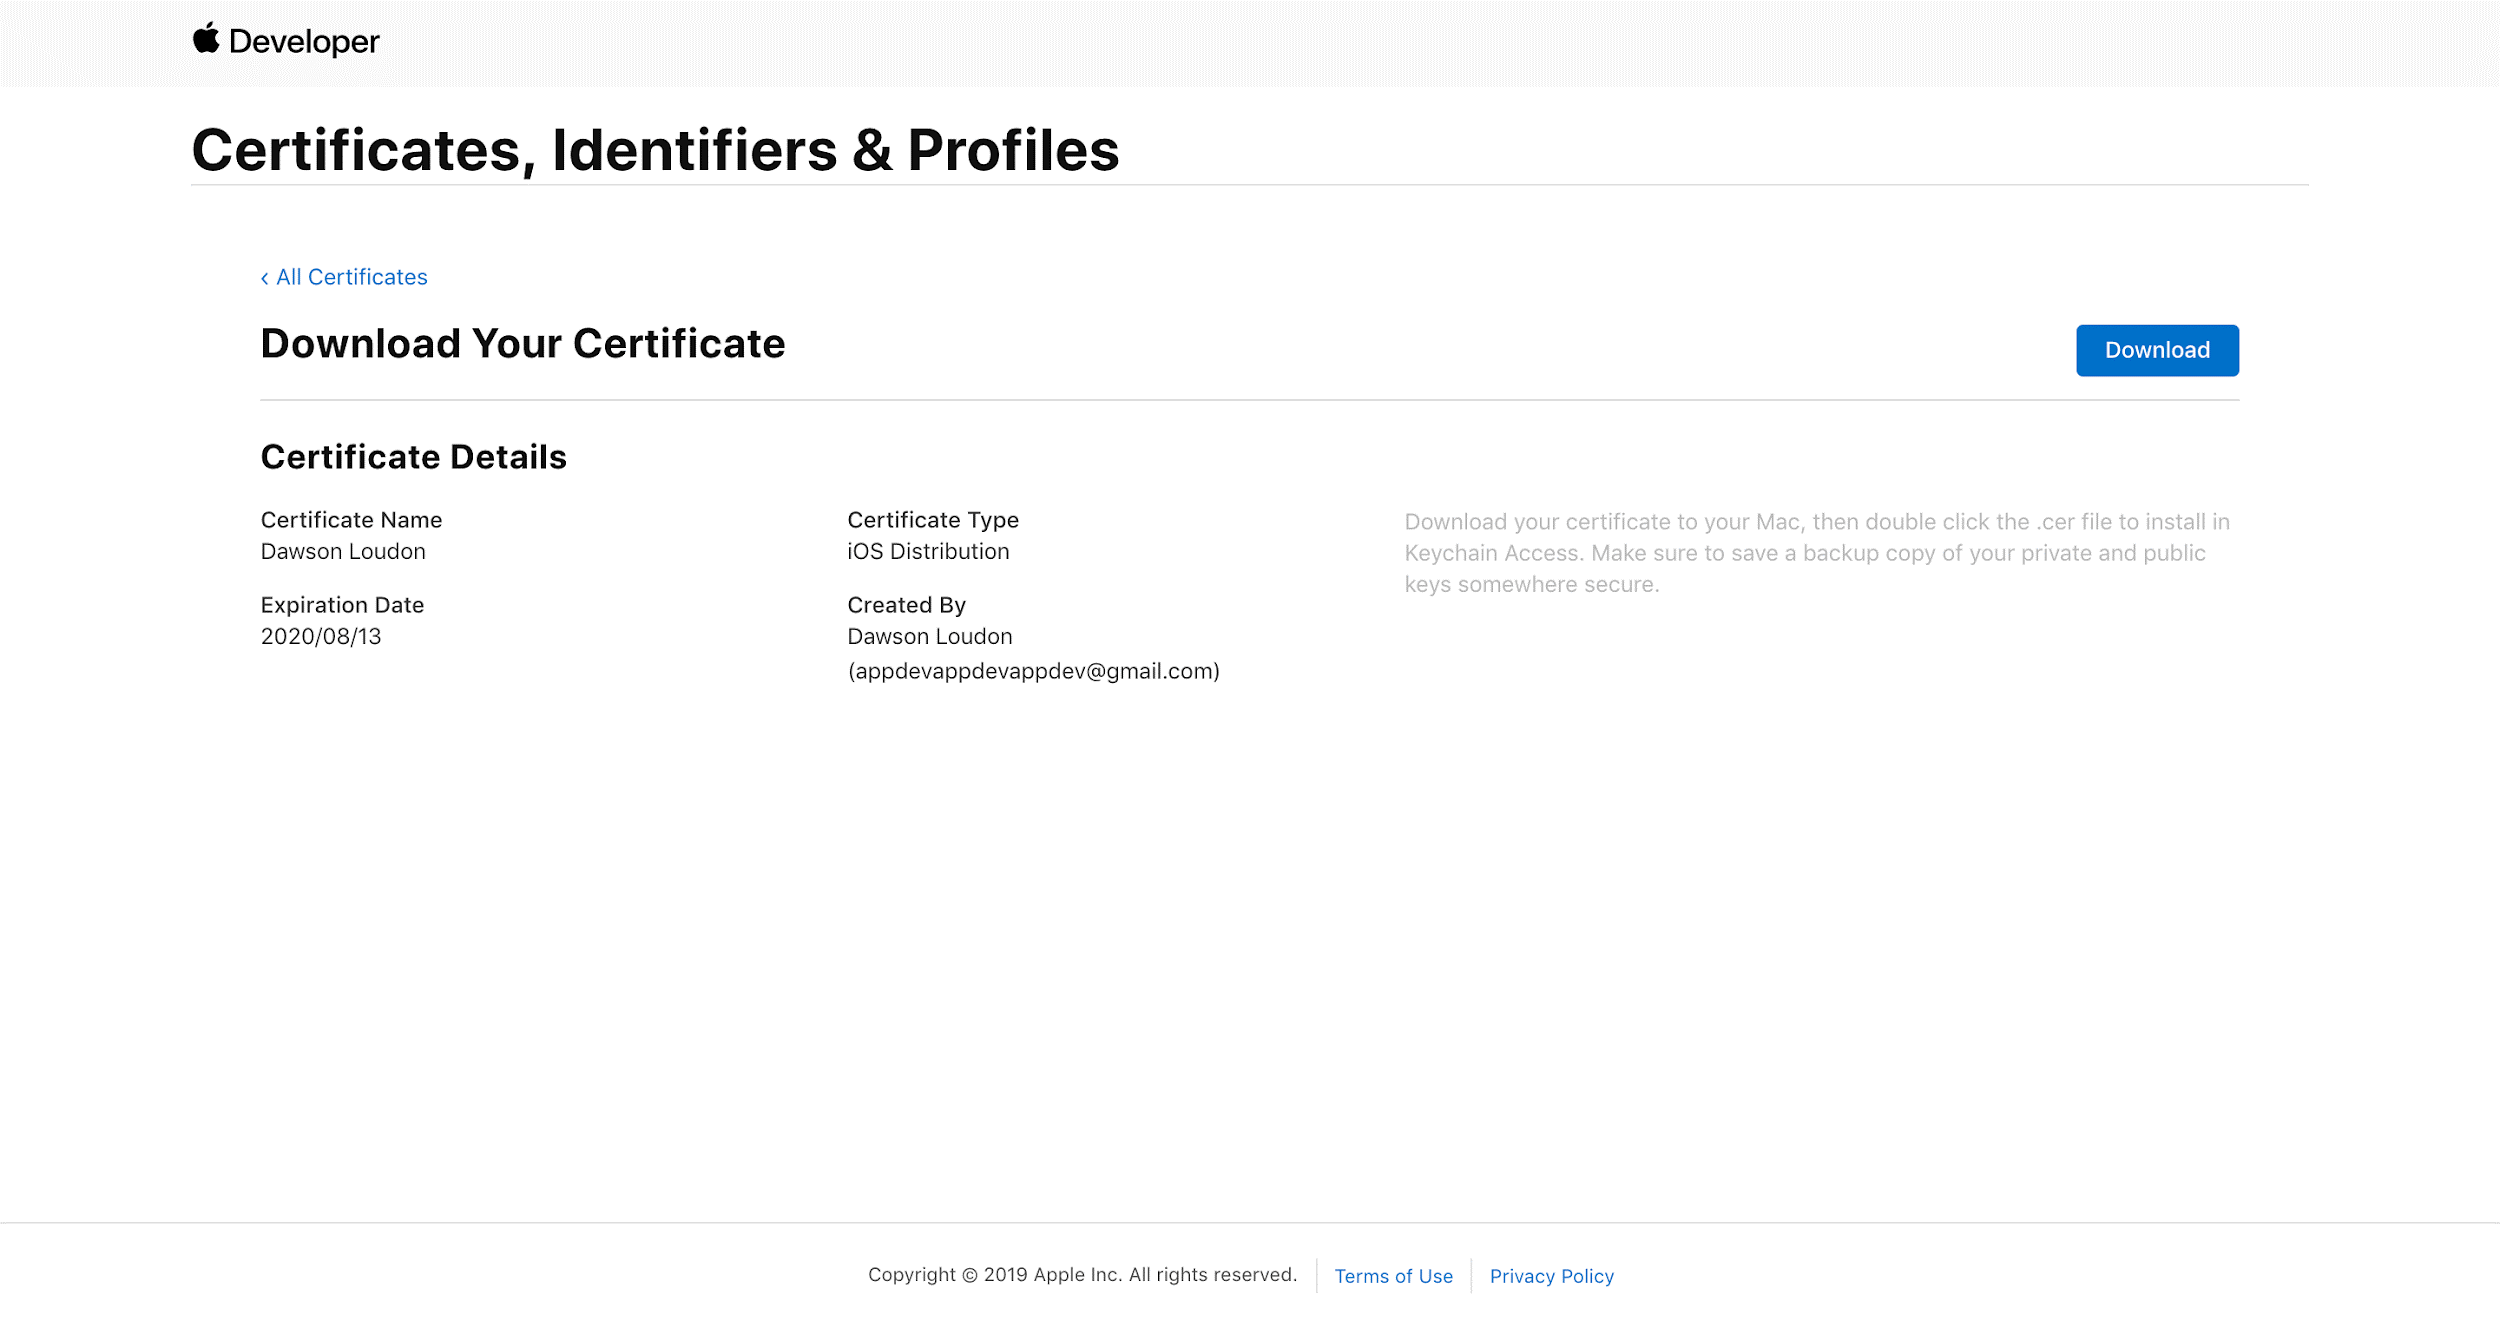
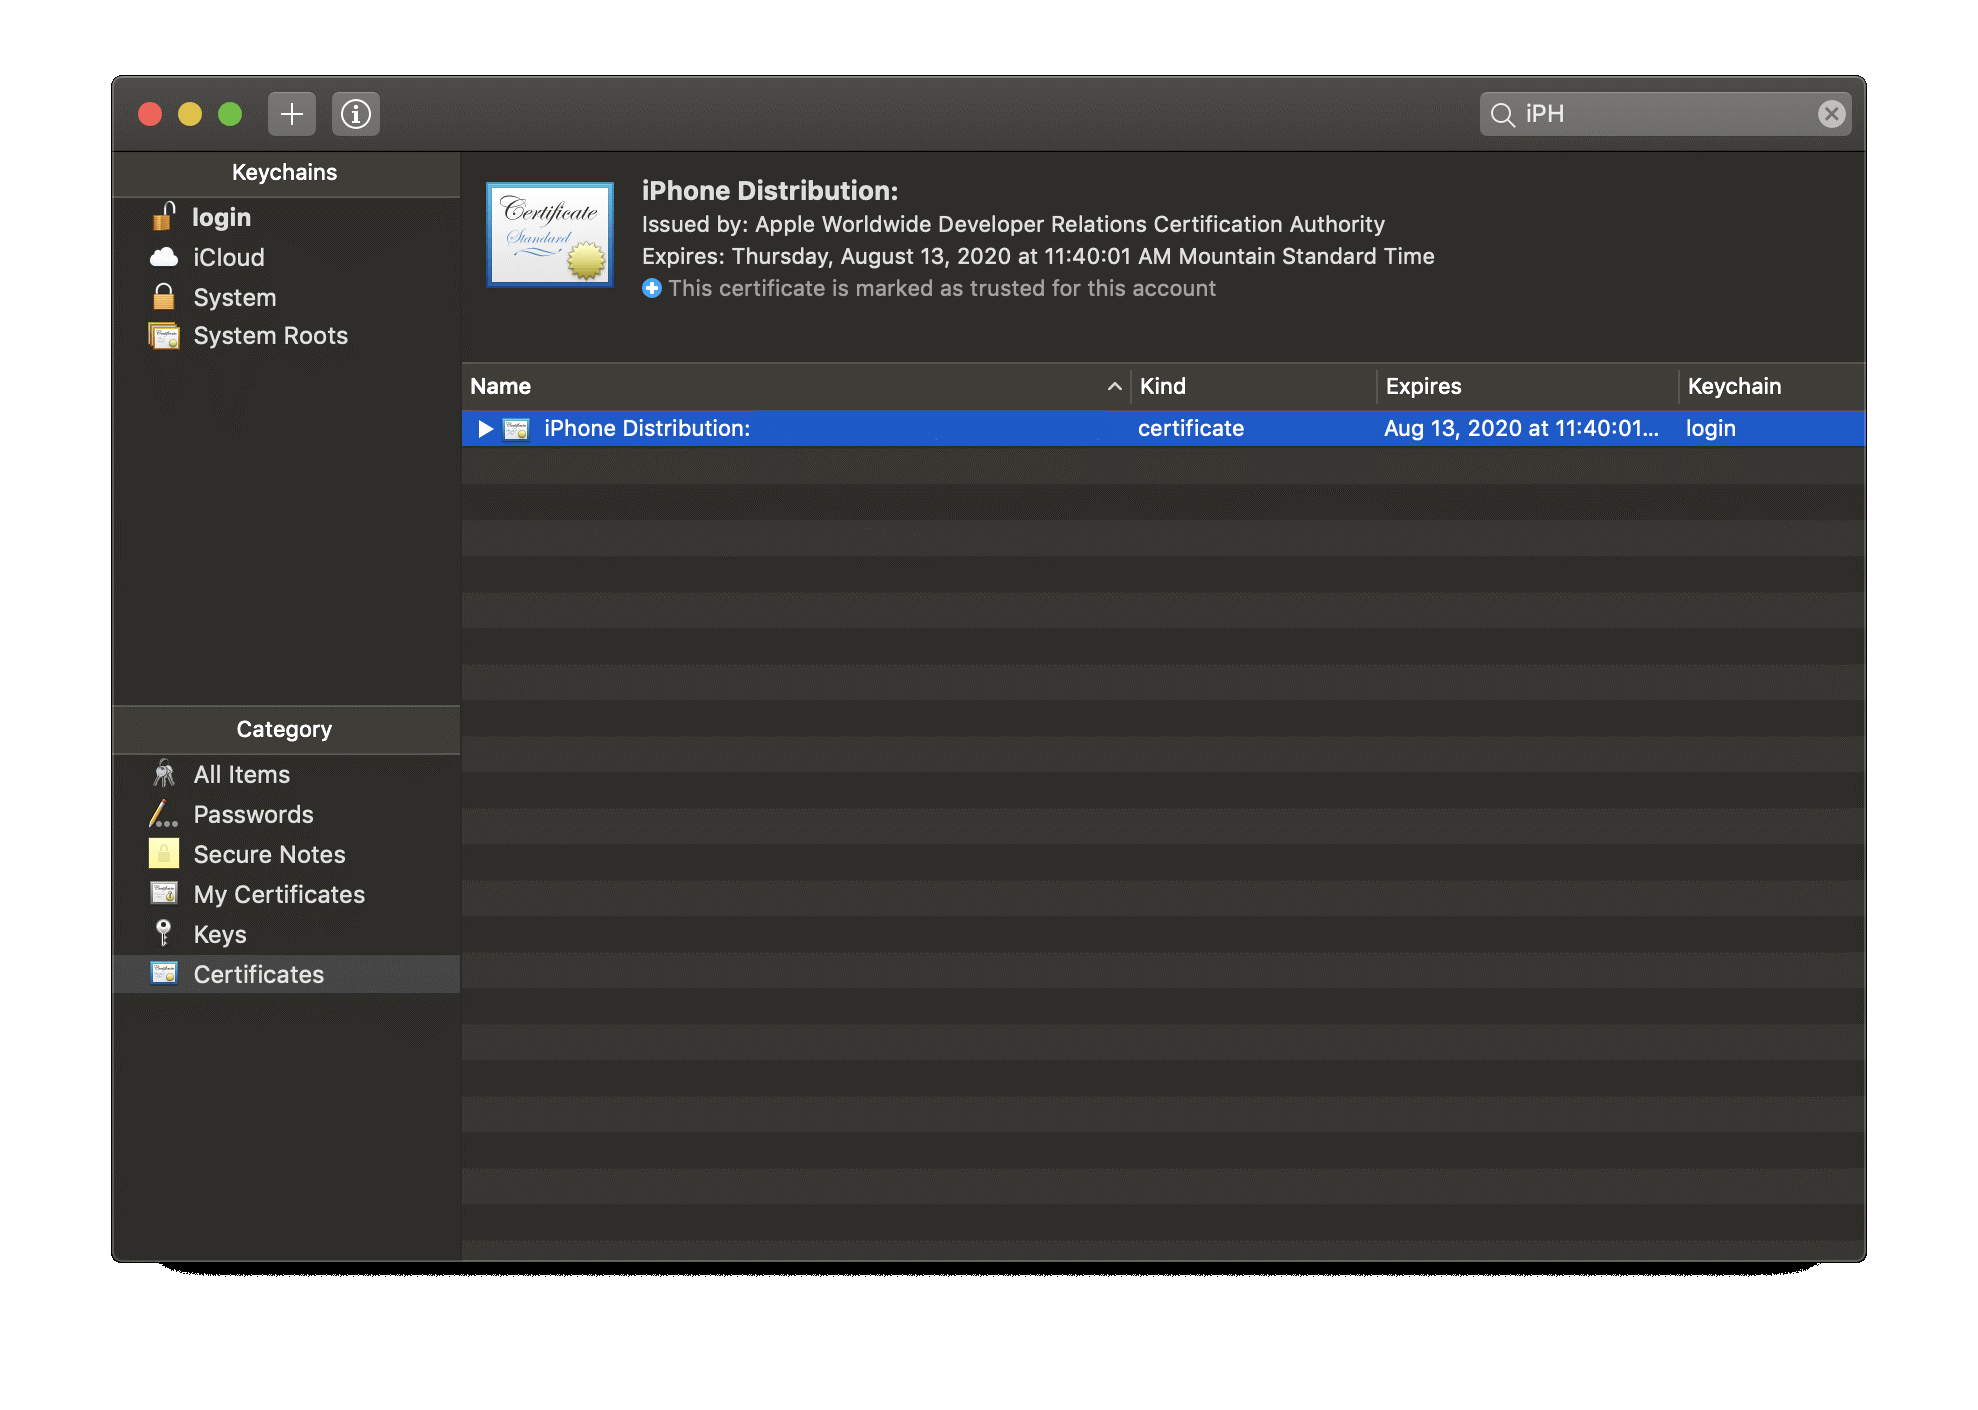
It would be best if you double click on the .cer file, and it will be installed in the Keychain access of your Mac Machine as shown in the below figure.
Note: Keychain access is a pre-installed application in your Mac, and it can be located through Finder.
Create Provisioning Profiles
A provisioning profile is a collection of digital entities that uniquely ties developers and devices to an authorized iPhone Development Team and enables a device to be used for testing.
Click on Certificates, Identifiers & Profiles from the above screenshot shared web page and select Profiles from the left panel. You will see a + button to generate a new profile.
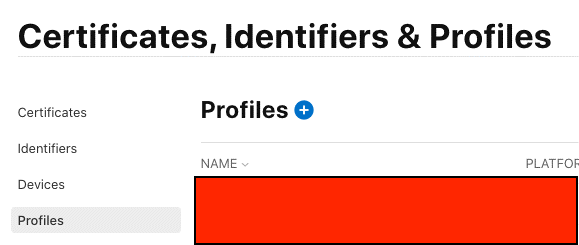
Please refer to the below figure for the following steps:
Select the radio button next to “App Store” underneath the Distribution heading. This is the Provisioning Profile needed to be able to upload your app to App Store Connect. Then click on the ‘Continue’ button at the top.
Instead of the App Store, you can also select “Ad Hoc” underneath the Distribution heading. This is the Provisioning Profile needed to distribute your application to a predefined list of iOS devices. For more info on adding test devices, please refer to this link.
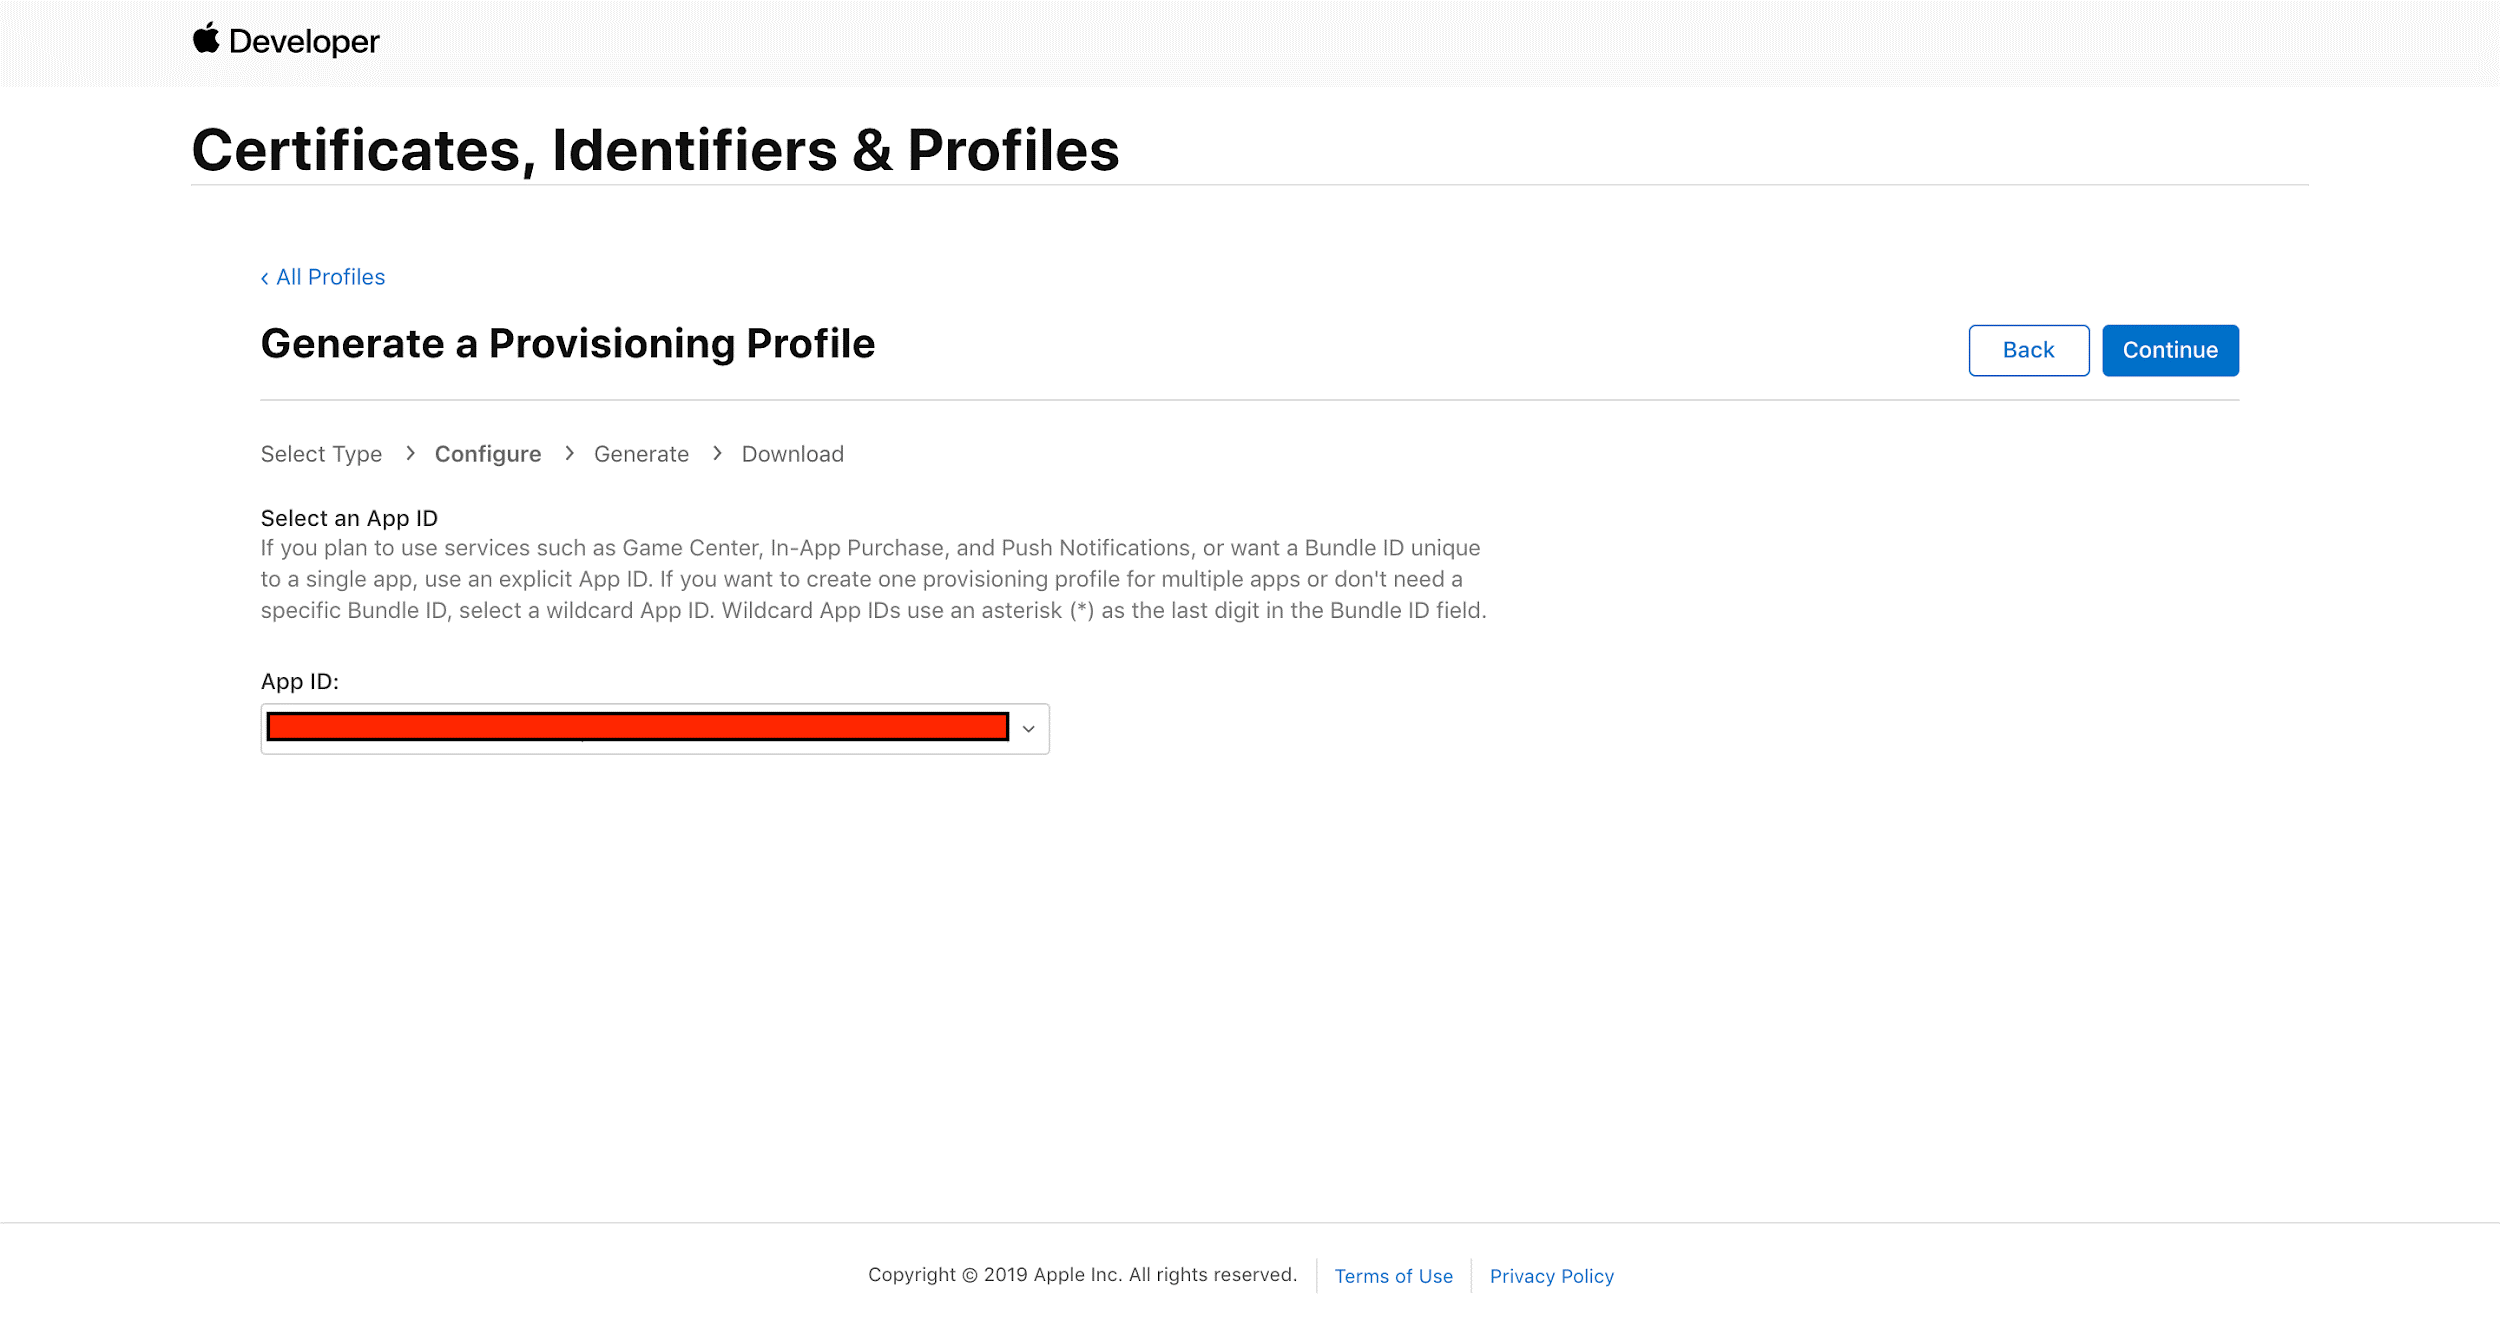
Next, Upon Clicking Continue, you will be asked to select an App ID to associate this Provisioning Profile. Click on the drop-down list and select the App ID that belongs to your app, com.EatancePharmacy in our case. Then click the ‘Continue‘ button.
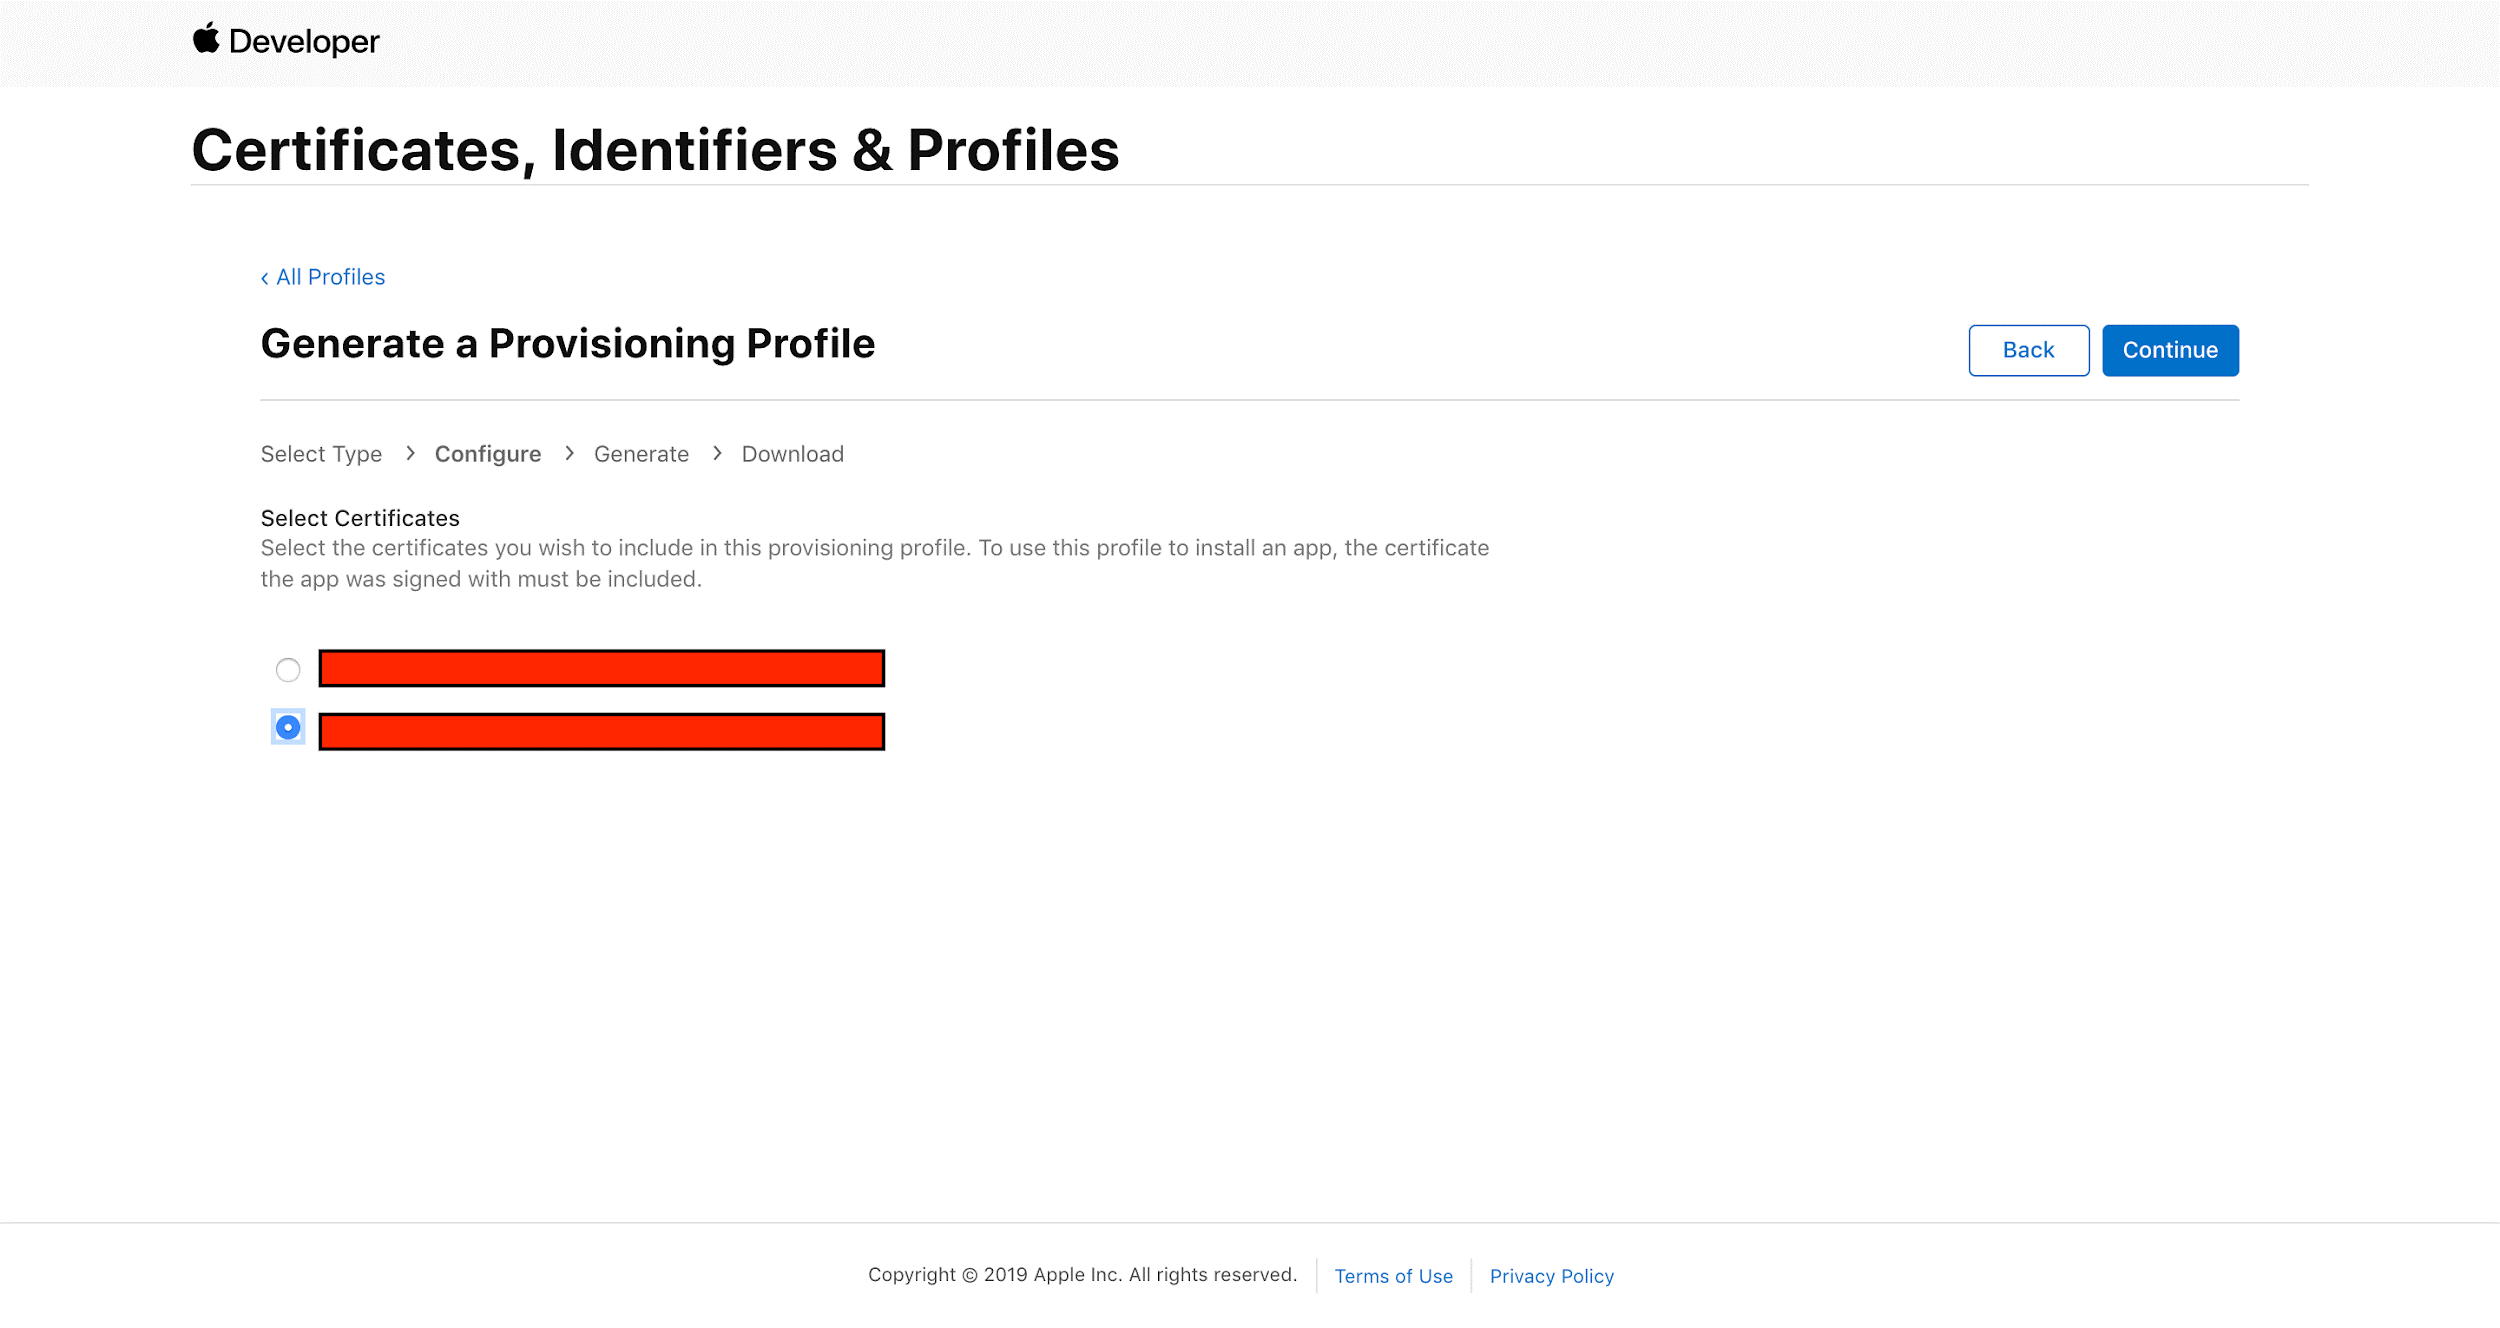
Next, when you click Continue, you will be asked to select the Distribution Certificate we created that this Provisioning Profile will be linked to. Most likely, you will have only one. Select the certificate that we created before by clicking on the radio button next to it. Then click ‘Continue.’

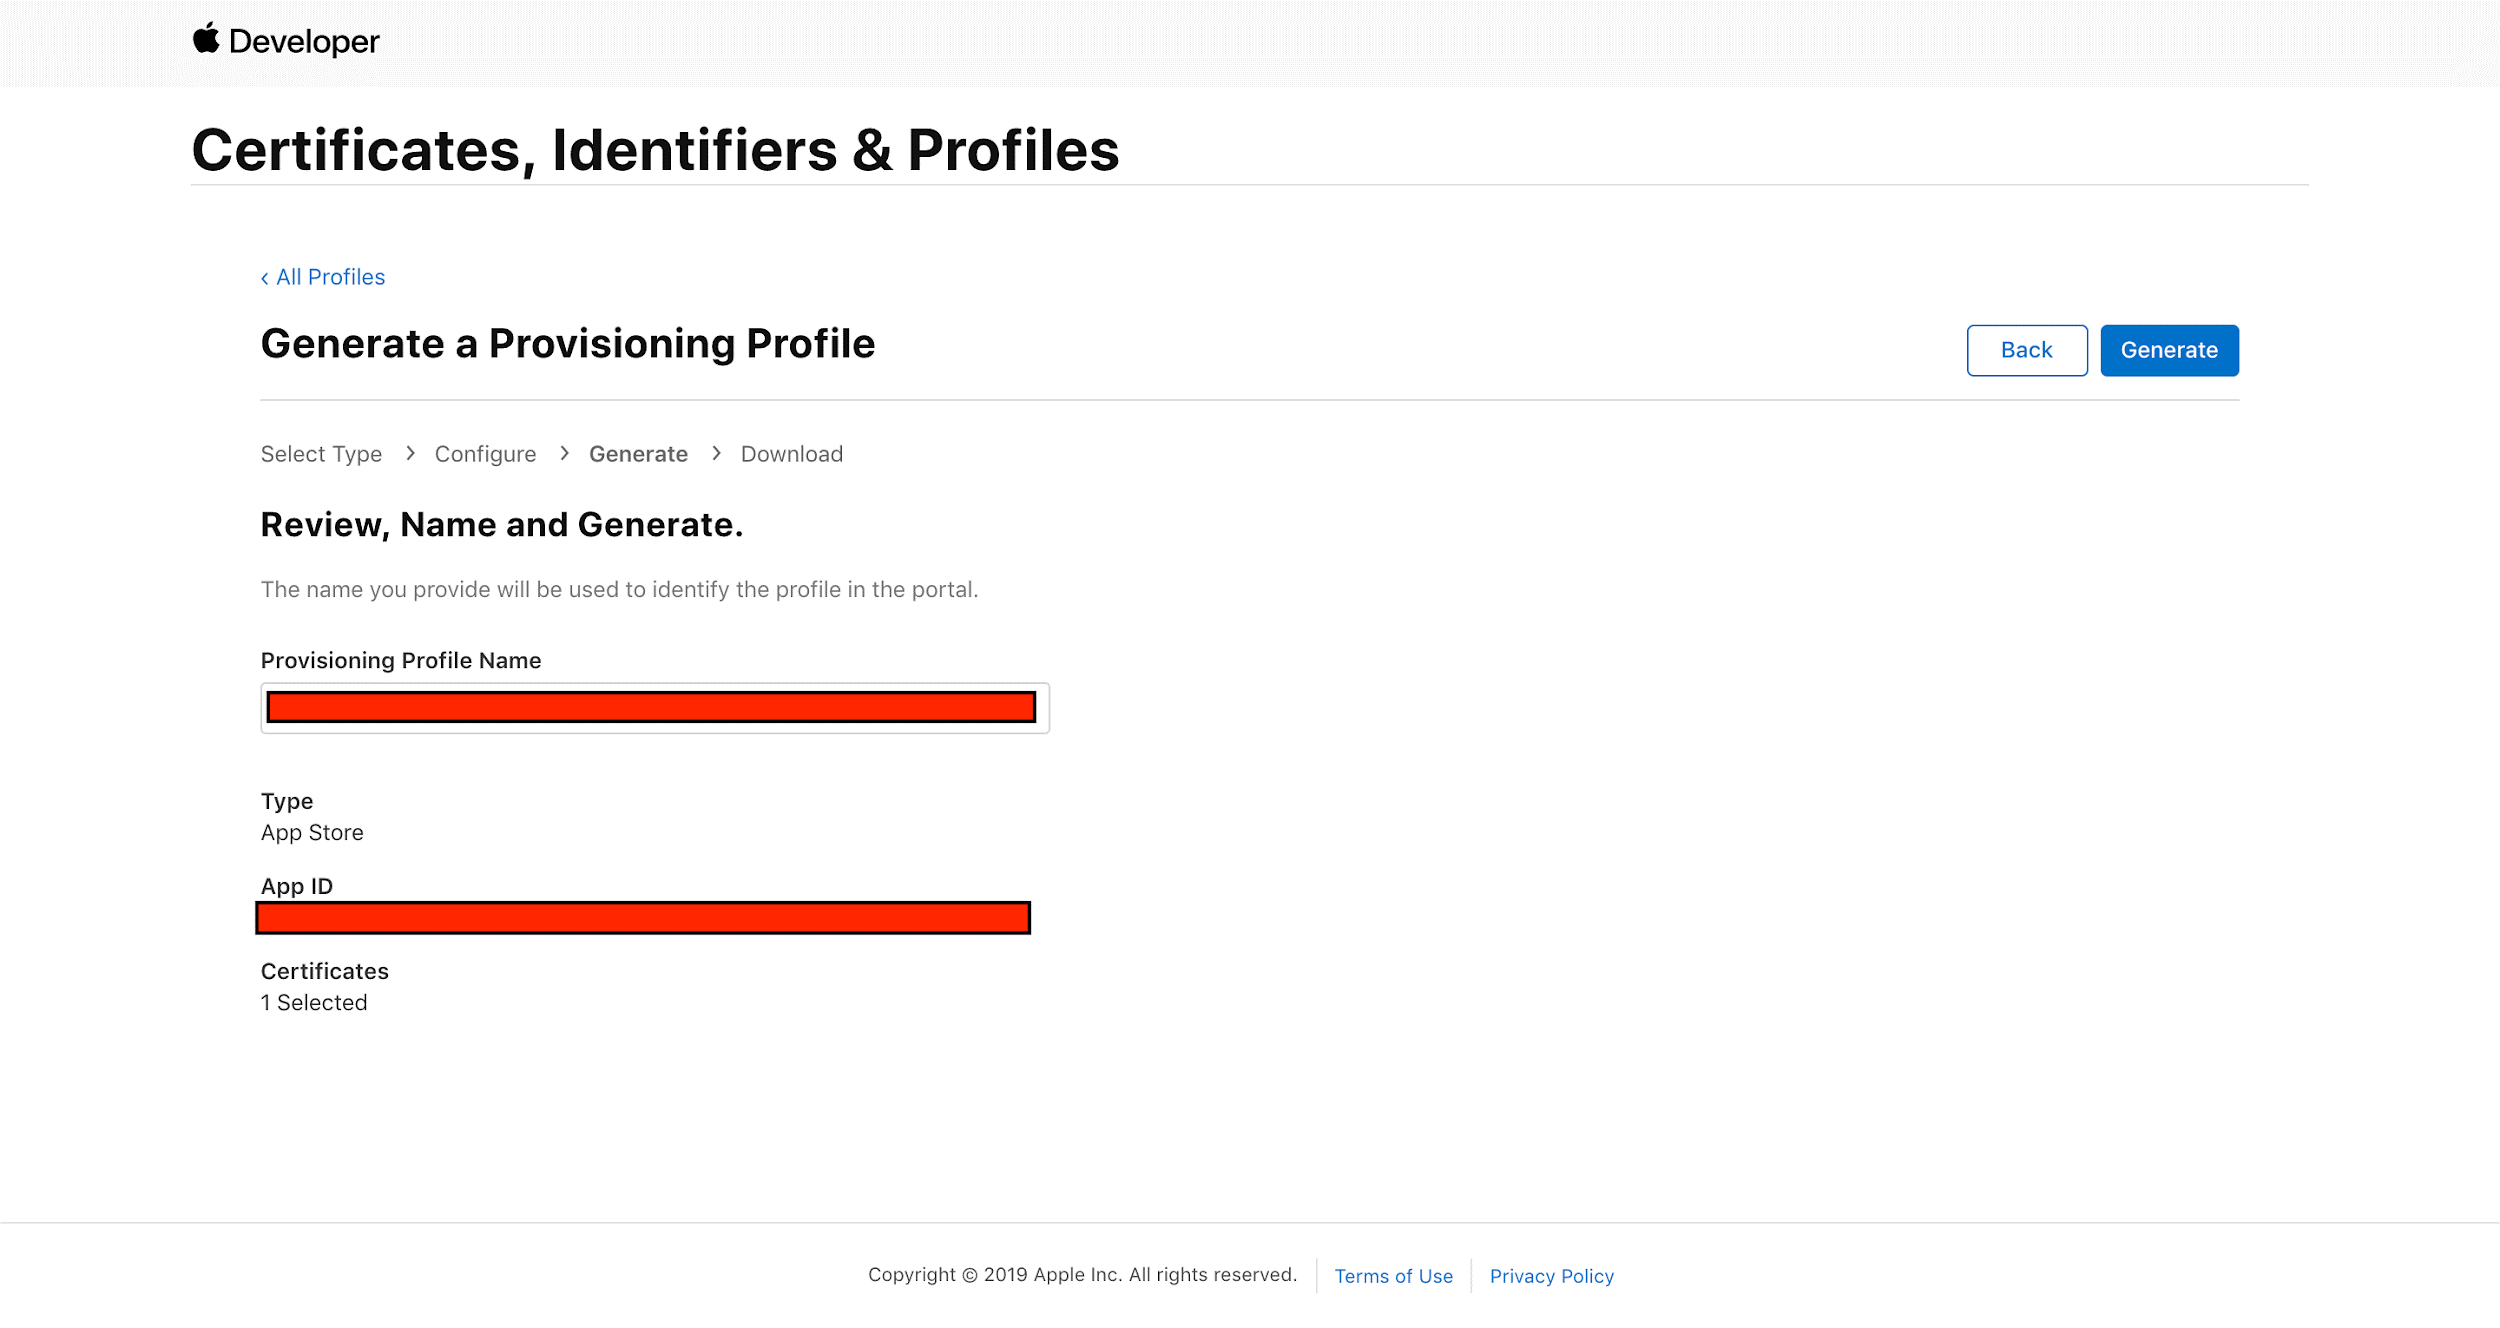
As shown in the below figure, the final step is to give this Provisioning Profile a name. It is best to give it the same name as your app. You can also include today’s date to document the date of creation. Then click on ‘Generate.’
We are done setting up the Provisioning Profile. Now it’s time to generate the push notification certificate, which will allow the app to send push notifications securely over all the devices on which the app is running.
Create Push Notification Certificates
A Push Notification Certificate is necessary to send push notifications to attendees via your app. To create a Push Notification Certificate, follow the steps below.
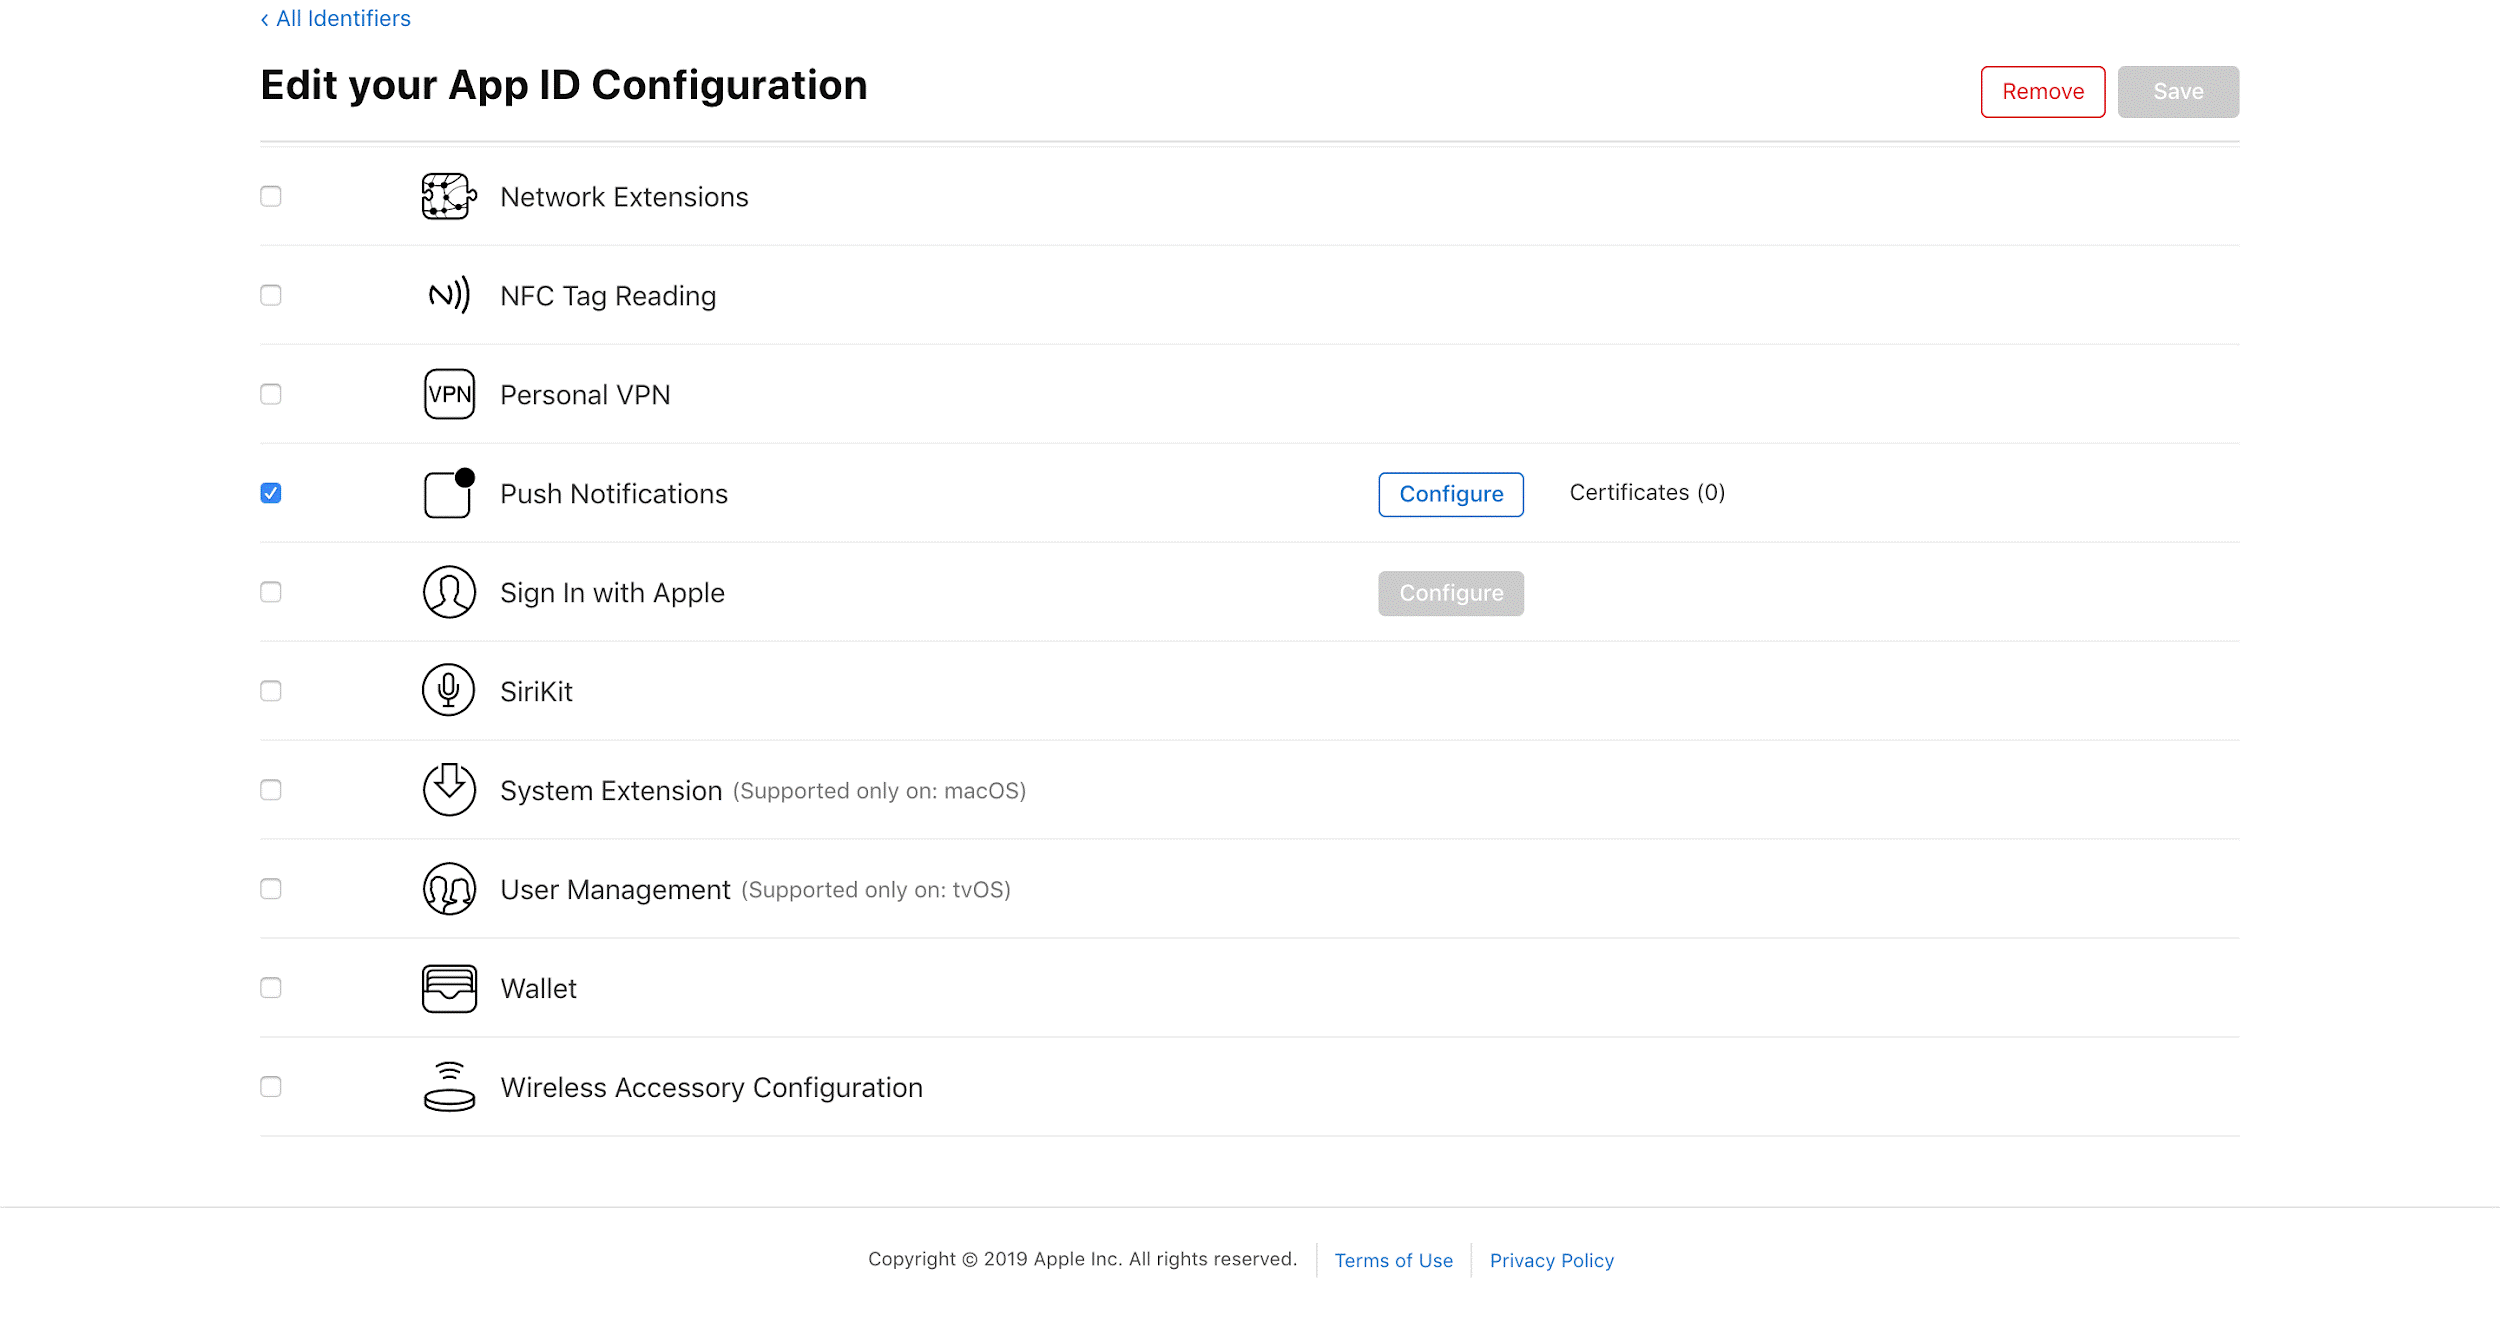
Select ‘Certificates, Identifiers & Profiles from the left menu pane and click on ‘Identifiers,’ locate your app, and click on the name as shown in the figure.

Scroll down the page to “Push Notifications” and click ‘Configure.’
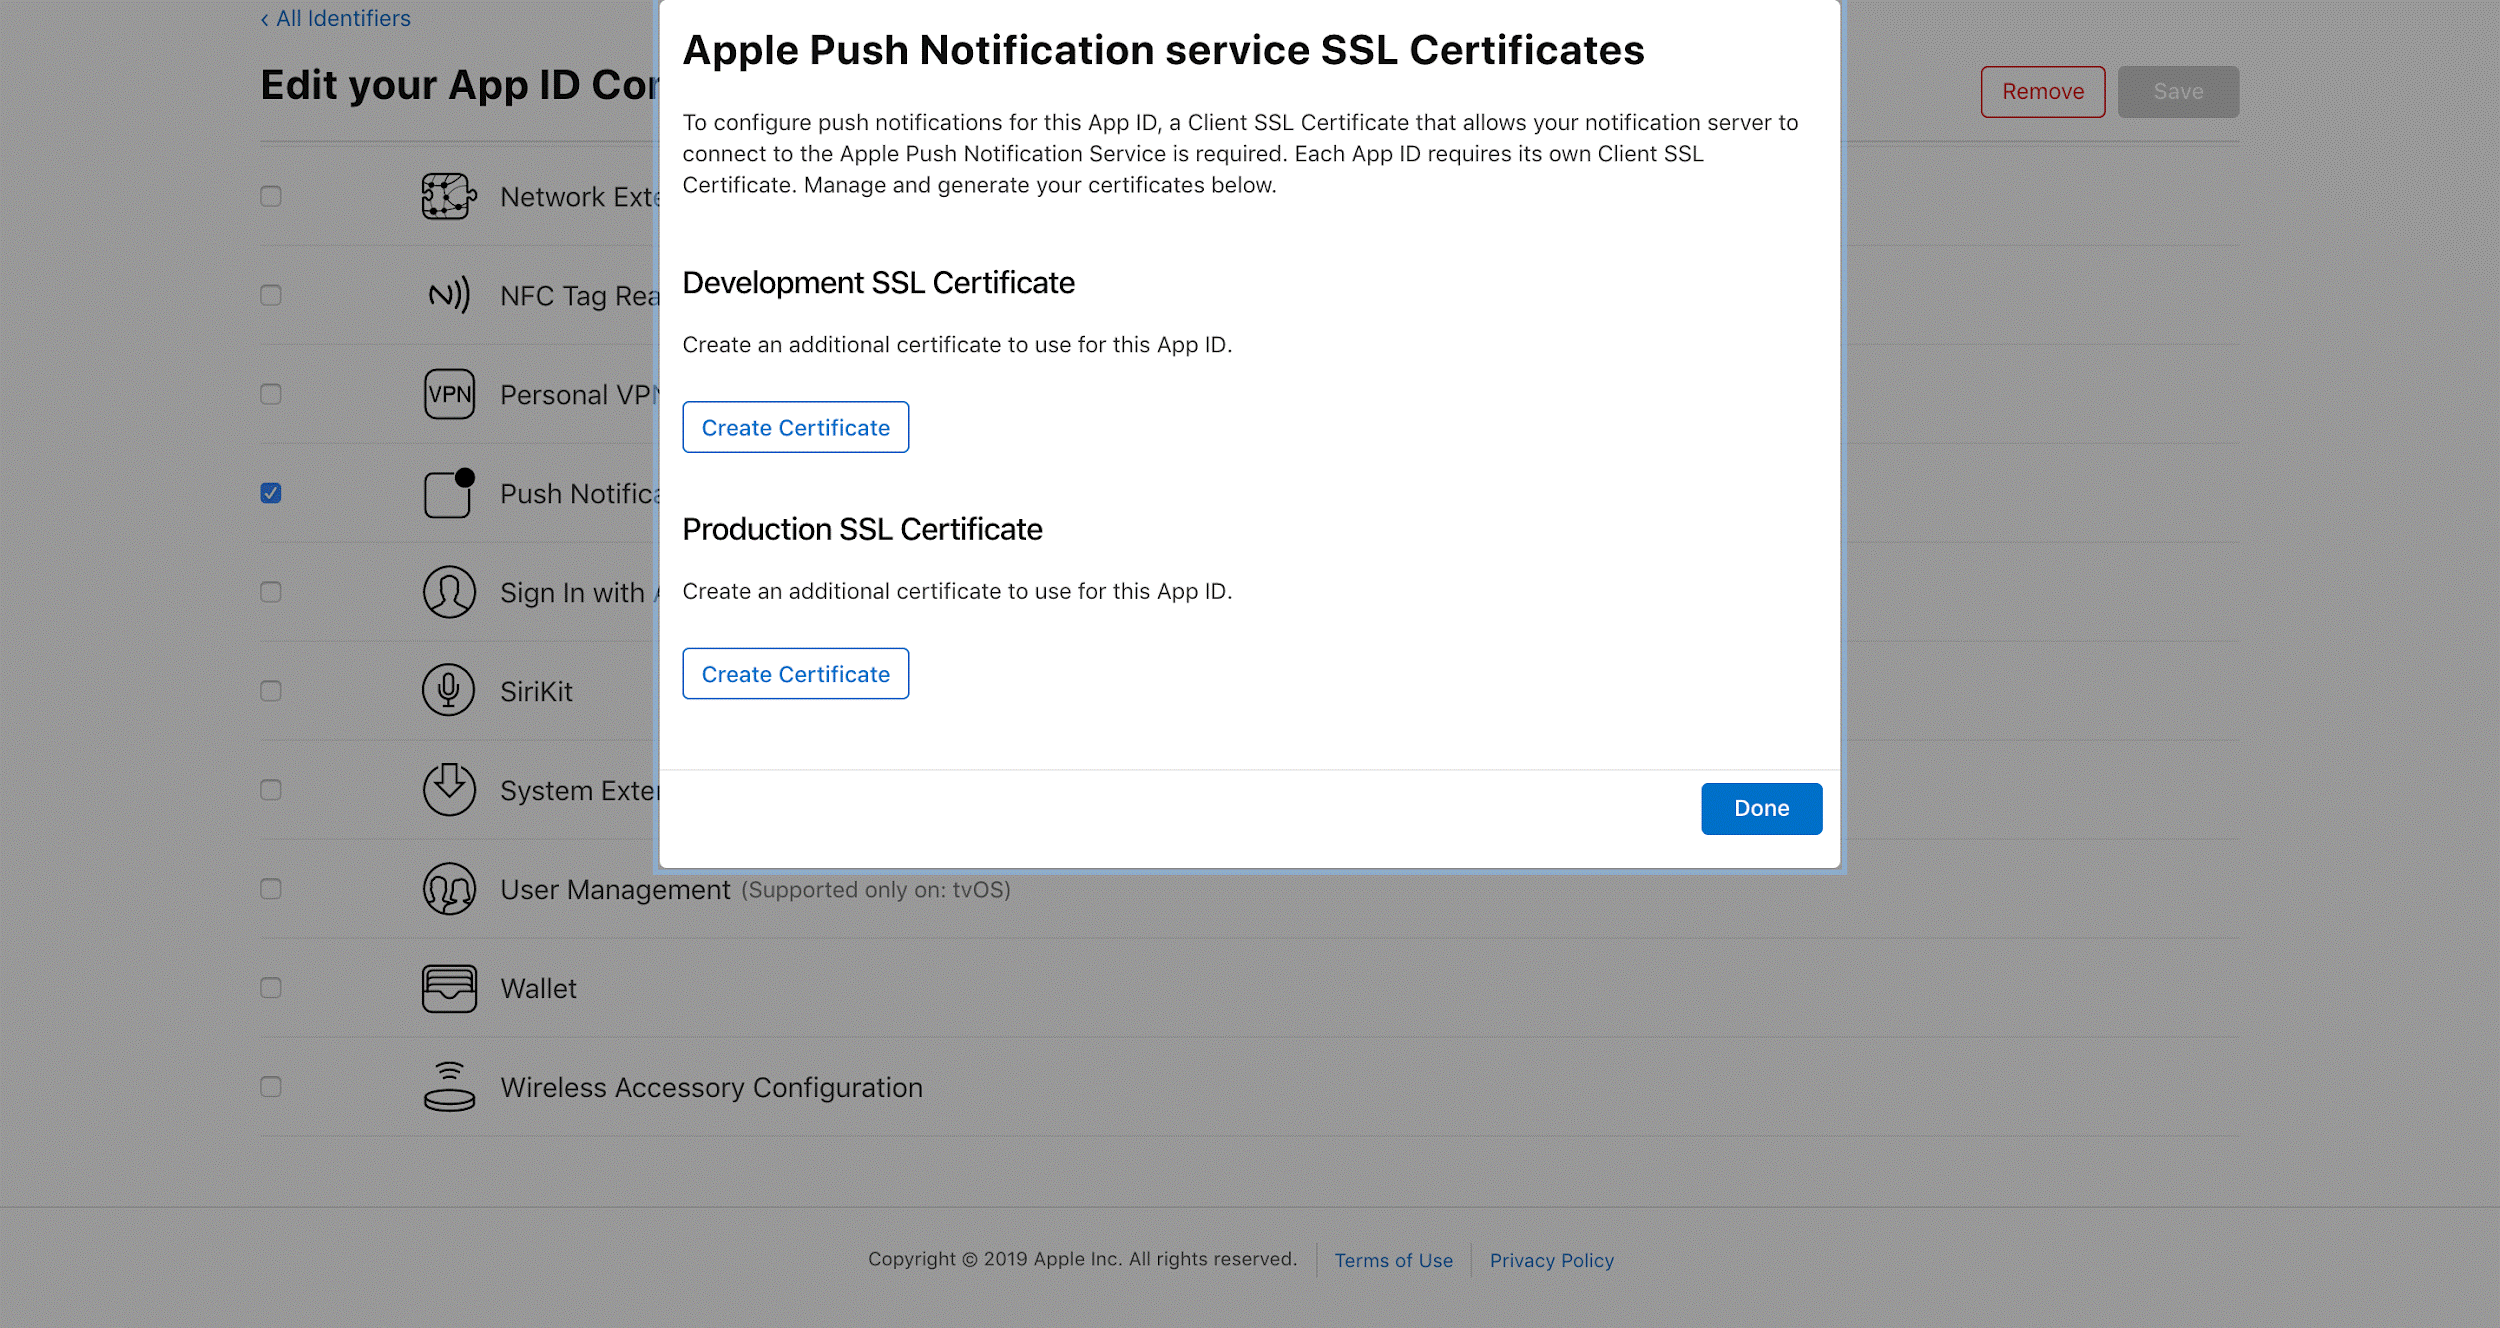
A popup window will appear on the screen. Click on ‘Create Certificate‘ under Production SSL Certificate.
Note: you can have up to three Push Notification Certificates under the Production SSL Certificate.
Click ‘Learn More’ under “Upload a Certificate Signing Request” to learn how to create a Certificate Signing Request (CSR) file. Then go back to Apple Developer and click ‘Choose File.’
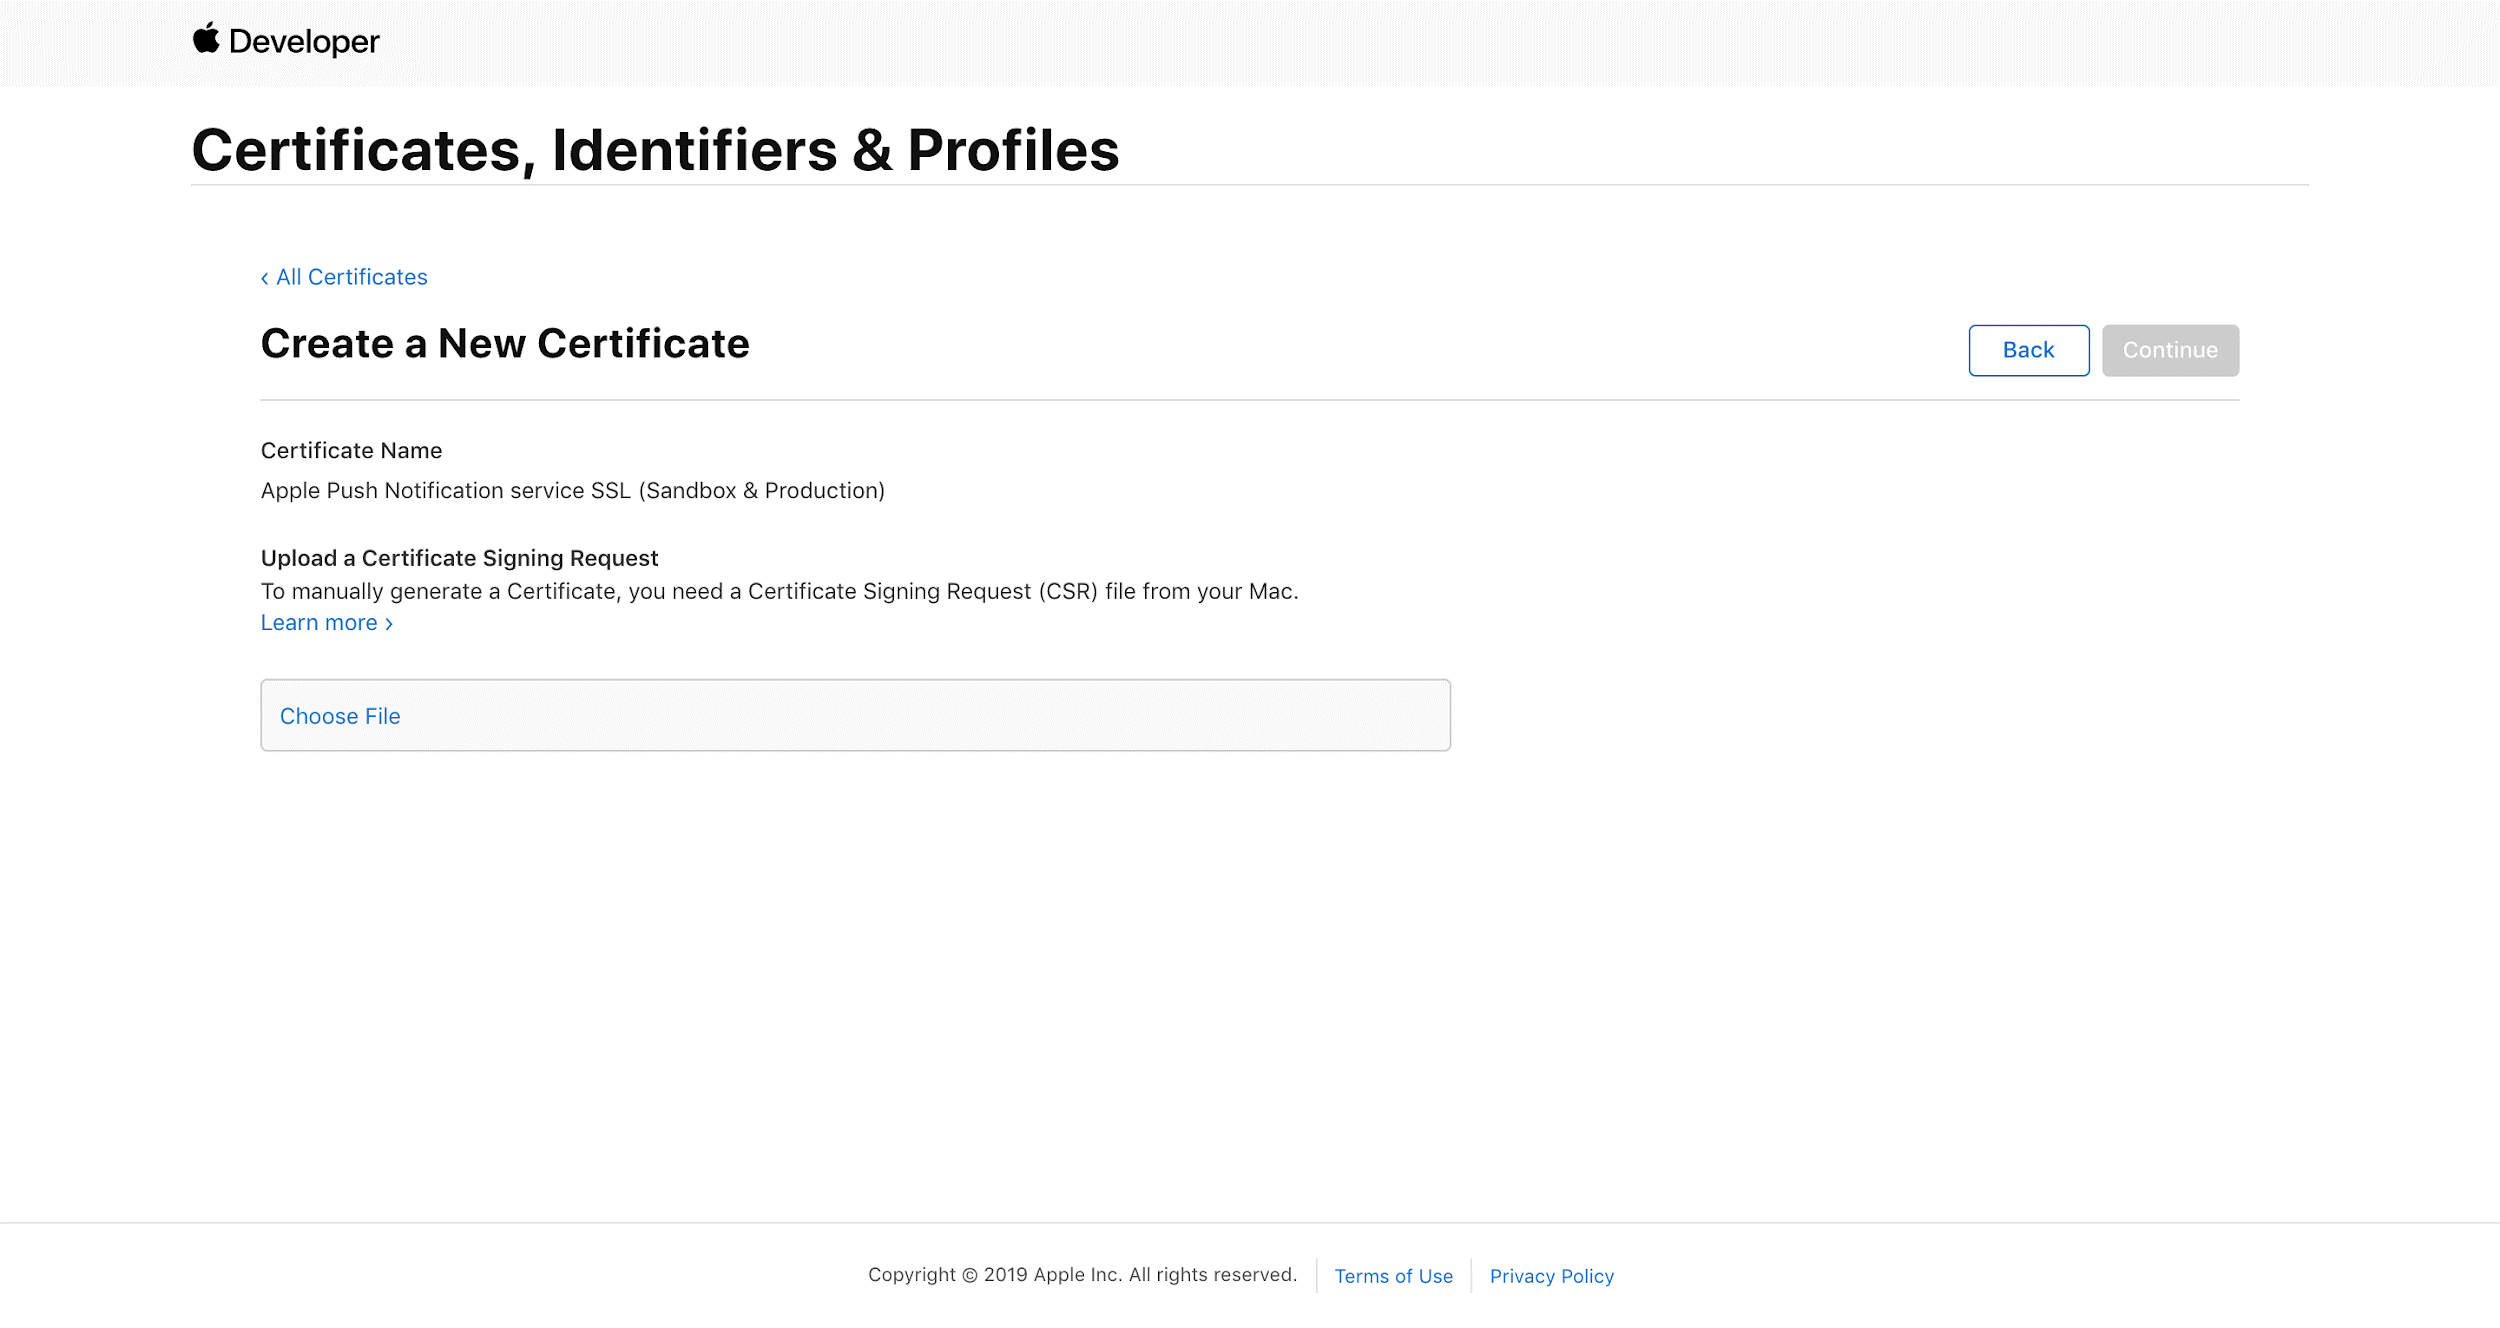
Use Finder to find your CSR file, select it, and click on ‘Open’ in the dialogue window. It will now be visible in the browser. Click on ‘Continue‘; it will take a moment to show the next window.
Your certificate is now ready for download. Click on ‘Download’
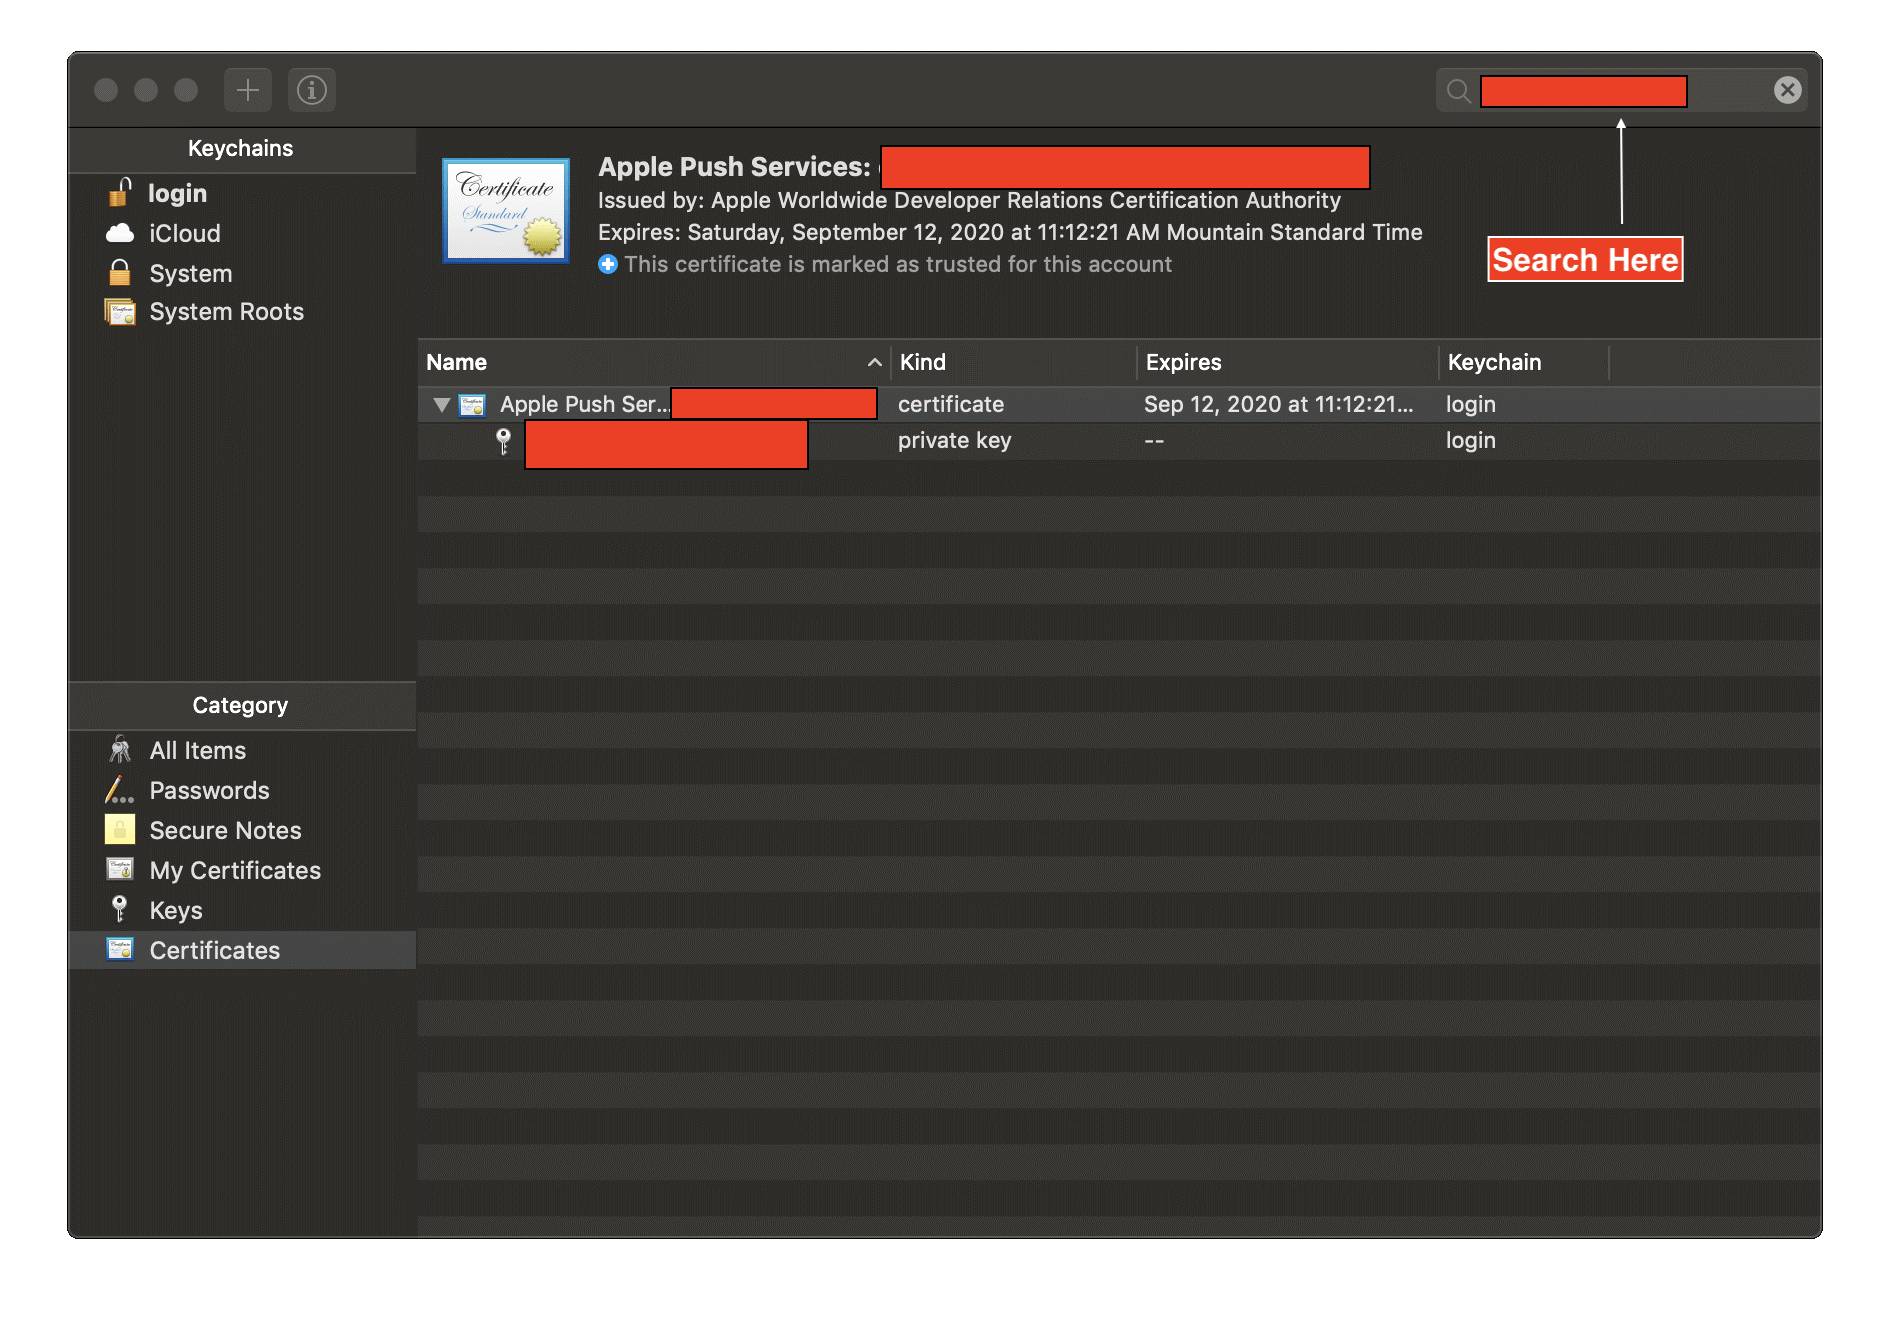
Locate the downloaded file, called “aps.cer”, on your Mac and click on it. It will trigger Keychain Access to open.
To find the certificate in Keychain Access, you can use the Search field in the dialogue window’s top-right. Type in the Bundle ID of the App ID. You can now confirm that the Push Certificate was correctly created, is valid, and has an associated private key.
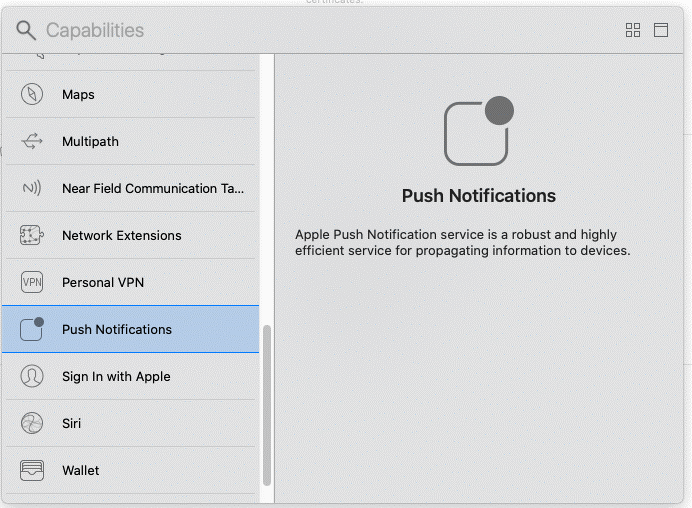
Now, we also need to add the Push Notification capability in XCode. Select Capabilities section in XCode as shown in the below figure.
After this, we need to select Push Notifications from the list of available Capabilities as shown in the screenshot below:
Next, you will export this certificate and save it as a .P12 file. First, you must unselect it in the list. Click somewhere below the certificate in a space in the Keychain Access dialogue window.
Right-click on the certificate to show the contextual menu. In the menu that appears, select Export: “Apple Push Services…”
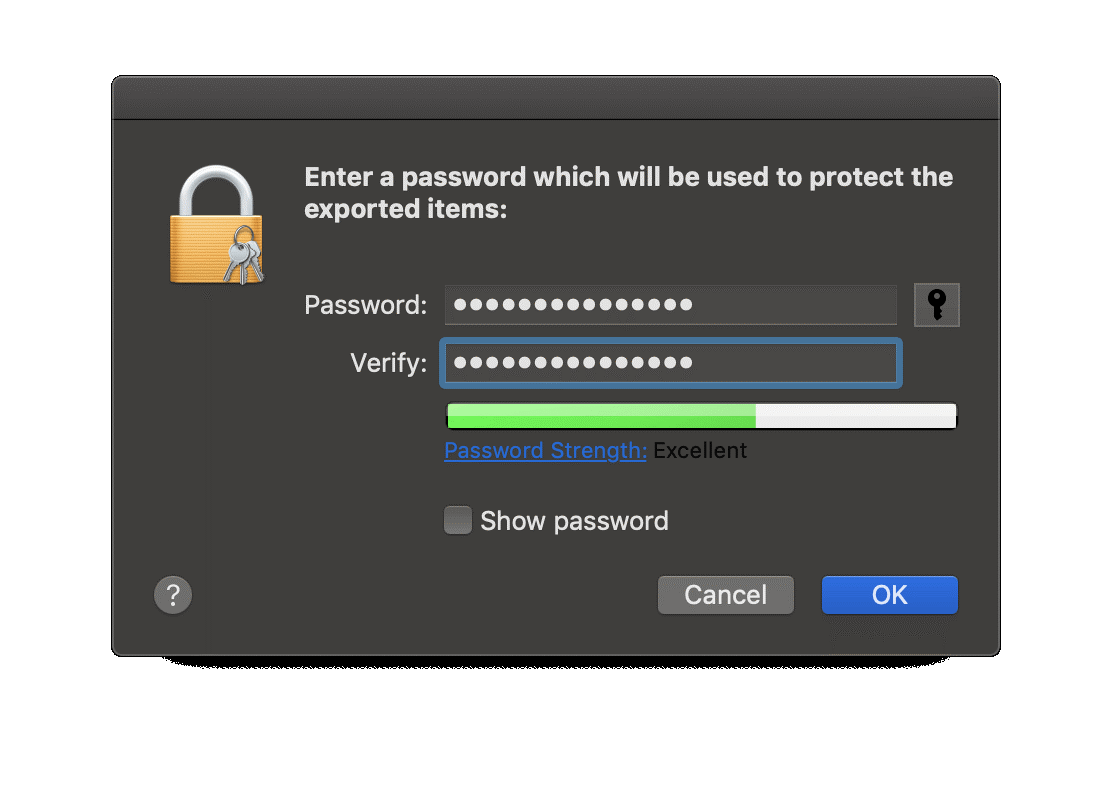
A dialogue box will open. Select a location to save the file. Could you give it a recognizable name? For Example, “EatancePharmacy_pushcert.” Then click ‘Save.’
Another dialogue will open, asking you to enter a password, which will protect the P12 file. Type in “admin” and enter it twice as requested. Click ‘OK.’
The next step is to upload this EatancePharmacy_pushcert.p12 file in firebase to communicate with APNS (Apple Push Notification Server).
Note: Push Notification Certificates expire after 12 months. You will receive an e-mail from Apple when that occurs. At that time, you will need to create a new Push Notification Certificate by following the process mentioned above. Also, you will need a Mac computer to create your push notification certificate, or else push messages won’t work.
Create a Release Build
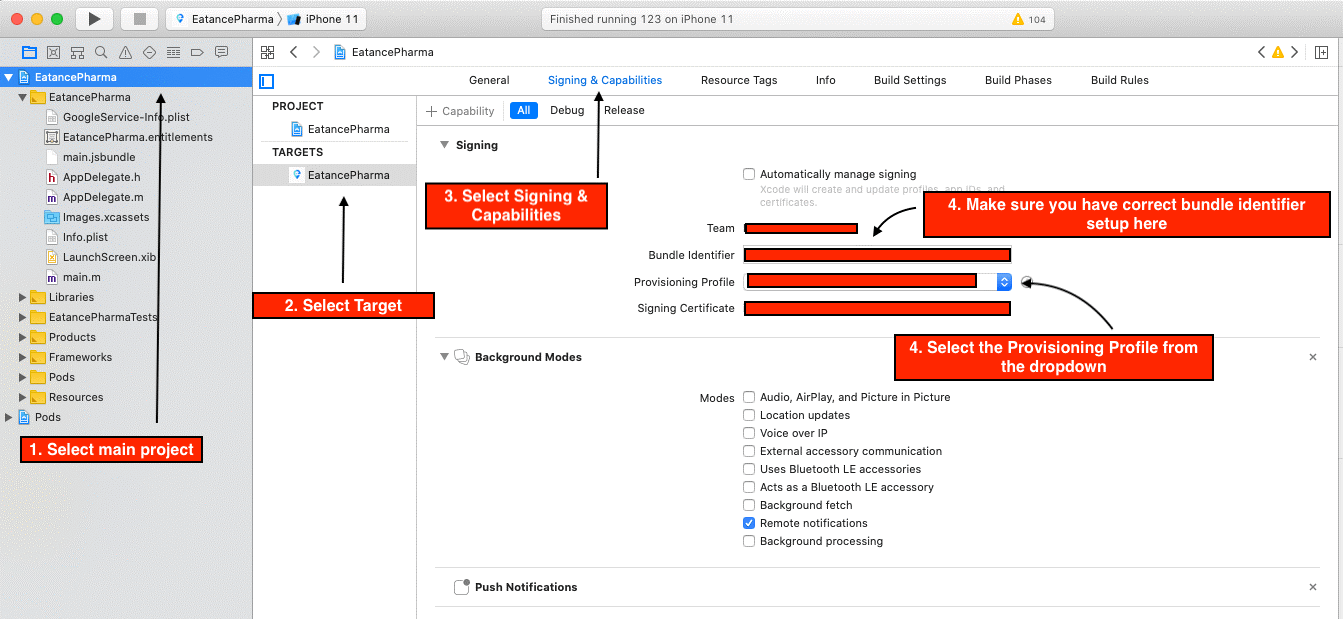
Code Signing: Create an iOS distribution provisioning profile and distribution certificate
- First, add your Developer Program account to Xcode if you haven’t already. From the top menu, select Xcode, then choose Preferences.
- Click on Accounts. In the bottom left corner of the window, press the + sign, then Add Apple ID.
- Enter the Apple ID and password you use for the Apple Developer Program, then click Sign In.
- Next, ensure that you have placed correct values for bundle identifier under the Signing & Capabilities tab in Xcode. Below is the reference screenshot for the same:
Create an App Store Connect record for your app
- Login into the AppStore Connect portal
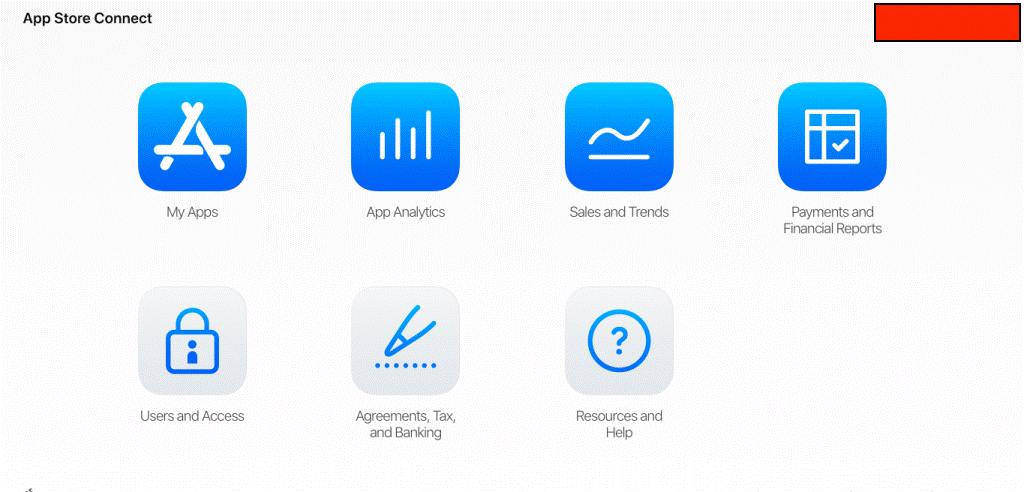
ADD A NEW APP
- In the App Store Connect dashboard, select My Apps.
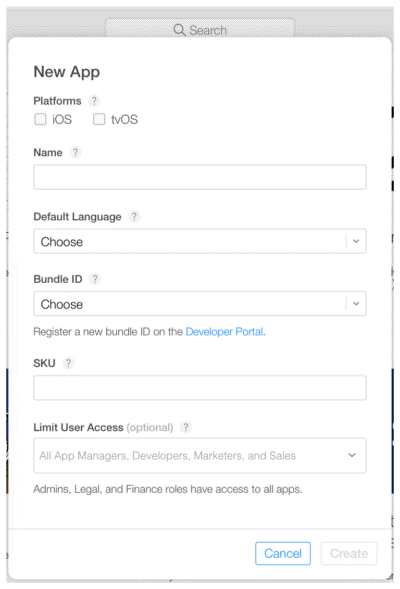
- Click on the + sign in the upper left-hand corner, then New App.
- To create a new App Store Connect record, you’ll need these details: platform, app name, default language, bundle ID, and SKU. You can’t change these details later, so be sure of what you enter.
- Use keywords in your app name to optimize for discovery.
- The bundle ID must be an exact match of the bundle identifier in your Xcode project info. List file (in the target’s General > Identity section).
- The SKU is not visible to users and is up to you to set. It can be an identifier you use in your company or something else that is meaningful for you. Acceptable characters include letters, numbers, hyphens, periods, and underscores, and they must begin with a letter or number.
Archive and upload your app using Xcode
- Before you can submit your app for review through App Store Connect, you need to upload the build through Xcode.
- In Xcode, select Generic iOS Device as the deployment target.
- Choose Product from the top menu and click on Archive.
- The Xcode Organizer will launch, displaying any archives you’ve created in the past.
- Make sure the current build is selected and click on Upload to App Store in the right-hand panel.
- Select your credentials and click Choose.
- In the next window that appears, click on upload in the bottom right-hand corner.
- A success message will appear when the upload has been completed. Click Done.
Configure your app’s metadata and further details in its App Store Connect record
- Under the “App Store” tab in App Store Connect, in the “App Information” page, you can add additional languages, categories, and your app’s Privacy Policy URL.
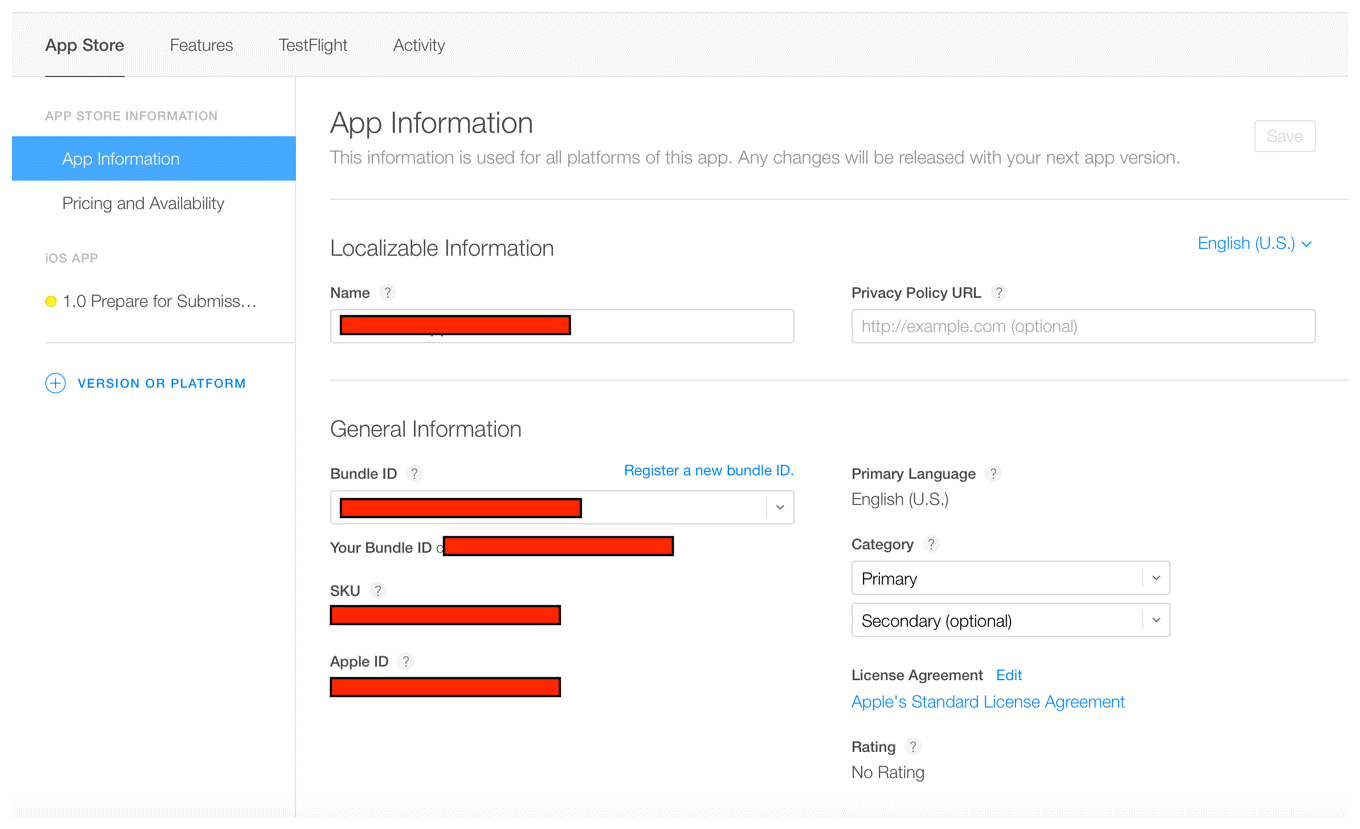
Set your app as free or select its price tier on the “Pricing and Availability” page.
At this stage, your app is marked with a yellow dot and the status “Prepare for Submission” in the left-hand panel under “App Store.” Select the build you want to configure. This is where you will add the information for your product page on the App Store.
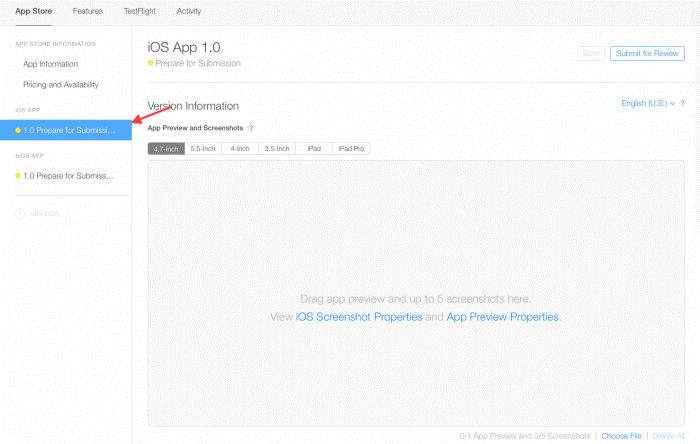
Upload your app’s screenshots (in JPEG or PNG format and without status bars). You can upload a set of screenshots for one device and use them for all the other sizes.
Click on Save in the upper right-hand corner of the window after your screenshots have finished uploading.
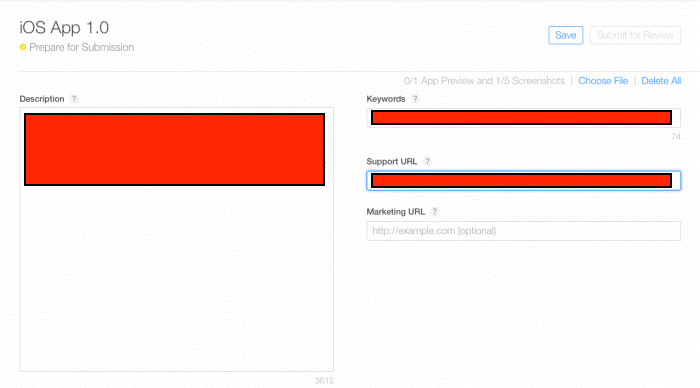
Scroll down and enter your app’s description, keywords, support URL, and marketing URL.
Your app’s description and keywords are critical. Make sure you optimize them for discovery.
The supported URL can be as simple as a landing page with a contact form.
The marketing URL can be your app’s website and is optional.
Support Pre-requisites
Eatance Support team thanks and welcomes you on board for a human digital experience.
We’re committed to giving you the best support, and so we have worked on a solution for you.
-
You should have the following setup ready with you in your system before initiating the Pharmacy Application Setup:
- Android Studio Complete Setup
- Xcode Code Support Path Set-up
- Visual Studio Set-up
- Node Set-Up (Please Find Reference: https://reactnative.dev/docs/environment-setup)
- React Native: (Please Find Reference

- Open/import projects in appropriate IDE.
After Payment, our team will start deploying the App via Remote Access; we would like to ensure that you perform the following Prerequisite.
- You should have the following details to make your app live in the store
- Name of the Application
- Language to be supported (Client need to provide Content)
- LOGO: 1024×1024 PNG Format
- PSD/AI for splash screen OR a PNG image for it in 1242×2208 resolution
- The primary/theme color to be considered for the application.
- If you need to change the font, then provide the font family name. It will support a single font family. If you want to add multiple fonts, then you need to pay an additional customization charge.
- Google Maps API key will be needed in all the cases to start work on the project/customization
- If the back-end is not to be hosted on Evince server, then we will need cPanel access for the client’s server.
- If the mobile apps are not uploaded from Evince accounts, we will need access to the client’s Apple Developer Account and Play Publish account. We will provide our e-mail address to a client, and he/she has to grant admin access
- For his/her store accounts so we can function without having the dependency of 2-factor authentication (in the case of Apple) and e-mail verification (in the case of Google), leading to an increase in the project’s turnaround time completion.
- App category
- Short & long description for play store.
- Selected images to be uploaded.
- For IOS, the UID must be appropriately linked.
- If payment gateway integration then needs to support react-native SDK.
- CPanel credential must support his CodeIgniter.
-
Server requirement for Eatance Pharmacy App:
- Operating System – Linux
- Web Server – Apache
- Database – MySQL
Note:
- All applications related to Healthcare or Medical category must be uploaded under the name of a registered medical organization or entity. Evince will not be responsible for iOS app publishing if your business is not registered under Registered Medical Organization or Entity.
- If you own an Apple Developer Account in your Pharmacy Shop’s name, then only Apple will accept your publishing application.
- If you’re not able to follow these prerequisites, you need to request additional paid support hours. You need to send us a request for paid support, and we will send you a link to purchase the paid hours.
- Our Technical team will do the App Deployment for you after you pay for paid support.
- To Get Installation Support, you need to provide Remote Access. If you fail to provide remote access, we will not be liable to refund the money paid for installation.
- Before purchase, please ask for documentation from the support team. If you have any questions related to support, please contact to support team at [email protected].
In the “General App Information” section below, upload your app’s icon, enter its version number, and copyright and contact information.
The version number should exactly match the one in Xcode.
The copyright info typically looks like this: “Copyright (c) 2020, Company Name.”
The contact info here is what will be displayed to users.
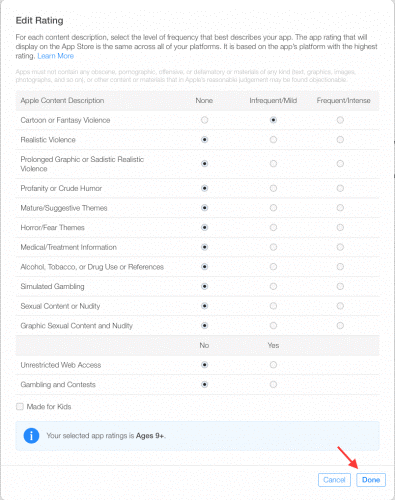
Click on Edit next to “Rating” and select the appropriate options for your app. Be honest — your app can be rejected during the review if it doesn’t match its rating.
Under the “App Review Information” section, enter your contact info, any notes for the reviewer, and set the version release date.
The contact information here is for the reviewer in case they need to reach you directly.
Notes for the reviewer can include information about specific hardware they might need to use or user account information they might need for access.
For first releases, you should typically leave the version release date as automatic.
In the top right-hand corner, click Save. Now you’re almost ready to “Submit for Review.”
Submit your app for review
- Scroll to the “Build” section in your app’s App Store Connect record.
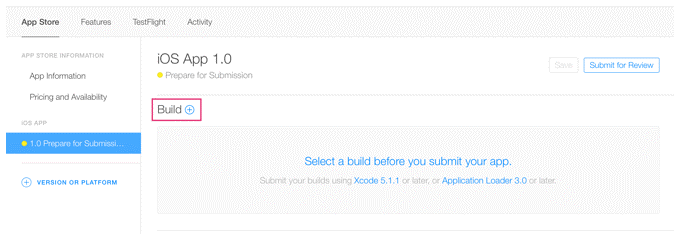
Click on “Select a build before you submit your app.”
Choose the build that you uploaded through Xcode.
Click Done in the bottom right-hand corner, then Save in the top-right hand corner, then Submit for Review.
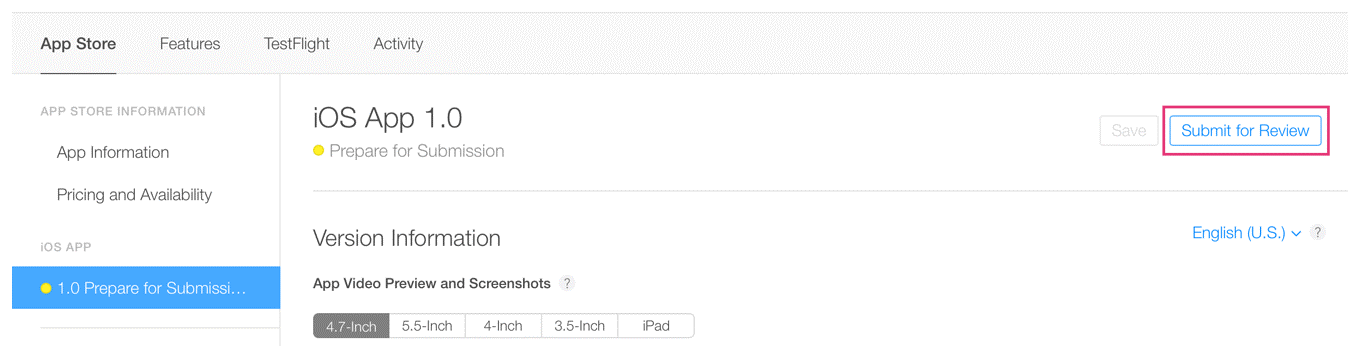
Finally, answer the Export Compliance, Content Rights, and Advertising Identifier questions and click Submit.

Your app’s status is now “Waiting For Review.”
Check on the status of your app
- In-App Store Connect, selectivity in the top horizontal menu, then App Store Versions in the left-hand panel.
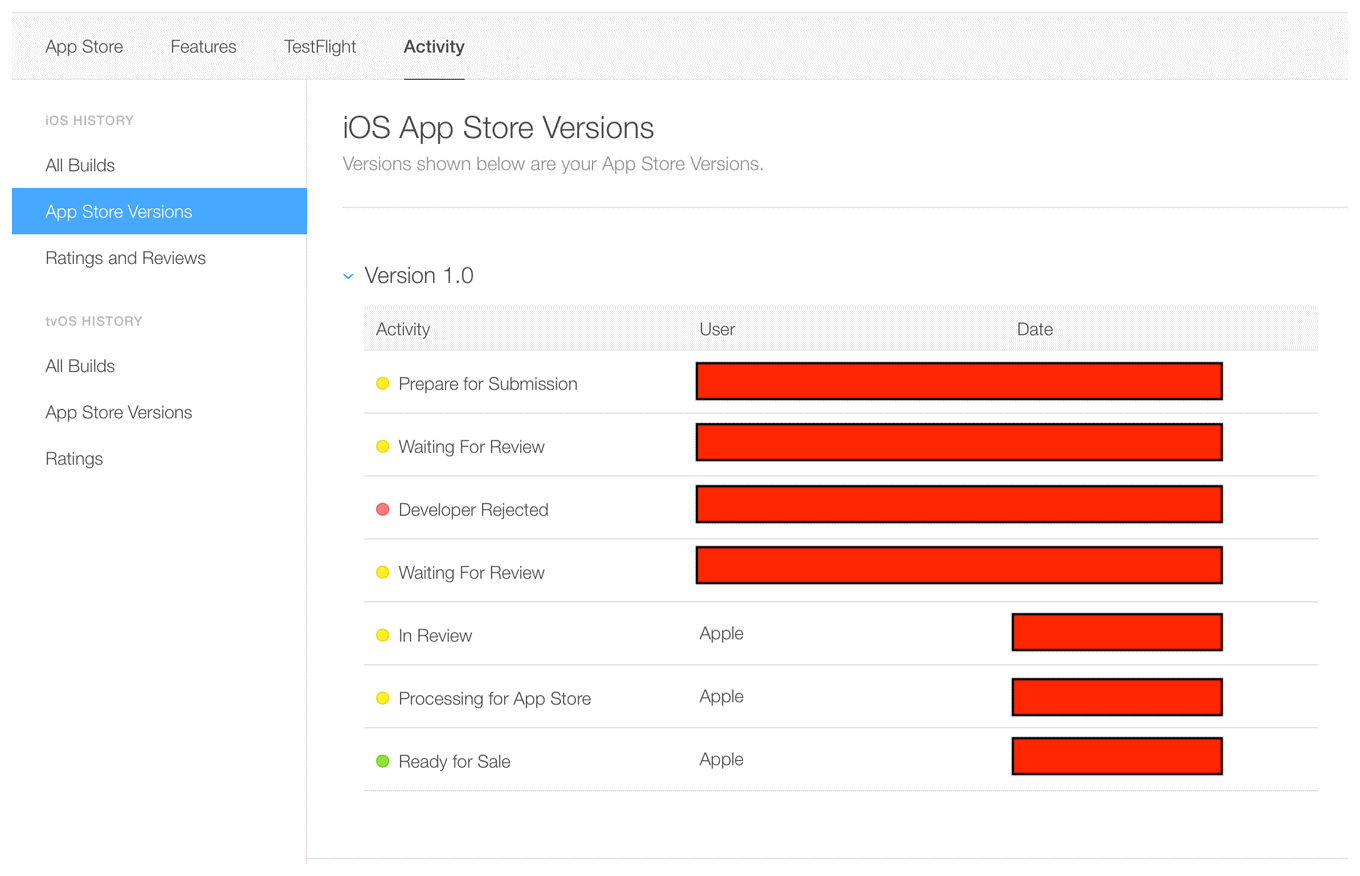
HOW LONG DOES IT TAKE TO GET APP STORE APPROVAL?
- In most cases, it takes about one to three days to receive approval, and it can take up to 24 hours for your app to appear in the App Store after approval. Check the app, and You’ll have to make the necessary fixes before submitting your app again for current average app store review times here.
- You’ll receive e-mail notifications at each stage. Read more about each status here.
- If you’re on a tight timeline and need to align your release with a specific event or if you need to release a new version with an urgent bug fix, you can request an expedited review.
IF YOUR APP IS REJECTED
- You’ll have to make the necessary fixes before you can submit your app again for review. Use the Resolution Center in App Store Connect to communicate with Apple about any questions you may have. You can also escalate the issue and submit an appeal if you believe your app was wrongly rejected.
- One of the most common reasons for rejections from the Apple App Store is performance. Make sure that your app is complete and that you’ve tested it thoroughly and fixed all bugs. Using a bug reporting tool while beta testing will help reduce your app’s chances of being rejected due to performance issues.
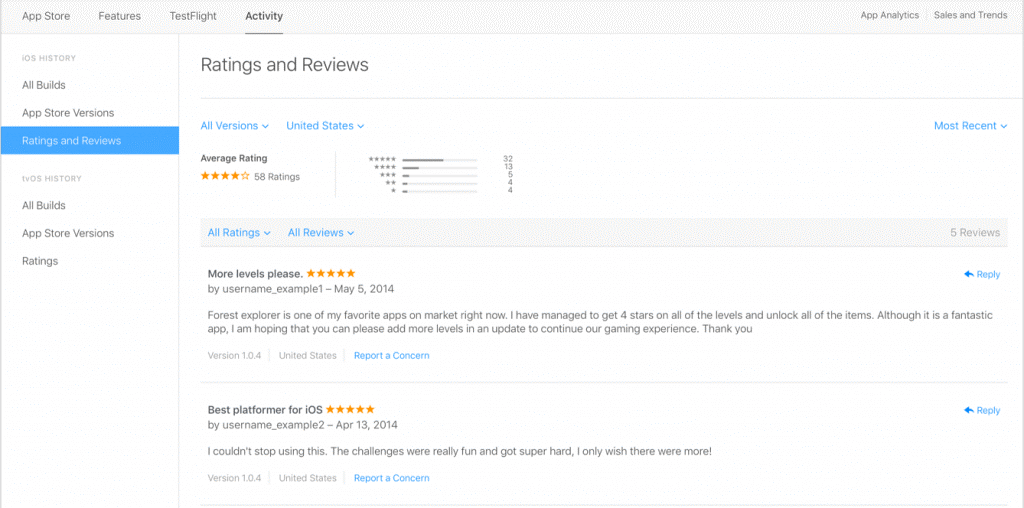
IF YOUR APP IS APPROVED
Congratulations! You’re now on the App Store. You can view downloads, sales, ratings, and reviews directly in App Store Connect.
Thank You for choosing us in your journey of building digital excellence and providing the best food ordering experience at the doorstep.
We warmly welcome you to our Eatance Family. We are committed to providing trusted and efficient support as a Consultant, Service Provider, and Solution Expert in the best possible manner.